Teaching Myself And Learning From Others Part 4 of 4
Onward- Not long ago, Kevin Salki performed a great act of chivalry by coming to my aid and helping me with a work flow that I had to figure out.
To recap, I’m a traditional sculptor who uses digital technology to create presentations. The technology assists me in my traditional work, as I use it to have my monumental designs milled out. If you are interested to read more about that it is talked about in these two project blogs- Evelyn Rubenstein, and Prairie View Panther blog . I have been a traditional sculptor for 30 years.
My difficulty that I posed on a facebook forum was, how do I create a bronze material in ZBrush that I can light, and how would I create tiger stripes in a presentation?
This is part 4 of this documentation
Part 1 talks about how I needed a new bronze material instead of a metcap- we are working in ZBrush
Part 2 talks about how I got that material using Kevin’s video ( at the bottom of this post)
Part 3 talks about painting strips on my tiger using a darker version of that material – This is for a presentation for a client
Part 4, this page talks about putting it into my presentation.
Kevin walks me through the entire process above, and then goes a step further into making the sculpture into a presentation.
Kevin states, “this is going to be basic.” Good, I need basic.
He says he loads in a few HDR maps. (What are these?) According to Wiki
High dynamic range imaging (HDRI or HDR) is a set of methods used in imaging and photography, to allow a greater dynamic range between the lightest and darkest areas of an image than current standard digital imaging methods or photographic methods. This wide dynamic range allows HDR images to represent more accurately the range of intensity levels found in real scenes, ranging from direct sunlight to faint starlight, and is often captured by way of a plurality of differently exposed pictures of the same subject matter
Kevin states that Sibl has some pretty good HDR maps. Well, I had to see for myself, this is all about education. The website is intriguing and I could easily float off onto another track, but I’m on a deadline and doing these blog posts is distraction enough FOCUS! Kevin also mentioned a plug in at Sibl but. I’ll have to ask him about what he meant.
In my project I won’t use an HDR, but I do want to see how it works so I uploaded Topanga_Forest_B. I suppose my question is this- Kevin states that the HDR that he is loading will give him a background and source for lighting information for his scene? Hmmm, does that mean that ZBrush takes information from the photograph? Lets check this out. I download topanga forest and have a bunch of things in the file. Kevin clicks around on a few files in the video and I can’t really see, so I’m guessing. I pick forest 3 pk hdr. Nothing happens even after adjusting the gamma, as he states. Still nothing. I change what file I choose, and try again-still nothing. I’ll check with Kevin and clarify this direction.
(I don’t necessarily need to do my background this way, but I’m dedicated to getting through his video and understanding the process, and finding the best way to work this, but because my deadline is pressing down on me, I’ll have to experiment later. )
FYI I Looked around for other free hdr maps her is what I found.
http://freepanorama.blogspot.com/
http://www.unparent.com/photos_probes.html
PROBLEM
Next day after rendering I don’t like how the stripes look. I tried a variety of ways to create them. In the traditional sculpture, I do believe I will put texture over the entire sculpture or perhaps sculpt deeper fur texture where the stripes are. That way the traditional patination can settle into the crevises. (See the previous post for more information on this.)
In the end, I ended up adjusting the color and the Materials Blend Radius in the Render pallet, until I get the look that I need.
PRESENTATION
I would have loved to put my sculpted tiger into the scene of the school, however, I did not have a high resolution image of the school.
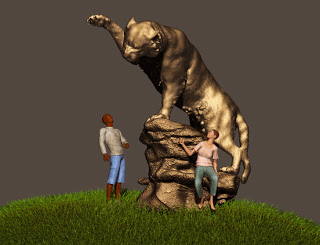
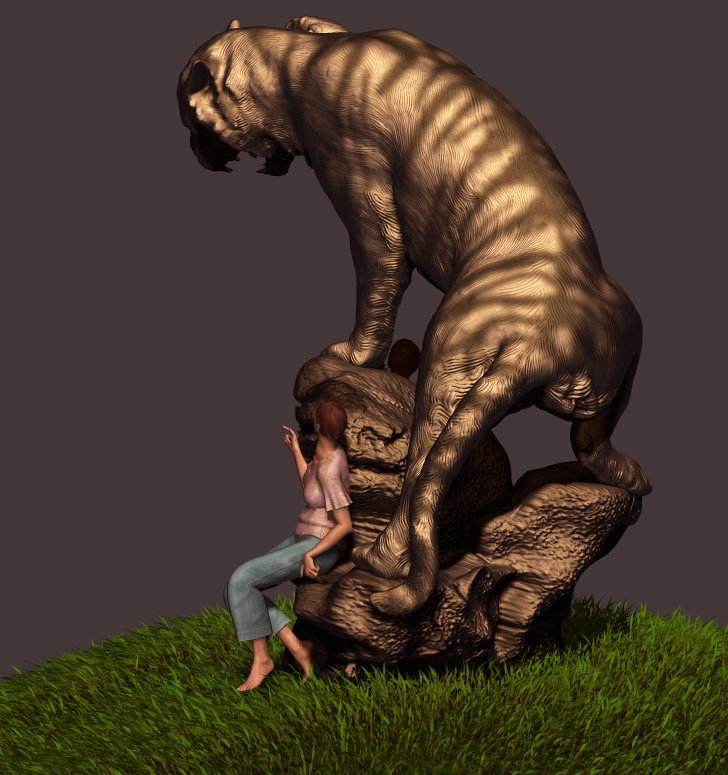
This tiger is massive and therefore, I did feel it was necessary to show a relationship to a real person. I move to Poser grabbing a Daz Michael and a Daz Vickie model. Clothing is essential, and I have often said that this part reminds me strangely of playing paper dolls when I was a little girl. I loved paper dolls. Unfortunately, those making daz models and their clothes are often men. This simply means that these men see no need to have real casual clothes for the poor Daz Vickie model. Poor Vickie, she must walk around all confined and pushed up. I’m sure she is sitting in the computer saying, “Hey guys, get real, how about a comfortable sun dress?” So I purchased the most casual clothes
I could find from Daz, and gave Daz Vickie a makeover. After clothing Michael and Vickie, I export them as obj’s and then add them to the scene. I do wish that that this process was easier. As an obj Vicki and Michael are just the color of the material and not life-like. I wish I could import them into my scene totally clothes and with facial texture, hair etc. This would save me a ton of time. I feel I probably will have to learn another 3D program that will allow me to import Vickie and Michael, completely clothed and textured, as well as the complete rendered ZBrush tiger. I’m open for suggestions to additional software to add to my repertoire, though I’m not terribly excited about having to learn a new software. My husband has been telling me the same thing.
Meanwhile, I take the Daz Michael and Daz Vickie from Poser and use lightbox textures, polypaint and Spotlight to help me show some type of reality or at least so that it does not look like the bronze.
I have not used Fibermesh much in zbrush, but I do like it and am thankful for the grass in this scene.
I am sorely lacking in skills on both lighting and rendering and wish I could hire someone to really walk my little brain through this process. Any takers? we can do joint tutorials on my process.
Photoshop is my final stop for this presentation. I like that I can manipulate the color balance as well as the brightness.
So hear are the final versions of the Tiger. A very long but fulfilling learning process. Now, let me get my hands in the traditional clay.
I will be documenting this entire project on a blog, but can’t put it up quite yet. I’ll be sure to let everyone know when that goes up.
Bridgette Mongeon-Sculptor, Writer and Speaker
Bridgette Mongeon is a sculptor, writer, illustrator and educator as well as a public speaker.
Her blog can be found at https://creativesculpture.com.
She is deeply engrossed in the planning committee for 3DCAMP Houston 2012 http://www.3dcamphouston.com
She is also the owner and creator of the God’s Word Collectible Sculpture series
Follow the artists on twitter twitter.com/Sculptorwriter twitter.com/creategodsword
Listen to The Creative Christian Podcast or the Inspiration/Generation Podcast
Click on Podcast Host Bios for a list of all podcasts.


