Mold Making And Bronze Casting- Part 1

Created for Best of Artists and Artisans web site By Bridgette Mongeon © 2008
There is one question that I receive on a regular basis, “How do you make a mold for bronze casting, or how can I make my clay artwork into bronze?”
Though the process is quite detailed, I have recently made this video of the Dick Hathaway mold and bronze casting. It is not instructional but it does show the process. Watch the video and I’ll share some hints, and tips as well as some of my resources for materials that I use. Mold making and bronze casting is much too much to cover in one article, so check back next month for part two.
I have been making molds for years; however, I still find myself saying, “I could have done this one better.” I learn from each process. Attempting to make your first mold will feel overwhelming, but start with something simple. The one thing I have found that keeps me from beginning a project is not just the learning process, but also the daunting task of finding all the materials and tools I need. So for this months article I thought I would give you a list of my tools and materials used in the mold process, some of which you will see in the video If you proceed with a mold and need any further assistance or have any questions just go to my forum on my website, https://creativesculpture.com/forum and post your question. I’d prefer to answer your question on a forum. Then others might find our conversation at a later date and gain some knowledge. I’ll list the contact information of my suppliers at the end of this article, though I do encourage you to research suppliers in your own area.

TOOLS
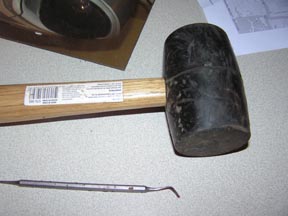
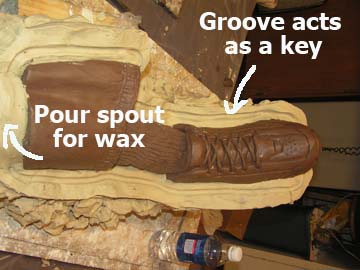
When I am claying up seams, I heat the clay up in a microwave, bang it out into thick slabs with a rubber mallet, and then put it on the sculpture while it is warm. Often I search around the studio for jars, cans, and other items to hold up this seam. Pressing hot Klean Klay against the base of a jar will help to hold it in place, and the jar helps hold up the seam. If I need to clean up a seam, I’ll use my favorite dental tool. I use a round ribbon tool to carve the groove in the Klean Klay. This creates the “key” to keep the two pieces of rubber together. Kitchen knives come in handy to cut the clay to make a clean edge.

As you can tell, making the seams and preparing each piece can take a lot of time. It probably took me three days to cut and prepare the entire sculpture.
Don’t forget to leave an area to pour your wax into the mold. This can be the cut area. For example, where the arm was cut. Sometimes I create a clay spout, adding it to the cut areas to give me a good pour. If you look at the lower torso in the video, I put rubber over the entire cut section, between waist and lower torso, and poured the wax into the rear area.
I love power tools. It is a reciprocating saw that I use for cutting apart the sculpture. Using this tool is something I learned from the foundry.
The metal shims used in creating the seams on the upper torso and head are from Wholesale Tool and they are taped together with scotch tape. I have also seen other sculptors use plastic for shims. One of my cans of shims says the size is .0005. The shims should be thin enough so as not to make too big a gap when the rubber pieces are put together and not too thin so that it bends when you push it into the clay.
HINT
Be careful when using metal shims. Throughout the process, the shims disappear after being covered with rubber and plaster, you may have an edge stick out that can slice your hand.
MOLD RELEASE
Each sculpture piece is sprayed with a couple of coats of mold release agent. I never seem to have enough of this around. Be sure to keep a few cans on hand. Universal Mold Release costs about $11.30 a can and is purchased from Reynolds.
RUBBER
RUBBER
I have tried several different rubbers, but right now I am using Reynolds Rubber Brush- On 40, gallon kit. It costs around $120.00. It took about four of these to do the Dick Hathaway sculpture, a big investment. Remember though, a foundry would charge you about $7,000 to make a mold this size. I’m open to investigating less expensive rubbers, but dependability and longevity of a rubber is something to consider when comparing rubbers and I know this rubber fits that bill.
RUBBER Mold making is messy. I put paper, plastic, or cardboard around the mixing area. Save all of your large plastic yogurt and sour cream containers. These can be used over and over again for mixing rubber. This entire process is not very earth friendly and reusing containers helps ease my conscience a bit.
Mixing sticks. I use a lot of these, so I try to pick them up from the hardware store whenever I go. Usually they give them when you buy paint. I also look for anyone throwing away old shutters or shutter doors. The slats work perfectly for stirring sticks. Yes, the word is out, I garbage pick.
HINT
Be sure to keep the catalyst (yellow container) of your rubber covered while working with it, it can go bad.
HINT
Keep a stick to scoop out Part A and a separate stick for Part B and then another clean mixing stick. You don’t want to get any of part A into part B until you are ready to mix. You will notice in the video that I save my containers from sushi to set the cups in so they don’t drip all over the work area.
HINT
You must have equal parts. You must also be sure to mix thoroughly. If you are using yogurt containers be careful of the groves in the bottom of the container. You will want to be sure to mix every bit of it from the bottom. If you falter on these two hints, you will lose your mold and maybe your original.
GLOVES
Have plenty of gloves on hand. Mold making is very wasteful, but working without rubber gloves is maddening. I usually try to keep both vinyl and latex, just in case an apprentice prefers one to the other.
PAINT BRUSHES
You will use quite a few paintbrushes. I change out paintbrushes after each coat of rubber. One inch chip brushes work best for me, and I get mine from Montalbano Lumber, $14.04 a box Even though this is a little item, I suggest looking around for a good price per piece on these. You will use a lot.
HINT
When applying the first coat of rubber, be sure to dab the rubber into all crevices. The second and third coat will go much faster than the first. I like to have several pieces to work on to keep the flow going. That way I am not waiting around a long time for something to cure for the next coat. If you touch the rubber and it feels sticky but kind of leaves a fingerprint, it is ready for the next coat.
UNDERCUT PREPARATION
This is a step that is not covered in the video. The video does not show how to make sure a mother mold will come off of the rubber. It is a vital step. Please contact me and I’ll explain this or I’ll be sure to video tape it in detail the next time I make a mold.
NEXT MONTH – Making the mother mold
SUPPLIES AND SUPPLIERS
Paper or plastic to cover floor
Recipricating saw
Klean Klay
Rubber
Mold Release
Stiring Sticks
Yogurt Containers
Gloves
Microwave
Rubber mallet and tools to clean up seams
Large garbage can for disposing of gloves and brushes
Paper towels
Ceramic Store Tools and water base clay
1002 West 11th St.
Houston TX 77008
1-800 290-8990
http://www.ceramicstoreinc.com/
Circle Supply in Houston Hydrastone
6401 Long Point Rd # 506
Houston, TX 77055
(713) 688-9803
http://circle-supply.com/
Fine Art Foundry of Texas wax and bronze casting
6107 W34th
Houston, TX 77092
713-686-5567
http://www.fineartsfoundrytexas.com/
Klean Klay Clay for claying up the seams
P.O. Box 678
1019 Salamonie Ave.
Huntington, IN 46750
260-356-2328
http://www.kleanklay.com/
Montalbano Lumber Chip brushes
5850 N Shepherd Dr
Houston, TX 77091
Phone: 713-691-6611
http://www.montalbanolumber.com/
Reynolds Advanced Material Rubber, clay, mold release
5 locations 1-800-421-4378
http://www.reynoldsam.com/
Wholesale Tool Shims
Several locations
1-800-521-3420
http://www.wttool.com/
