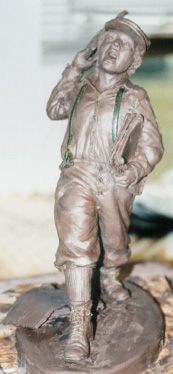
Newsboy- The Finished Small Sculpture
October 19th-25th 2004-
Sculptor Bridgette Mongeon has documented the entire process of creating a figurine of a newsboy and a life-size bronze sculpture. Watch the artist work through these posts. In this blog, she has also included information for students and teachers. In the previous post, we watched her sew a vintage outfit.
If you are lost and want to go back to the chronological running list of posts, follow this link.
It has been a very busy week, and I know that all of the details of the work this week will take a lot of room to record in this journal. I hesitate about putting in all of the sculpture details, but I do have art students who are looking at the web journal, so I have decided to elaborate.
The work on the small sculpture is progressing this week; I have put my client on call for this weekend or Monday. It will be imperative that I receive approval as soon as the sculpture is finished. We are planning on going to the foundry next Friday, and there is much to do to get the sculpture ready.
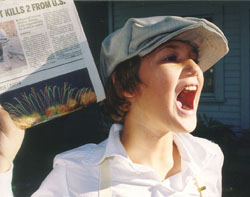
There were some final details that needed to be decided on. One was the masthead of the newspaper that the little boy is caring. It has been decided that it will say Texas Press Messenger. This is the paper of the Texas Press Association. In all of the reference photos, Dusty is holding a Houston Chronicle newspaper. There was really no other reason for this other than I live in Houston, Texas, and our local paper is the Houston Chronicle, so it was easy for me to get it as a prop.
All week I have been culling through the 144 photos. Each time I work on a piece of the sculpture I search for all of the photos that showed that body part. People wonder in awe at what I do and how on earth I do it. It is very simple – I’m a copycat. I just copy the photos that I have taken. Cutting away and adding to the sculpture until it looks the same as the photos that I have taken. It is a long process.
DETAILS
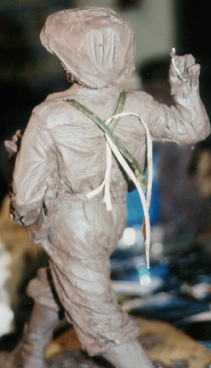
When working on the suspenders, pants, and shirt I needed to be sure I had the suspenders correct. Notice the suspenders pull on the pants and push the shirt in. This creates what is called “a point of radiation for the fold” or where the fold begins.
I did not want to use clay suspenders on this little piece. I needed something that would be visually different for me to work around. I also didn’t want to use clay because I did not want it to mush into the folds. I needed something that would act like suspenders. I walked around the studio looking for something that was the right size to help me with this area. I opted for the elastic that was on a paper facemask. I pinned the elastic in place and then worked on the shirt and pants, all the intricate folds that attached or came in contact with those areas.
Later I removed the elastic and replaced it with hard wax suspenders. I could have ultimately kept the elastic on the sculpture and they would have worked through the mold process, similar to the “real” clothes subject that I mentioned in the last newsletter. However I needed to sculpt on the suspenders and needed something more substantial. After I was able to get the folds in the pants and the shirt, I removed the elastic suspenders and replaced them with hard wax suspenders. For his buttons I rolled out little tiny pieces of hard wax into a snake and then cut out buttons with a hot exacto knife. There were little
SHOES
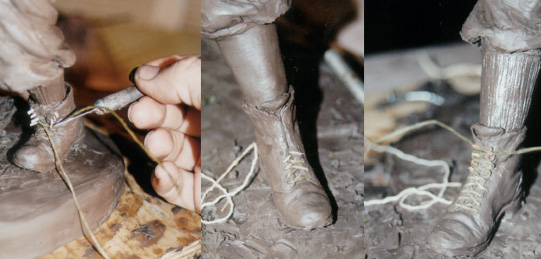
I loved the shoes. They were so much fun. For the laces I pulled apart a piece of small braided string, dipped it in wax and pushed that into the clay. The detail of the string laces will hold in the mold process. I hesitated in how to get the upper laces correct. The lower laces where no problem because they went into holes, though it was a little difficult trying to figure out which hole it would go into and which hole the string would come out of. Remember all of this was done with very small pieces of string that measured about 1/4 of an inch or less. The top of the shoe had little brads that the shoelace went around. I ended up sticking small pieces of shaved toothpicks in the shoe, around those pieces of wood, lacing up the shoe, leaving enough to tie a bow. I then covered the pieces of toothpick with clay to resemble brads.
This type of detailed work seems tedious to most, but I find it quite challenging. It is especially nice when my husband came in and said, ” look at those shoes, they look so real, like they could come right off his feet.”

I love doing this type of detail. It probably stems from my total fascination with miniatures. Whether it be dollhouses or model airplanes and tanks, I love miniatures.
When I talked with Mike Hodges at the Texas Press, he said that he could not notice the difference in the coins in Dusty’s pockets. A trained eye can. Look at how Dusty’s right pocket and side of his pants sag or are weighed down.
At a couple different points I had to cut the arms off. It is too difficult to focus on his fingers and the paper with the arm attached to him. I will put it back on him with toothpicks, or I may leave the right arm off as it goes into the mold making process.
I jump around on the sculpture quite a bit, working on different areas. I guess it keeps it interesting for me. Soon there will come a point when I will turn the sculpture to proceed to the next area and find I have come full circle, and there is nothing else to do. I’ll be finished.
FACE
I so want to redo Dusty’s mouth, but I am running out of time. It looks good they way it is. I may keep it this way and just modify the large sculpture. Dusty’s hat is totally different from the first photo sitting and I had to redo that as well. His hair is also a bit longer from the first sitting. I like this better and the added extra curls.
APPROVAL
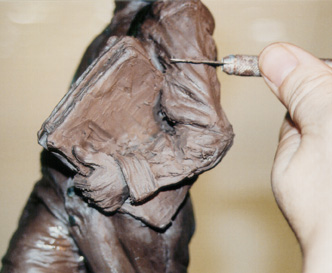
Saturday Wanda Garner Cash, President of the Texas Press Association, came to the studio to approve the sculpture. There were a few things that needed to be done yet, like fixing his right hand, sculpting the paper and smoothing some areas, but the sculpture was done enough to get an approval.
It is good to have the client’s approval so that I can leave the appendages off if I need to. I was not worried about getting the approval; the sculpture looks really good and has a great feel to it. I am very pleased.
So, now what? Where does the artist go from here? She must Prepare the Small Sculpture for The Foundry.
STUDENTS AND TEACHERS
Art
If you would like to learn how to draw folds you can focus on models in the class, and photos of people. Knowing how to draw people’s clothes can add depth and realism to your drawing. Here is an on-line course that I found where Patrick Shettleworth describes the process. Although this web site is working with comic art and computer graphics skills, it is a nice resource and will help you to start thinking about folds.