Sculpting Tiny Hands

hand with Classic clay.
When creating a figurine, as I am now, I usually sculpt the head and hands separately. The difficult here is making sure your head, and hands match the size of your sculpted figure.
Because this is a commission piece, I have a full figure photograph of my subject. I can measure how many heads high my subject is and then I can be sure that my head is in correct portion to the body. Believe me there is nothing worse than working on a head for a week and then discovering it does not match the proportion of your sculpture. At this small size a sixteenth of an inch can make a huge difference.

the hand in comparison to the face.
Once I have this done, I can move on to the hands. If you take your hand and put the wrist area at your chin. This is the portion that has the creases in your wrist, and then roll your hand up your face, you will find that your middle finger will come to your hair line. Unless of course you are a middle age man and losing your hair.
To create the hand, I start by making a wire armature. You will see that these fingers in the armature actually have two pieces of wire. I have narrowed the fingers to just one piece of wire later in the process.

Fingers are actually much easier to make when they are not on the hand. Roll small tubes of clay, being sure that you make some smaller or larger (thumb and pinky) than others. Also being sure that right hand and left hand are mirrored and similar in size and shape.
Once I have all of these sausage shapes I’ll roll the side of the sausage in two spots, just above the middle knuckle, and just below. I usually do this on a round tool.
I can then add some more clay for the knuckles and underneath the finger carve out the areas below the knuckle where the finger will bend. A simple angular cut with a knife will do fine. I did that with this tiny finger and then stuck it on the wire. Pushing the tip of the finger up , at the bottom, makes it look much more natural.

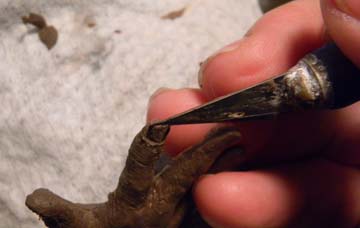
FINGERNAILS
Fingernails are really quite easy. With just two strokes of a sharp object I have the basic nail. In this case it is an X-acto knife. Place it on the side, and scrape it over the nail in an arch pattern. Then place it at the other side of the finger nail and bring it to the middle again. A third stroke to separate the nail from the finger at the top is the last portion of sculpting the nail. Push the sharp object in and pull down over the finger tip.
Though I have a good start on this hand, there is one more area that I would like to point out. Note that when your hand is flat the skin flap where your finger meets your knuckle. The pinky and ring finger have a crease that goes to the ouside of the hand and between the middle finger and the index finger the crease is to the thumb.

The two on the right point to the right, the one between the middle finger
and index finger point to the thumb.
MORE SHAPING
The placement of the thumb is also an area that new students will have difficulty with. The thumb is not placed on the same plane as the figners but instead points down to the ground when the fingers are straight up. Also note that the top of the hand is curved and not flat. Because this is a very expressive sculpture, I will be counting on capturing that expression within the hands as well. More on that later. This short little tutorial will get anyone started on a good sculpted hand.
Unfortunately there are two figures in this sculpture and four hands as well as 20 fingers. I can expect to spend a good full day on or a day an a half on hands. I am just thankful thee are no bare feet in the sculpture.
I’ll post some more photographs as I continue.
_____________________________________________________________________________

Bridgette Mongeon is a sculptor, writer, illustrator and educator as well as a public speaker.
Her blog can be found at https://creativesculpture.com.
She is also the owner and creator of the God’s Word Collectible Sculpture series
Follow the artists on twitter twitter.com/Sculptorwriter twitter.com/creategodsword
Facebook http://www.facebook.com/bridgette.mongeon
Listen to The Creative Christian Podcast or the Inspiration/Generation Podcast Click on Podcast Host Bios for a list of all podcasts.
Listen to the Art and Technology Podcast