Sculpture tutorials
Portrait Sculpting Class- New Students And Returning Students Twist
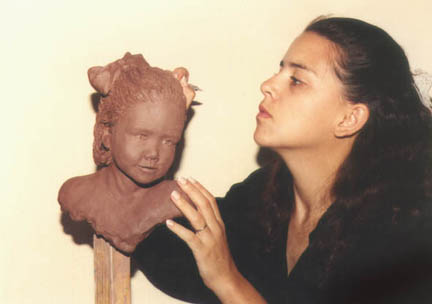
Learn how to sculpt a likenessA portrait sculpture class will be given by master sculptor Bridgette Mongeon in her Houston area Heights Studio. The process of sculpting a bust can be translated to sculpting any of your loved ones. Our subject is a beautiful baby, an inspiring model for all and a creative inspiration for those who might have a hankering to sculpt dolls.
DATE:The class will take place two Saturdays, May 5 and 12 from 9:00-3:00. Please bring a sack lunch. The cost of the class is $200.00 plus $25 material fee. Space is limited.
(You are welcome to bring your own sculpting tools, but it is not necessary. Be sure all of your tools are clearly marked with your identification. Smocks are also encouraged. )
To register:Click the Pay Pal link below for your Pay Pal payment or contact Bridgette@creativesculpture.com and she can send you an address to pay with a check.
Please register by Saturday April 28th. If you need further information please call 713-699-1739. The artists work can be found at https://creativesculpture.com
NOTE: NEW RETURNING STUDENT OPTION: If you have taken this class, and would like to sculpt your own loved one instead of the baby that the others will sculpt, you are welcome to register for the class again, and Ms. Mongeon will give you personal assistance on your project while the others work on the sculpture of the baby.
No Comments Please, Well Yes, But No
I have had several people come to my studio for various reasons and without being asked, have offered their suggestions on Evelyn. I realize that though I am keeping this blog and have kept others on my process it is really a solitary job. The comments I receive from those who see it on facebook are things like, it is coming along or WOW or things like that. But having comments on the piece in my studio or about the structure of a piece, before I am really ready to show it is a bit frustrating. It is kind of like cleaning your closet and taking everything out and organizing it and having someone walk into your room and say, “Wow, this is a disaster.”
I think that the process of creating an entire human form is huge. I jump around from head to feet, to in between, back to feet and legs and, step back and see so many things, and make a list and then try to focus and them put things together and look and make more lists. My clients may be watching from afar, but it is in no way shape or form ready to review. I will appreciate the comment from those that I trust, when I’m ready, but until then… My closet is a disaster, but I’m getting there.
You can follow along with this entire process of creating a life size bronze for the ERJCC on the Evelyn Rubenstein project blog located at http://erjcc.blogspot.com/
______________________________________________________________
Bridgette Mongeon-Sculptor, Writer and Speaker
Bridgette Mongeon is a sculptor, writer, illustrator and educator as well as a public speaker.
Her blog can be found at https://creativesculpture.com.
She is also the owner and creator of the God’s Word Collectible Sculpture series
Follow the artists on twitter twitter.com/Sculptorwriter twitter.com/creategodsword
Facebook http://www.facebook.com/bridgette.mongeon
Listen to The Creative Christian Podcast or the Inspiration/Generation PodcastClick on Podcast Host Bios for a list of all podcasts.
Listen to the Art and Technology Podcast
Laying Down On The Job
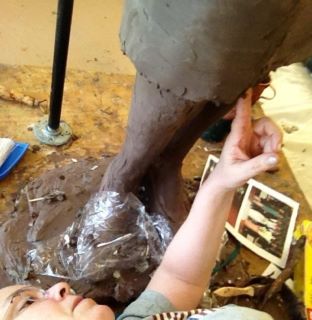
So, you could say I have spent the last two days on the floor of the studio. How else are you going to sculpt ankles and legs? Pillows are thrown about as I try to crawl around and sculpt, then stand up and go to the other side of the room to look, and then back down on the ground.
You can follow along with this entire process of creating a life size bronze for the ERJCC on the Evelyn Rubenstein project blog located at http://erjcc.blogspot.com/
Bridgette Mongeon is a sculptor, writer, illustrator and educator as well as a public speaker.
Her blog can be found at https://creativesculpture.com.
She is also the owner and creator of the God’s Word Collectible Sculpture series
Follow the artists on twitter twitter.com/Sculptorwriter twitter.com/creategodsword
Facebook http://www.facebook.com/bridgette.mongeon
Listen to The Creative Christian Podcast or the Inspiration/Generation PodcastClick on Podcast Host Bios for a list of all podcasts.
Listen to the Art and Technology Podcast
Finished 3D Presentation For Possible New Project
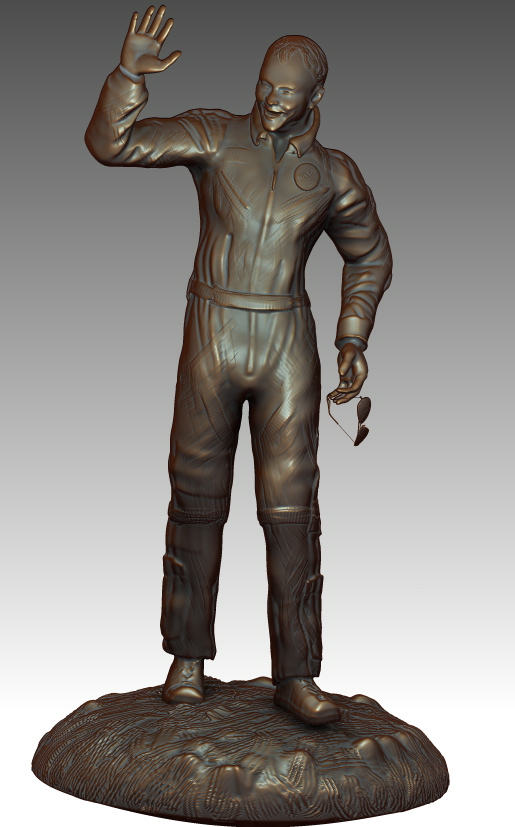
I mentioned in a previous post that I was looking for just the right 3d outfit to use in a presentation that was similar to the ones I had in a photograph. Well, I must say that the people on the forum of daz 3d rock. They answered my questions within an hour and pointed me in the right direction.
To learn more about this project follow along on the project blog at United In Space.
Starting From The Ground Up! Process Writing For The Evelyn Rubenstein Sculpture

I guess I’m starting from the ground up. Or putting my best foot forward. I had the foam legs and feet with heels on and thought it might be good to start here. I found a pair of my own high heels as reference and have been sculpting for the last few days. It is funny to have the feet almost done and the rest of the body has not been started.
There are other motives for sculpting the the feet off of the main body of the sculpture. I have worked on them for about 2 days and it is much easier having them on a table than to be scrunched down on the floor.
Now that they are done I have wrapped them in saran wrap to prevent any foam from getting on them when I put the entire piece together. I have created a pipe armature that will enter Evelyn’s back. This way the weight of the sculpture does not have to set entirely on the foam legs and ankles. It would be great if there was a pipe going through her leg and heel, but I’m not sure that can work. I can’t wait to put the foam pieces together and see her as a whole. First, to hem that skirt a bit.
You can follow along with this entire process of creating a life size bronze for the ERJCC on the Evelyn Rubenstein project blog located at http://erjcc.blogspot.com/
Bridgette Mongeon is a sculptor, writer, illustrator and educator as well as a public speaker.
Her blog can be found at https://creativesculpture.com.
She is also the owner and creator of the God’s Word Collectible Sculpture series
Follow the artists on twitter twitter.com/Sculptorwriter twitter.com/creategodsword
Facebook http://www.facebook.com/bridgette.mongeon
Listen to The Creative Christian Podcast or the Inspiration/Generation Podcast Click on Podcast Host Bios for a list of all podcasts.
Listen to the Art and Technology Podcast
What Does Milled Foam Look Like As It Is Being Milled?
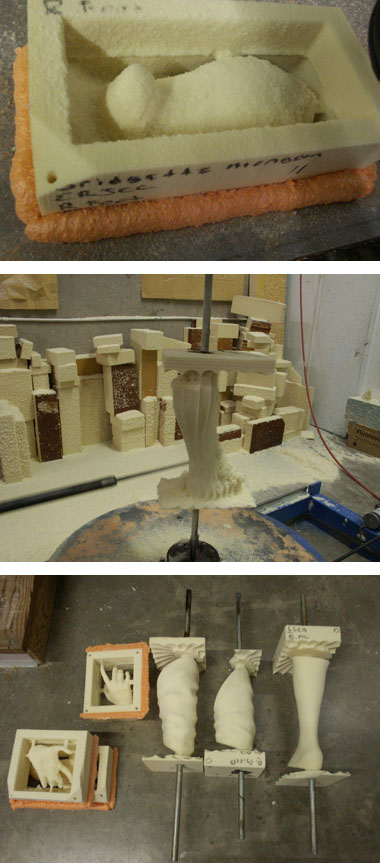
Synappsys Digital Services sent me photographs of the milling of Evelyn. I’m including them here so others can see.
You can follow along with this entire process of creating a life size bronze for the ERJCC on the Evelyn Rubenstein project blog located at http://erjcc.blogspot.com/
Bridgette Mongeon is a sculptor, writer, illustrator and educator as well as a public speaker.
Her blog can be found at https://creativesculpture.com.
She is also the owner and creator of the God’s Word Collectible Sculpture series
Follow the artists on twitter twitter.com/Sculptorwriter twitter.com/creategodsword
Facebook http://www.facebook.com/bridgette.mongeon
Listen to The Creative Christian Podcast or the Inspiration/Generation Podcast Click on Podcast Host Bios for a list of all podcasts.
Listen to the Art and Technology Podcast
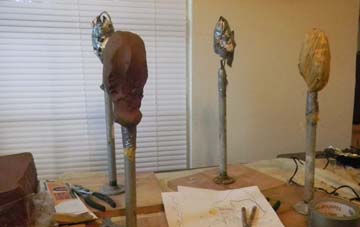
My Armature Is Delivered To My Door

Love when an armature is made for me.
I had been away and out of the studio for a week and while gone I was happy to see that Synappsys Digital Services, took the digital work that I had done and created and milled out my pieces. Here is a bit of technical information for any artists seeing this blog post. Synappsys has two CNC milling machines, a 21inch z axis, and a custom one that they designed and built— a 3 axis- with a 8′ rotary axis. besides milling Synappsys Digital Services, offers 3d rapid prototyping. They are in Norman Oklamoma which does not pose that much of a problem for me as a Texas artist as I can send them my files and foam pieces are light and will fit in a wardrobe box.

The process
Foam is put on the milling machine and the machine mills out the digital file that I have sent to them. The entire reason for this process is that it saves me time in creating an armature. I also can figure out some details of the process, and design which has been discussed in previous posts.
______________________________________________________________
You can follow along with this entire process of creating a life size bronze for the ERJCC on the Evelyn Rubenstein project blog located at http://erjcc.blogspot.com/

Sculptor, Writer and Speaker
Bridgette Mongeon is a sculptor, writer, illustrator and educator as well as a public speaker.
Her blog can be found at https://creativesculpture.com.
She is also the owner and creator of the God’s Word Collectible Sculpture series
Follow the artists on twitter twitter.com/Sculptorwriter twitter.com/creategodsword
Facebook http://www.facebook.com/bridgette.mongeon
Listen to The Creative Christian Podcast or the Inspiration/Generation Podcast Click on Podcast Host Bios for a list of all podcasts.
Listen to the Art and Technology Podcast
Working On Preparing An Armature
I have been using zBrush to create an armature to send to Synappsys Digital Services for milling.
This is similar to what I wrote about in Digital Sculpting With Mudbox: Essential Tools and techniques for Artists, and what I have done with the panther project; however, I feel I’m pushing the process a bit more.
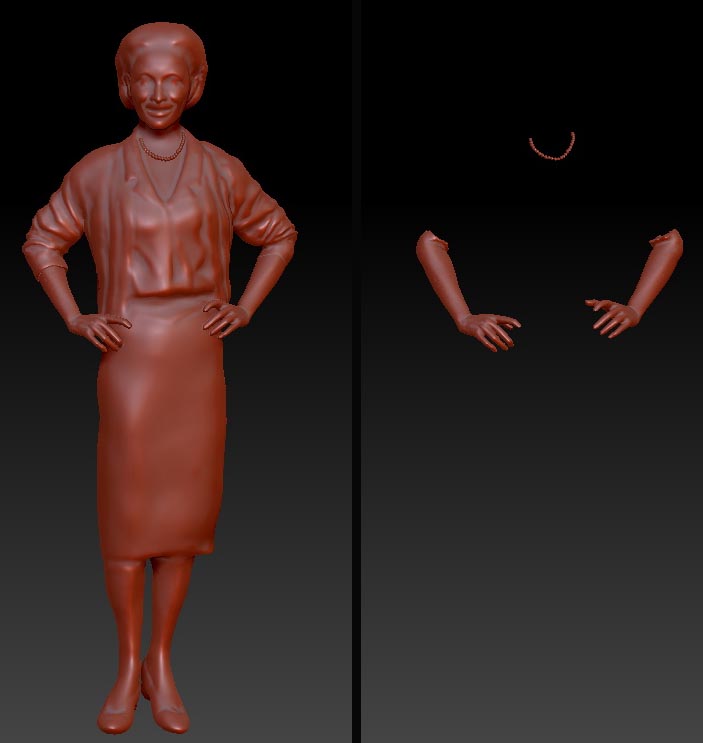
Here is the digital sculpture almost ready for the milling process. I believe I am going to send it to them but would like to separate the arms from the sculpture. The reason for this is that in the digital sculpture if the hands are sent with the body as one file they get lost in the clothing. I would like to determine their placement without losing details. Synappsys will separate them anyway within the process of getting the pieces ready for milling.
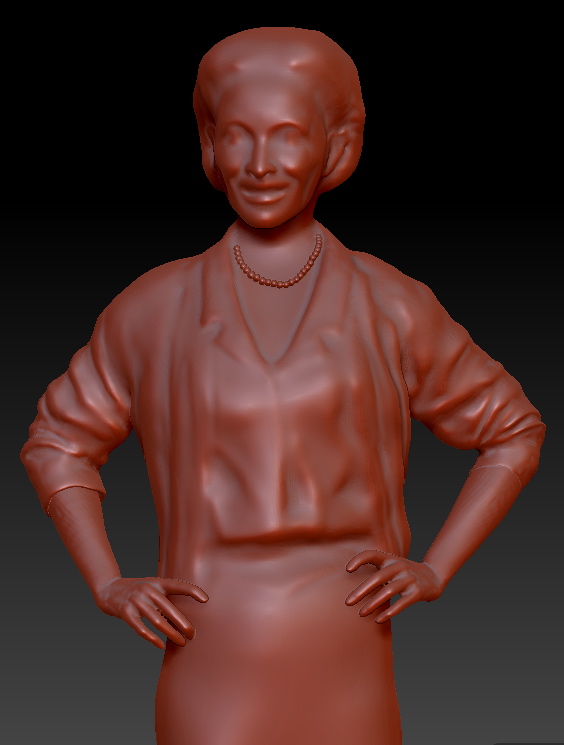
I’m not sure what will happen with the pearls. I doubt these can be done, and might actually be better for me to sculpt them on her. In fact, I’m leaning in that direction. Having them on the sculpture while working digitally has helped me with size and proportions. I have a few more things to do to the sculpture, and am anxious to hear what Synappsys thinks.
I SPOKE WITH SYNAPPSYS
Here are some of the things we discussed. As mentioned in my previous post, this Dynamesh is acting similarly to what Synappsys’ program will do when it lowers resolution. I have been requesting that Synappsys to mill out several heads that show either different resolutions of milling or different reductions. I am hoping to include this in my up and coming book, 3D 2012 digital art in a physical form. This will be a very important visual for artists to understand this entire process.
Some thoughts as Synappsys and I spoke
- The arms are created as what zbrush calls a “sub tool” I can separate them for milling , but I should probably be sure that they are cut and align evenly with the arms. Presently they sit within the sleeve. If they are a clean cut, and can match up, preferably somewhere in the arm where the sweater is, where I will have more design wiggle room, that will be better.
- It is almost paralyzing to try and figure out what size to mill this out at. There are several variables. If I want to add a lot of clay in the traditional studio , I have to allow for that mass. This may mean that I want to reduce the size. I may want to add little clay to the arms and hands, and up to 1″+ amount of clay to areas like the sweater, skirt, hair etc. So, I might have the pieces milled at different sizes.
- But the size problems don’t end with milling. In the traditional process of bronze casting of a life size person, it is known that artwork shrinks. My foundry indicates that I could lose up to an inch in size. But often times, the foundry can make this up as they are welding the many pieces together. Another aspect of casting in bronze is that “some pieces can shrink in the center, or look skinnier,” says Scot Yoast of Art Foundry Houston.
The entire concept is frustrating for an artist who goes through great lengths to sculpt a perfect or near perfect sculpture and have such deformations. My heart gets excited when I think about how digital processes are infiltrating the lost wax method of bronze casting and how this will change in the near future. A subject that I have discussed quite often on this blog, and I will go into great detail in my new book For now, I’m having to work this tra-digi art in any way that I can to get the results I desire.
Glad You Could Join Us. Some Pictures From Class
Love the feeling of having students fall in love with the clay.
Though my schedule over the last years has not permitted me to have classes in the studio I have decided to squeeze some in. This is a portrait sculpture class, two all day Saturday classes. A bit intense, but also incredibly rewarding.


It is interesting to see so many working people in my own studio. It is a private place only becoming lively during one of our parties, where everyone seems to congregate. The best part about doing classes is meeting so may incredible artistic people. There are some beginners in clay and others who are not. It is a challenge as a teacher but I want everyone to feel comfortable with their creative place. Some are very realistic and others become stylized. Those are the hardest students. I can help them make their work more realistic, but I hesitate in touching it. I like their style.
The subject for this class is a newborn baby. It offers some challenges, but the best part about it is that it is inspiring for the teacher! I must say it feels strange to be working on a portrait without a client in mind. Though I have told the parents that I will give them either the original or a copy of their wonderful inspiration. So in some ways they are my client.
The class starts early on a Saturday with students arriving at 9:00 a.m.. We take a short break for lunch, no one wants to pull away from the sculpture, but I like the sharing time and it is good to walk away from a sculpture from time to time. we all hang out on the porch, which does not feel so bad in the heat with the pond nearby and the shade of my trees.

Class is two long Saturdays, but very fulfilling. If you missed signing up for this class, don’t worry. I’m doing another in August- two Saturdays beginning August 6th. I wish I could find more time to do this on a regular basis.

Sculptor, Writer and Speaker
Bridgette Mongeon is a sculptor, writer, illustrator and educator as well as a public speaker.
Her blog can be found at https://creativesculpture.com.
She is also the owner and creator of the God’s Word Collectible Sculpture series
Follow the artists on twitter twitter.com/Sculptorwriter twitter.com/creategodsword
Facebook http://www.facebook.com/bridgette.mongeon
Listen to The Creative Christian Podcast or the Inspiration/Generation Podcast Click on Podcast Host Bios for a list of all podcasts.
Listen to the Art and Technology Podcast
Sculpting Tiny Hands

hand with Classic clay.
When creating a figurine, as I am now, I usually sculpt the head and hands separately. The difficult here is making sure your head, and hands match the size of your sculpted figure.
Because this is a commission piece, I have a full figure photograph of my subject. I can measure how many heads high my subject is and then I can be sure that my head is in correct portion to the body. Believe me there is nothing worse than working on a head for a week and then discovering it does not match the proportion of your sculpture. At this small size a sixteenth of an inch can make a huge difference.

the hand in comparison to the face.
Once I have this done, I can move on to the hands. If you take your hand and put the wrist area at your chin. This is the portion that has the creases in your wrist, and then roll your hand up your face, you will find that your middle finger will come to your hair line. Unless of course you are a middle age man and losing your hair.
To create the hand, I start by making a wire armature. You will see that these fingers in the armature actually have two pieces of wire. I have narrowed the fingers to just one piece of wire later in the process.

Fingers are actually much easier to make when they are not on the hand. Roll small tubes of clay, being sure that you make some smaller or larger (thumb and pinky) than others. Also being sure that right hand and left hand are mirrored and similar in size and shape.
Once I have all of these sausage shapes I’ll roll the side of the sausage in two spots, just above the middle knuckle, and just below. I usually do this on a round tool.
I can then add some more clay for the knuckles and underneath the finger carve out the areas below the knuckle where the finger will bend. A simple angular cut with a knife will do fine. I did that with this tiny finger and then stuck it on the wire. Pushing the tip of the finger up , at the bottom, makes it look much more natural.

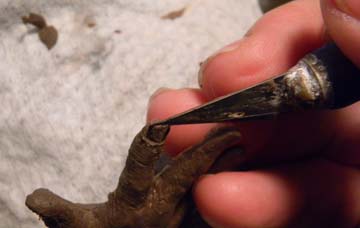
FINGERNAILS
Fingernails are really quite easy. With just two strokes of a sharp object I have the basic nail. In this case it is an X-acto knife. Place it on the side, and scrape it over the nail in an arch pattern. Then place it at the other side of the finger nail and bring it to the middle again. A third stroke to separate the nail from the finger at the top is the last portion of sculpting the nail. Push the sharp object in and pull down over the finger tip.
Though I have a good start on this hand, there is one more area that I would like to point out. Note that when your hand is flat the skin flap where your finger meets your knuckle. The pinky and ring finger have a crease that goes to the ouside of the hand and between the middle finger and the index finger the crease is to the thumb.

The two on the right point to the right, the one between the middle finger
and index finger point to the thumb.
MORE SHAPING
The placement of the thumb is also an area that new students will have difficulty with. The thumb is not placed on the same plane as the figners but instead points down to the ground when the fingers are straight up. Also note that the top of the hand is curved and not flat. Because this is a very expressive sculpture, I will be counting on capturing that expression within the hands as well. More on that later. This short little tutorial will get anyone started on a good sculpted hand.
Unfortunately there are two figures in this sculpture and four hands as well as 20 fingers. I can expect to spend a good full day on or a day an a half on hands. I am just thankful thee are no bare feet in the sculpture.
I’ll post some more photographs as I continue.
_____________________________________________________________________________
Bridgette Mongeon is a sculptor, writer, illustrator and educator as well as a public speaker.
Her blog can be found at https://creativesculpture.com.
She is also the owner and creator of the God’s Word Collectible Sculpture series
Follow the artists on twitter twitter.com/Sculptorwriter twitter.com/creategodsword
Facebook http://www.facebook.com/bridgette.mongeon
Listen to The Creative Christian Podcast or the Inspiration/Generation Podcast Click on Podcast Host Bios for a list of all podcasts.
Listen to the Art and Technology Podcast