Articles
Mold Making And Bronze Casting- Part 1
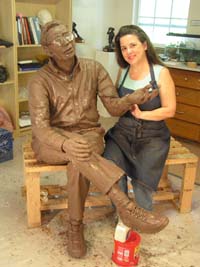
Created for Best of Artists and Artisans web site By Bridgette Mongeon © 2008
There is one question that I receive on a regular basis, “How do you make a mold for bronze casting, or how can I make my clay artwork into bronze?”
Though the process is quite detailed, I have recently made this video of the Dick Hathaway mold and bronze casting. It is not instructional but it does show the process. Watch the video and I’ll share some hints, and tips as well as some of my resources for materials that I use. Mold making and bronze casting is much too much to cover in one article, so check back next month for part two.
I have been making molds for years; however, I still find myself saying, “I could have done this one better.” I learn from each process. Attempting to make your first mold will feel overwhelming, but start with something simple. The one thing I have found that keeps me from beginning a project is not just the learning process, but also the daunting task of finding all the materials and tools I need. So for this months article I thought I would give you a list of my tools and materials used in the mold process, some of which you will see in the video If you proceed with a mold and need any further assistance or have any questions just go to my forum on my website, https://creativesculpture.com/forum and post your question. I’d prefer to answer your question on a forum. Then others might find our conversation at a later date and gain some knowledge. I’ll list the contact information of my suppliers at the end of this article, though I do encourage you to research suppliers in your own area.
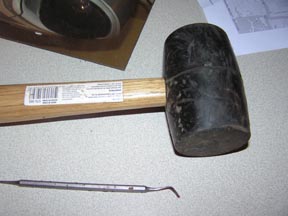
TOOLS
When I am claying up seams, I heat the clay up in a microwave, bang it out into thick slabs with a rubber mallet, and then put it on the sculpture while it is warm. Often I search around the studio for jars, cans, and other items to hold up this seam. Pressing hot Klean Klay against the base of a jar will help to hold it in place, and the jar helps hold up the seam. If I need to clean up a seam, I’ll use my favorite dental tool. I use a round ribbon tool to carve the groove in the Klean Klay. This creates the “key” to keep the two pieces of rubber together. Kitchen knives come in handy to cut the clay to make a clean edge.
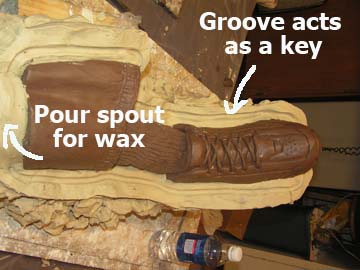
As you can tell, making the seams and preparing each piece can take a lot of time. It probably took me three days to cut and prepare the entire sculpture.
Don’t forget to leave an area to pour your wax into the mold. This can be the cut area. For example, where the arm was cut. Sometimes I create a clay spout, adding it to the cut areas to give me a good pour. If you look at the lower torso in the video, I put rubber over the entire cut section, between waist and lower torso, and poured the wax into the rear area.
I love power tools. It is a reciprocating saw that I use for cutting apart the sculpture. Using this tool is something I learned from the foundry.
The metal shims used in creating the seams on the upper torso and head are from Wholesale Tool and they are taped together with scotch tape. I have also seen other sculptors use plastic for shims. One of my cans of shims says the size is .0005. The shims should be thin enough so as not to make too big a gap when the rubber pieces are put together and not too thin so that it bends when you push it into the clay.
HINT
Be careful when using metal shims. Throughout the process, the shims disappear after being covered with rubber and plaster, you may have an edge stick out that can slice your hand.
MOLD RELEASE
Each sculpture piece is sprayed with a couple of coats of mold release agent. I never seem to have enough of this around. Be sure to keep a few cans on hand. Universal Mold Release costs about $11.30 a can and is purchased from Reynolds.
RUBBER
RUBBER
I have tried several different rubbers, but right now I am using Reynolds Rubber Brush- On 40, gallon kit. It costs around $120.00. It took about four of these to do the Dick Hathaway sculpture, a big investment. Remember though, a foundry would charge you about $7,000 to make a mold this size. I’m open to investigating less expensive rubbers, but dependability and longevity of a rubber is something to consider when comparing rubbers and I know this rubber fits that bill.
RUBBER Mold making is messy. I put paper, plastic, or cardboard around the mixing area. Save all of your large plastic yogurt and sour cream containers. These can be used over and over again for mixing rubber. This entire process is not very earth friendly and reusing containers helps ease my conscience a bit.
Mixing sticks. I use a lot of these, so I try to pick them up from the hardware store whenever I go. Usually they give them when you buy paint. I also look for anyone throwing away old shutters or shutter doors. The slats work perfectly for stirring sticks. Yes, the word is out, I garbage pick.
HINT
Be sure to keep the catalyst (yellow container) of your rubber covered while working with it, it can go bad.
HINT
Keep a stick to scoop out Part A and a separate stick for Part B and then another clean mixing stick. You don’t want to get any of part A into part B until you are ready to mix. You will notice in the video that I save my containers from sushi to set the cups in so they don’t drip all over the work area.
HINT
You must have equal parts. You must also be sure to mix thoroughly. If you are using yogurt containers be careful of the groves in the bottom of the container. You will want to be sure to mix every bit of it from the bottom. If you falter on these two hints, you will lose your mold and maybe your original.
GLOVES
Have plenty of gloves on hand. Mold making is very wasteful, but working without rubber gloves is maddening. I usually try to keep both vinyl and latex, just in case an apprentice prefers one to the other.
PAINT BRUSHES
You will use quite a few paintbrushes. I change out paintbrushes after each coat of rubber. One inch chip brushes work best for me, and I get mine from Montalbano Lumber, $14.04 a box Even though this is a little item, I suggest looking around for a good price per piece on these. You will use a lot.
HINT
When applying the first coat of rubber, be sure to dab the rubber into all crevices. The second and third coat will go much faster than the first. I like to have several pieces to work on to keep the flow going. That way I am not waiting around a long time for something to cure for the next coat. If you touch the rubber and it feels sticky but kind of leaves a fingerprint, it is ready for the next coat.
UNDERCUT PREPARATION
This is a step that is not covered in the video. The video does not show how to make sure a mother mold will come off of the rubber. It is a vital step. Please contact me and I’ll explain this or I’ll be sure to video tape it in detail the next time I make a mold.
NEXT MONTH – Making the mother mold
SUPPLIES AND SUPPLIERS
Paper or plastic to cover floor
Recipricating saw
Klean Klay
Rubber
Mold Release
Stiring Sticks
Yogurt Containers
Gloves
Microwave
Rubber mallet and tools to clean up seams
Large garbage can for disposing of gloves and brushes
Paper towels
Ceramic Store Tools and water base clay
1002 West 11th St.
Houston TX 77008
1-800 290-8990
http://www.ceramicstoreinc.com/
Circle Supply in Houston Hydrastone
6401 Long Point Rd # 506
Houston, TX 77055
(713) 688-9803
http://circle-supply.com/
Fine Art Foundry of Texas wax and bronze casting
6107 W34th
Houston, TX 77092
713-686-5567
http://www.fineartsfoundrytexas.com/
Klean Klay Clay for claying up the seams
P.O. Box 678
1019 Salamonie Ave.
Huntington, IN 46750
260-356-2328
http://www.kleanklay.com/
Montalbano Lumber Chip brushes
5850 N Shepherd Dr
Houston, TX 77091
Phone: 713-691-6611
http://www.montalbanolumber.com/
Reynolds Advanced Material Rubber, clay, mold release
5 locations 1-800-421-4378
http://www.reynoldsam.com/
Wholesale Tool Shims
Several locations
1-800-521-3420
http://www.wttool.com/
Using the Computer And Poser in The Sculpture Studio

Created for Best of Artists and Artisans web site
By Bridgette Mongeon © 2008
It seems strange; here I am in the office on the computer working with my latest creation instead of being in the studio getting my hands dirty. Commissions usually begin with a concept, that consists of trying to figure out the best pose to represent your subject and to present to your client. This usually means many sketches. With a new program in my office, I can create images and make changes quite easily. The program, Poser 7, by Smith Micro is a 3D design program that allows me to bring subjects into a virtual reality and pose them. Smith Micro also offers Poser Figure Artist that is created specifically for artists needing reference. At $99.00 Figure Artist is quite a bit more affordable than Poser 7 is at $249, though academic pricing for Poser 7 is only $147. For the sake of this article I will be working with Poser 7, and will review Poser Figure Artist at a later date.
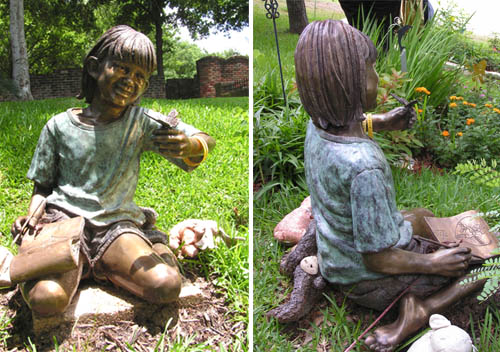
Not only can I create an idea of a pose in Poser 7, but I can also rotate that image and look at the sculpture from all angles, just as if I were walking around it in my studio.
I can’t say that this technology is new, Poser was first released in 1994. It has, however, taken me some time to get my own hands on it and get it in my office. Until this time I had to sit next to my husband as he works on the program prompting him, “Move this here, move that there.” It is stifling for someone who works with movement to try and direct someone else. I am thrilled to finally have this in my own hands and delighted with how easy it is to work with.
Ellie Sculpture
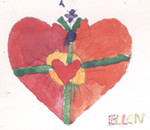
I have used this program for presentations in the past . When creating the concept for the sculpture Ellie, I used a 3D model of a young girl and posed her in a seated pose that I found in my reference photographs, adding pertinent elements like a butterfly and her sketchbook, that contains the image of The Gift Heart. This was an important element to the parents because her artwork was chosen by MD Anderson Cancer Center and made into many different artistic elements. The parent had originally considered creating just The Gift Heart as her headstone, so I wanted to be sure this was a part of the sculpture. By engraving it in her sketch book her friends could create a rubbing of her art.
Once the sculpture was posed it was brought into Photoshop and made to look like a bronze for a presentation to the clients. Of course the sculpture changed and morphed through the sculpting process, but it was with the sculpture of Ellie that I realized the value of Poser in the sculpture studio.
Lucas Sculpture
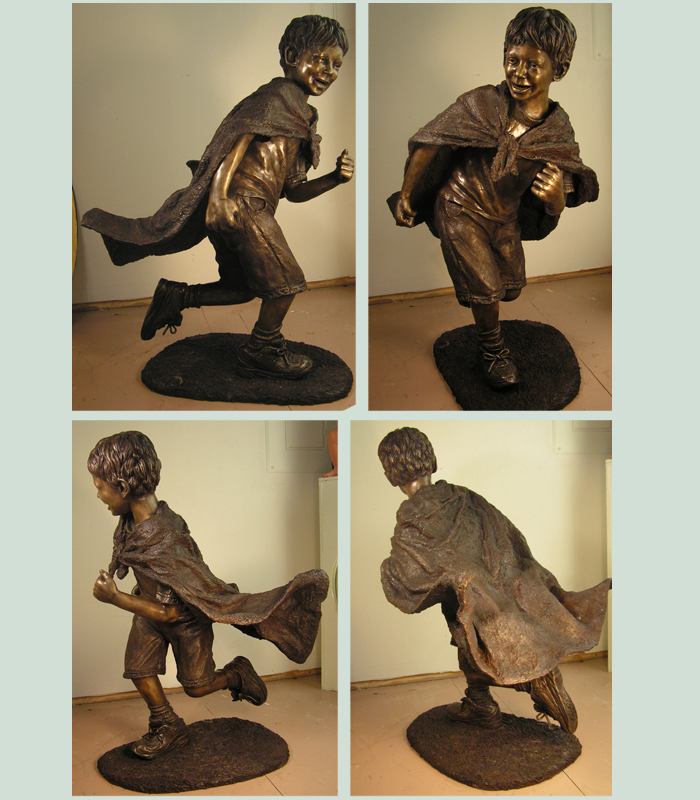
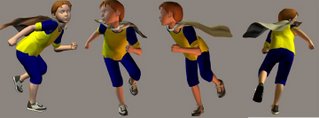
With the sculpture of Lucas, a little boy of five, for which I created a memorial, I wanted to create him running with a cape as he played Batman. If you have ever tried to prompt a child model to run and hope to catch that sort of action, it can be very difficult. I worked for hours and tired out the child, quickly running out of stickers and bribes to get him to try, “Just one more time.” My live model gave me some reference material, but for my presentation I went back to Poser. We purchased a 3D model named Matthew from Daz. Within Poser you can actually make your model walk or run. Walk Designer in Poser allows you to pick the gate of the walk, even head bounce, arm swing, and stride. With a little tweaking we made Matthew run, and I not only had something to show my client, but reference to work from.
Sculpture of Jenna
I utilized my recent commission of a 14-month-old little girl that I am going to create as a bronze cherub as an opportunity to try my own hand at using Poser. Poser has a limited amount of figures that it comes with, but you can easily buy more. For example, it didn’t come with wings or a cherub or a baby. I bought these 3D models, along with several poses from Daz. The total cost was about $55.00 for those extras, but it was worth it as it saves a ton of time in posing. Buying extra poses meant I had to make fewer adjustments to the 3D model.
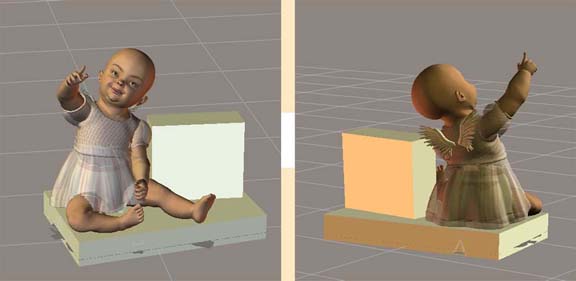
The client and I went through several poses, standing, seated, pretending to take off her socks, climbing on the headstone, and finally with a butterfly on her finger. The winner of all the poses was Jenna with a butterfly on her right hand and her left hand configured loosely with the sign language symbol “I love you.” I love that her leg is kicked up in glee.

I look forward to working with Poser for future projects expediting presentations and playing within a virtual worlds to help my clients see the vision that I already see, bringing these precious loved ones to life and quickly into the studio to be created in bronze.
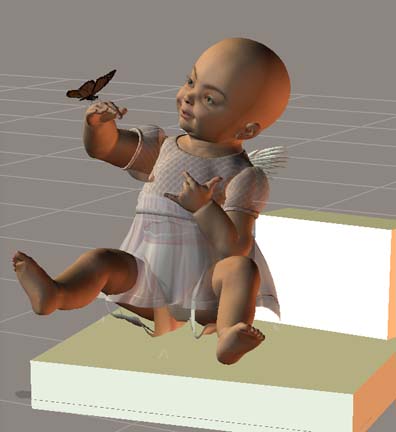
Each change was simply done to the original, saved, and then I captured an image to email to my client to review. Creating these models and sending JPGS to my client made my process of defining a pose fast and fun.
Here is an update on some of my Creative Endeavors!
Recent articles written by Ms. Mongeon
“Optimize Your Presence on the Internet.” Sculptural Pursuit. Vol.7 No.2 (Summer 2008) 53.
To see a list of all articles visit the artist’s works published page
Technology in The Art Studio
Created for Best of Artists and Artisans website
By Bridgette Mongeon © 2008
CLAY
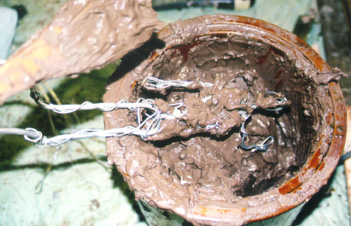
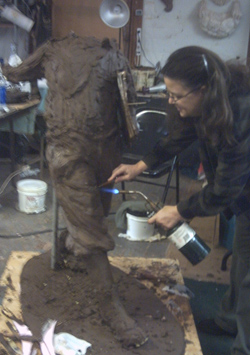
In my twenty-three years of sculpting, the process and materials have changed very little. Moving from water-based clay to a wax-based clay was probably my biggest change over the years. It was really done out of necessity. Being a commissioned sculptor, the time between starting a sculpture and a final approval could be months. Trying to keep a water-based clay portrait or a life-size figure from drying out and cracking was a nightmare and when introduced to Classic Clay (brown firm AB200) from Reynolds Advanced Materials, I made the switch. Almost all of my work is created for reproduction by either the manufacturer of my gift items or my foundry for bronze. I rarely fire sculpture in the kiln. In using Classic Clay I no longer have to keep my sculptures wet over the months of time that it takes for an approval, but having to heat up the Classic Clay, with crock pots and torches is a bit inconvenient. The studio is less dusty with the wax-based clay, than it was with water-based clay but I miss having the feel of the water based clay. Even the process of drying out, that caused me such tension, gave me that leather hard stage in the during the drying process that was perfect for adding fine texture to the sculpture.
Casting Outdoor Sculptures
I also keep my eye out for changes in technology as it pertains to casting material, especially outdoor material. Many years ago, when I cast in concrete, I was desperate for additives or different strong but lighter casting material. Whenever someone would tell me they had a product it always fell short of my expectations. Upon further research, it would not withstand the elements. it would chip or it did not come in bright white so that concrete dyes could be added. I have not poured in concrete in a while, so I do not know if anything new is on the market. Though it would be interesting to know if something is now available.
Mold Making Material
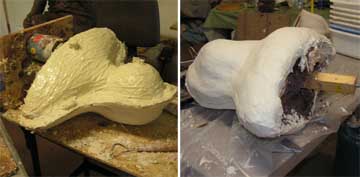
Mold making material is another area where technology is vital to my production. If someone could invent a mother mold material with the strength of fiberglass, but not the smell and toxicity, that would be great. (A mother mold is the structure that is put over a rubber mold when making a mold. The mother mold holds the rubber in place, so that when you pour something in it, it is not deformed. Usually the mother mold is plaster that is heavy or fiberglass resin that is toxic and uncomfortable to work with.)I have tried Plasti Paste, a mother mold material purchased from Reynolds Advanced Materials but personally I was not happy with the results. (photograph shows rubber mold with plaster mother mold)
I’m intrigued with the materials used in special effects and frequent the web sites of Reynolds Advanced Materials and Smooth On ( Reynolds Advanced Materials is part of Smooth On ) to see what new items they have.
I have spent some time ordering and utilizing their free dvd’s and pamphlets. The Reynolds site has an entire section on How To. I would love the free time to play with all of the fun things that can be found from these vendors. And now Smooth On has Youtube videos! Like this one on how to create a face mold.
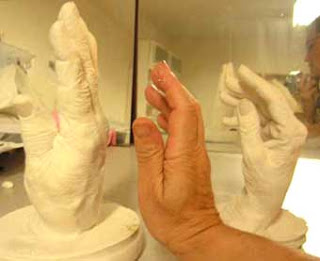
I recently utilized Smooth On’s material for casting hands, and the process that they discuss in the second YouTube video, is similar to what I did. I cast my mom and dad’s hand and they are now two of my most prized possessions. I wrote about them in my newsletter, and posted my thoughts and the process on my forum. The process was the same as the Smooth On video, though I cast their hands in plaster and the Smooth On video shows plastic. ( picture shows father’s cast, my hand, and mother’s cast)
Digital Enlarging
My most recent endeavor into new technology in the art studio has been digital scanning and enlarging. I visited Synappsys Digital Services and was intrigued by what I saw.
Before I go any further, I must first explain the process that a sculptor goes through to enlarge a sculpture. Often a client will want to see a small maquette, which the artist creates for approval by the client. Then the artist proceeds to enlarge the sculpture by creating a metal armature of pipe or rebar, foam and chicken wire. This armature gives the sculpture structure and support, and the foam offers mass that is light in weight. A final layer of clay is put over the foam and details are added. This process can take weeks. (If you would like to see the entire process of creating a life-size sculpture in this manner, please review my online journal of creating the life-size newsboy.) If a sculpture is going from maquette to monumental, the process is a monumental task!
Synappsys Digital Services, along with a few others in the country offer the resource of digital enlarging. They take your small maquette and digitally scan it. Once the scan is in the computer, the data is compiled to create a 3D model. The 3D model is enlarged in the computer and milled out in urethane foam. I have written about this process in detail for an article in the up and coming Sculptural Review Magazine on technology.
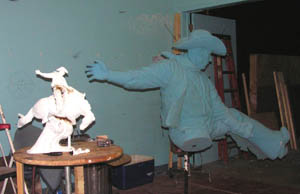
(Picture of the Ranger by Harold Holden maquette and enlarged urethane foam created by Synappsys Digital Services)
I visited Synappsys Digital Services to review the process and was thrilled with this new technology. I can’t wait to use it myself. Of course it is a bit of investment. The cost ranges from $1,500 to 4,000 for scanning and milling a 6-foot man depending on the detail and the density of foam used. They can even spray clay on the foam before shipping it to your studio. This process will save me so much time and money, I am definitely adding it to my repertoire of new resources. While preparing the article for Sculptural Review Magazine, I called many different vendors that offer this process. Here is a short list for your records. Prices can vary between vendors as well as the detail that can be obtained in the scanning and milling.
They say “necessity is the mother of invention”, and looking over this article I can see why. It is necessary that I create, and I love vendors that can assist in my creative process.
List of 3D resources
Digital Atelier, formerly Johnson Atelier
Cyber FX
Direct Dimensions specialize in scanning.
Satellite Model specializes in milling.
Digital stone project This company mills in stone.
All written work is copyrighted and cannot be used, whole or in part,
without the written consent of the author.
New Online Article-


A new online article about using the computer program Poser to create presentations and reference for sculpture. The May issue of the online Magazine Best of Artists and Artisans online blog.
Article That I Wrote On “Optimizing Your Presence On The Internet”
Is now available in the new Sculptural Pursuit Magazine Summer 2008 “Optimize Your Presence on the Internet.” Vol.7 No.2 (Summer 2008) 53.
Best of Artist and Artisans- Article
“As a figurative sculptor I am entranced with the human form, male, female, young or old.”
Created for Best of Artists and Artisans web site
By Bridgette Mongeon © 2007
Recently the editors of this column wrote me concerned that people were shying away from sending in nudes to the Best of Artists and Artisans art competitions. Are nudes a controversial subject to submit? As an artist I would certainly have to evaluate each competition carefully, before entering a nude. I posted this same topic on the sculpture community forum and received some enlightening responses.
Here are some of my own experiences with nude/naked art.
The human form is an important element of focus for any artist. My husband, who is also an artist, and I are always telling art students, “Draw from life, and make sure you can draw the human form.”
Working with nude models and creating paintings and sculptures of nudes are all part of the learning process. There was a time when there were more nudes in my repertoire of art. Although I rarely sculpt a nude these days, it is not because I have outgrown them. It is because of my very busy schedule, working with a live model would be a luxury; working from a live nude model would be a way to relax. All my work is through commission and I keep very busy doing just that. Unless someone commissioned me to create a nude, and I have had a few of those, then you won’t see many nudes coming out of my studio.
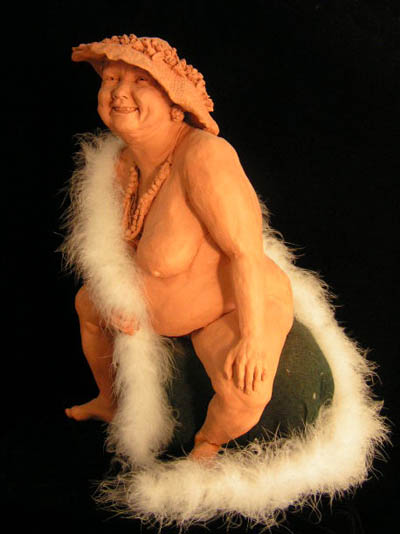
By far the piece that gets the most attention and always initiates comments from those who enter my studio is “Ethel” – a nude. It is also one of my favorites, and if I crave to do other nudes, it is because I have fallen in love with “Ethel” and want to see more of her, no pun intended. The Ethel sculpture startles individuals, but at the same time seems to make them secure within their own body.
Before the time of digital cameras, I would take pictures of the nude model, with their permission of course, and when they were not at the studio I could continue to work on the sculpture. There was a time when I was banned from coming to the local pharmacy photographic processing center, until they learned more about what I do, but even then they suggested I take these “type” of photographs to a professional lab.
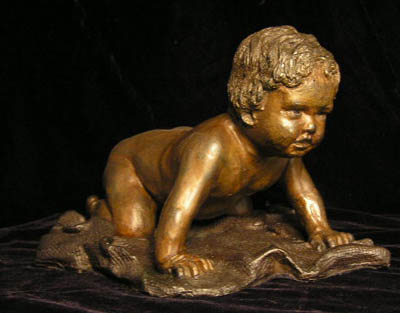
The most controversial of nudes is the child nude. During the creation of “Le petit pollison,” individuals were concerned that you could tell the sex of the baby. It infuriated me that I should change my art to appease what others thought, but in the end I compromised by pushing down the child’s rear end.
I love sculpting children. I long to study that tiny little form, watch the process of the growth of the skull and bones, and yes I desire to sculpt nude children. To be perfectly honest I long to sculpt every human form. I’d love to find another Ethel, and would also love to sculpt a very old person as a nude. The thought of it immediately brings to mind the science behind what I am doing, how does the muscle and skeleton change over the years? But more than that, what emotion is exhibited from each form? The young child with his/her plump cheeks and swayed back, rear end sticking out and chin down initiates a feeling of innocence. On the contrary the frail form of the elderly, stature bent over with time, skin hanging, exhibits the ravages of life and in that wisdom. As a figurative sculptor I am entranced with the human form, male, female, young or old. When that longing is transmitted to the clay, accompanied by the emotion and the artistic passion, it can become an award-winning piece of art, one that, with the proper competition, could be submitted to without hesitation!
Getting Past Ourselves to Live Our Dreams
Created for Best of Artist’s and Artisans website
By Bridgette Mongeon © 2007
The Houston Public Television Station created an artist documentary on my work that began, “Making a living, while living a dream, a hard combination, many hope for but few achieve.” Why is this difficult for some artists to achieve? There are many reasons. Some want to create and don’t want to bring the element of sales or business into their sacred place of creating. Others may not have the business resources. Still others have psychological barriers that keep them from succeeding and reaching their dreams. Through my marketing in the arts workshops I have helped many different individuals overcome those obstacles that stood in their way of achieving. I hope to help some of you do the same. But be forewarned, sometimes the biggest obstacle can be yourself!
In my lecture on creativity I often state, “Watch out, the moment you want to be creative; the moment you sit down to begin the process of writing or painting or drawing or composing, your mind will suddenly feel a different urge. Suddenly you will feel that cleaning the grease off the back of the kitchen stove will be more important than creating.”
It is the voices we hear in our heads that keep us from doing the very thing that our heart wants to do. We distract ourselves with other things. Yesterday I sat down to write a chapter of my marketing book and felt compelled to check my e-mail, look up random topics on search engines, and then clean off my desk. The same thing happens when I begin to sculpt. “Don’t forget when you get back into the office you should…,” my mind bellows. Last week I was working on a sculpture and jumped up so many times I thought there must be something wrong with me. Now I make it a point to keep a pad and pencil by my sculpture and jot down intruding thoughts.
A friend called with the deepest yearning in her heart, “I want to be a writer,” she stated. My answer was matter of fact, “Then write. Don’t just read about writing; don’t take classes on writing, WRITE!” We keep ourselves busy without actually doing the thing we want to do. Another friend called and said she wanted to be a mosaic artist. “I think I’ll get a part time job so I can afford more art materials, then I’ll go and buy some really nice concrete birdbaths and more art supplies, and then I’ll create the most beautiful pieces.” I told her to break some old plates and create. Why do we make things more difficult than we have to?
If you really want an eye opener, purchase Steve Pressfield’s book, The War of Art.
Pressfield calls it resistance. My husband, also an artist and writer, said this is one of the best books he has read. “It doesn’t leave you any places to hide,” he told me. The book is a quick read but one you will want to keep around. It will; however, make you take a hard look at yourself. Scrawled on my husband’s marks-a-lot board in his office is, “RESIST RESISTANCE—EXCUSES”.
Pressfield put a name to the voice—resistance. I have approached it a different way, telling attendees of my workshops that the left hemisphere is the more dominant. My queue cards for the left brain (the left side of the audience) reads, “You can’t draw, you can’t write, you can’t act, NO WAY, NO WAY, NO WAY!” The audience is rather timid when saying it, but I convince them to say it in the voice they hear in their head. The retort is a scream that comes from the gut. It is their voices that keep them from their dream. The queue card for the right side of my audience (the right creative hemisphere) is often said in a whisper, “Yes you can, yes you can, just try.”
In the words of Pressfield;
“Resistance is fueled by fear: Resistance has no strength of its own. Every ounce of juice it possesses comes from us. We feed it with power by our fear of it. Master that fear and we conquer Resistance.”
Gary Staab, Staab Studios
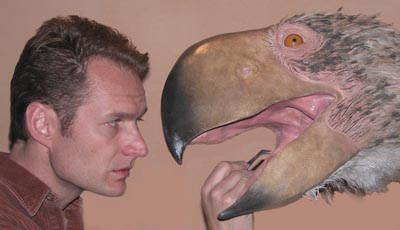
Gary has learned to combine his passion with art and claims, “I’m still in love with Lucy.”
An Artist Interview
created for Best of Artist’s and Artisans web site
By Bridgette Mongeon © 2007
It is wonderful to be able to mix your passion and your art. Gary Staab of Staab Studios has not only accomplished that, but he has also learned how to make a living doing so. Gary’s passions are art, biology, and natural science. He was first introduced to the concept of combining his passions in a liberal arts college when the class was drawing a diorama at the local museum. It struck him that someone had to prepare the exhibits.
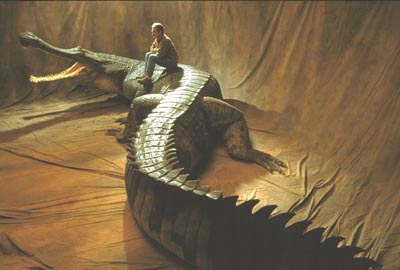
He states, “I always liked making stuff,” and turned his Hastings College studies into a directed study with a focus on art and biology. Soon Gary began to learn from the best at the Smithsonian Institute and the British Museum of Natural History. His work spans sculpting a flea to a T-rex and everything in between. Each project that comes through his studio is different and offers a new challenge. Most of his works are one of a kind, and many of the works, even the very large ones like the 40 foot Sarcosuchus imperator, or super croc that lived 110 million years ago are part of traveling exhibits and must be made to be disassembled and reassembled—seamlessly.
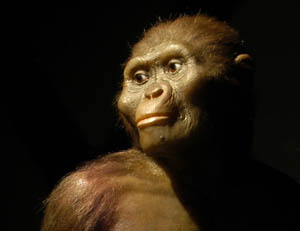
When asked what his favorite sculpture is, Gary is like most artists combing through their mind for the personal connection, weighing each creation, but he found himself drawn to his most recent creative endeavor. “I’m still in love with Lucy,” he states. Lucy, an Australopithecus Afarensis or 3.2 million year old walking primate is part of the traveling exhibit “Lucy’s Legacy”. Gary received a cast of Lucy’s bones and in three months time painstakingly created this wonder of science. He reports that at least a quarter of his time is spent on research, but knows a great deal of his work is interpretation.
“When restoring extinct animals, you can’t be afraid of being wrong.” Gary reports that there are so many scientist and such little material that this has taught him to have a thick skin, to do the best he can, and then trust the one scientist that signs off on the project. He built Lucy from the bones outward and describes forensic art as a science and a rather mechanical process, layering on muscle to a designated point, putting eyes just so. The body came to the artist much easier than Lucy’s portrait bust. As analytical as the process can be he still wants to, “…make it breath as much as I possibly can.” It is when he steps back from the details of the process and realizes it has become real, this is the part he describes as being emotional. “It is a living breathing being, that is the exciting part of restoration.”
Gary has created work for National Geographic Society, the Smithsonian Institute, and Walt Disney animation, as well as a host of others. He has had the privilege of studying fossils, bones, and casts that many paleontologists would love to see. And he is involved in many interesting projects from the Ice Man to the most recent projects in his studio that he wrapped in secrecy. He simply states, “They are two anatomically modern human skulls that are 10,000 years old.” The rest, he reports cannot be discussed.

In his career he has had great adventures such as being invited on archeological digs and measuring crocs in Costa Rica. He spends endless hours studying anatomy and his research also consists of dissection when necessary. The process of creating the super croc documented on the Staab Studio web site states, “To help aid in the understanding of how the musculature system works with the skeletal system, Gary dissected several modern crocodilians.” The study of anatomy is important for restoration, “Knowledge of any living animals compliments the prehistoric,” states Gary.
Each project Gary speaks about appears to be invigorated with a deep respect and a passion. Gary Staab, who for eighteen years has combined his passions for art and science, asks the same question he did when he began, a question that is combined with an infectious, inquisitive nature, “What did this thing look like when it was alive?”
Contributing Writer for Sculptural Pursuits?
I was thrilled to have found the magazine Sculptural Pursuits. The editor and I have been e-mailing and if all goes as planned I will be a regular contributing writer for Sculptural Pursuits and be contributing to the Artful Business Column. I am thrilled to be able to share. As an artist and in business I have shared a great deal of information on the business of art in a weekend workshop. (I still do present this workshop. If you are interested please contact me through my website.) Now the readers of Sculptural Pursuits will be reading all of my wonderful hints. I plan on creating a portion of my new forum that we are building and dedicate a section to the Sculptural Pursuits articles that I write. Individuals can ask questions, post comments and suggestions for further articles. I also will try to provide further material for the users. That is once I get my site updated, which is as I have said before, a herculean undertaking! Funny thing is the first article Sculptural Pursuits has asked me to write about is creating a web site!
If you would like to subscribe to Sculptural Pursuits you can do so on their website.
Past And A Future in the Green Mountain State
Houston Tribune
May 2005
Bridgette Mongeon © 2005
I just came out of the science lab, one of the only two places that I can e-mail things here on the campus of Vermont College of Union Institute & University. Walking up to my dorm building at Dewey Hall I watched a half a dozen people outside, playing music talking and smoking cigarettes. These students are not your typical eighteen to twenty year olds. No, in fact they are students of all ages. The door to the dorm hall seems to be in perpetual motion. Someone is always coming or going. I can hardly believe I’m forty-four years old and having a college experience. I’m on my first intensive week residency in a very progressive sort of program. In this program at Vermont College of Union Institute each learner picks a faculty member to work with. The learner also picks what they want to learn. Ah, what a wonderful idea for education. Tap into the passion of a person, give them guidance and watch them grow. I know the program sounds new and inventive, but this program has been around for almost forty years.
If the program in itself isn’t stimulating enough, there are all these learners (students) around me that are so impassioned with this past semester projects that they will present throughout the week. I am a newbie, one of only three new people, trying to make my way through the maze of buildings and schedules. I’ll stay here for a week; design a program of study, according to the program is dubbed” twenty-forty-twenty. I have to spend twenty hours a week, write forty papers through the semester and read twenty books as a part of my project. Luckily I’m using my sculpting work as my project, so the actual work won’t take any additional time away from my life. And I’m journaling most of my projects on my web site as well, so I am hoping that will work into the writing portion of the program.
This week I will also watch a hand full of people from this incredible program culminate. I can’t help but envision my own graduation eighteen months from now.
My future is in Vermont, but it is not my only ties to this wonderful “Green Mountain State.” In fact it is amazing that of all places I would choose to go to school I would end up here.
When I was little girl, every year in the spring, usually around Easter my parents would take the long drive to Vermont. Our first leg of the journey was 300 miles from my hometown in Buffalo, New York to Troy, New York where we would spend time at my aunt Bea’s. I loved aunt Bea’s. The meandering creek held my attention for hours. The large pine tree in the neighbors yard held the biggest pinecones I had ever seen.
From Troy, New York Mom and Dad would load us all up into the car and head off for the additional 150 miles to Vermont to see Meme (French for grandmother) and Pepe (French for grandfather). The trip from Troy, New York to Burlington Vermont always held the special attraction of visiting the maple syrup manufacturer. I only remember really getting the grand tour once. When you are six years old watching how the maple syrup is tapped from the trees, poured into huge steaming vats and turned into sweet syrup seemed like magic. As a family ritual, on each of our Vermont trips we always stopped at the maple syrup manufacturers gift shop. Each child, my brother, my sister and myself were allowed to get one thing from the shop. I always bought the same thing- a small rectangular package that contained an entire maple syrup sugar candy family. The joyful family stood glistening at attention under the cellophane wrapper. I watched my brother and sister devour their candies. If I was lucky mom would have bought a small package of maple syrup candy pressed into the shapes of maple leaves and I could taste that sweet sensation, which was preferred by me over moms favorite gift shop item -peanut brittle. I would however leave my little candy family intact for as long as possible, sometimes even the entire trip. They were much too special to eat.
Meme’s house smelled like old people. The thing I remember the most about it was her walk-in pantry. A room filled with cabinets with glass doors that contained canned food of all sorts of pretty colors. I would sit at the table and color in my coloring book while I watched the women bustle about. Every now and then someone would ask Meme, “Where is the…” and this was always followed by Meme’s comment, “… in the pantry.” I would look around the kitchen and though it was a nice size I wonder how my father and his twelve brothers and sisters could all eat at the same time in the same small room.
I thought that when I grew up Vermont would be just a memory, but a few years ago I began to research my family Genealogy. Until six months ago my search ended in all places –Wanooski, Vermont. In my own search I could not get past the five generation that ended in Wanooski. Then upon opening an e-mail that had a subject line that read …Mongeon genealogy, I was able to put all the pieces together. Or should I say a distant cousin was able to put them together. He sent me an old photo and the research that he had done. My great, great, great grandfather was in the bottom row; his was in the top row. This photo was of the generation that came to the United States, to Vermont. The sender of the e-mail gave me the rest of the genealogy all the way back to the sixteenth-century in France.
There seems to be quite a few things in my past that link me to Vermont. Who would have thought my future would be linked there as well. Here I sit in Vermont typing this article at my dorm room at Vermont College of Union Institute. I decided on this college less than two months ago. I know it will be a lot of work, but I am thrilled to be here.
It is hard to believe that at forty-four years of age I am sitting in a dorm room, away from home and in eighteen months after three more residencies, I hope to be graduating. Even though it has been over thirty years since I have been here as a child it still feels familiar. Not only is my past and my roots touching deep within Vermont history, but as the college experiences prompts me to reach higher than I have ever tried to before, this lovely state of Vermont also holds my future.
Bridgette Mongeon is a writer artist and now student of Vermont College of Union Institute. She works and studies in her Houston home.
All written work is copyrighted and cannot be used, whole or impart,
without the written consent of the author.
