Art and Technology
Pushing The Limits and Size of Fine Art And 3D Printing
I have been a fan of Eric van Straaten’s work for a while now. I found his work by doing research for the book that I am writing titled 3D Technology in Fine Art and Craft. I am thrilled that he has agreed to be one of the featured artists for the book and to share his process. As most of you know, the reason that I am writing this book is that I have been exploring and using a combination of technology and traditional art for a while now. I have reported on it in several magazines. Also, fine art and technology is what I received my degree in back in 2012.
The technology is constantly changing, and I have to spend a lot of time to keep up with it. That is why I hope that the book 3D Technology in Fine Art and Craft will become a series and repeat in the future, introducing the latest in technology and new artists who are pushing the limits. Of course, that will depend on my time and the publisher allowing for future editions, but first I need to complete this one, and there is a lot of research involved.
Now on to Eric’s work.
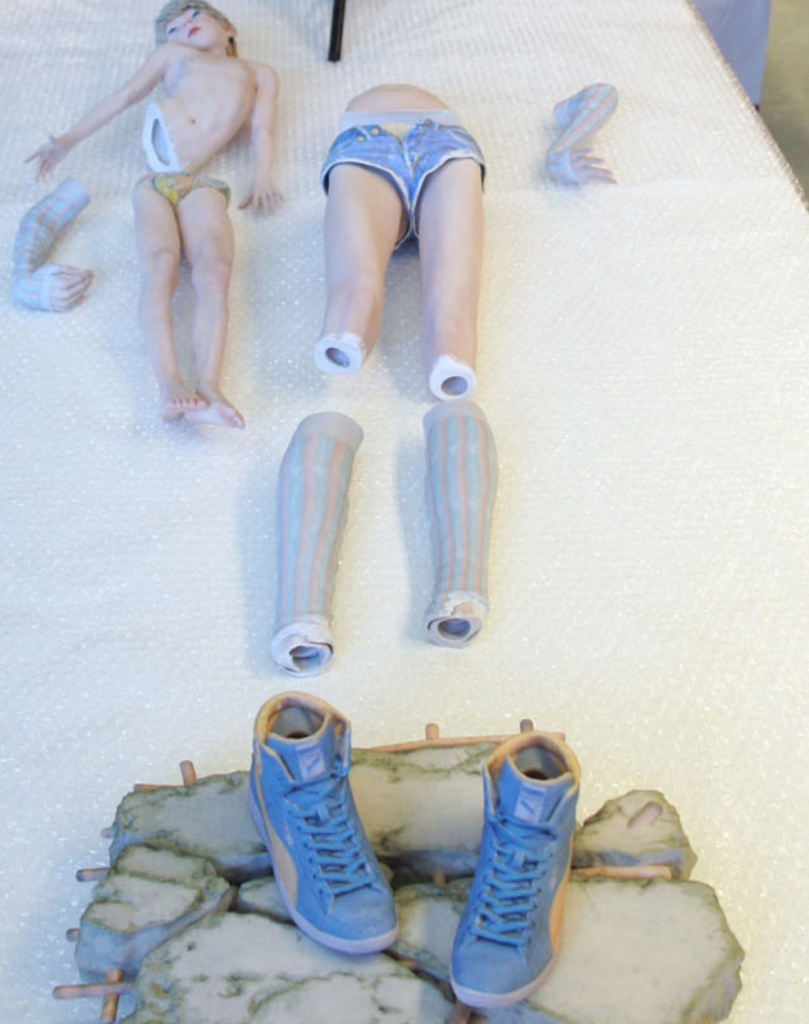
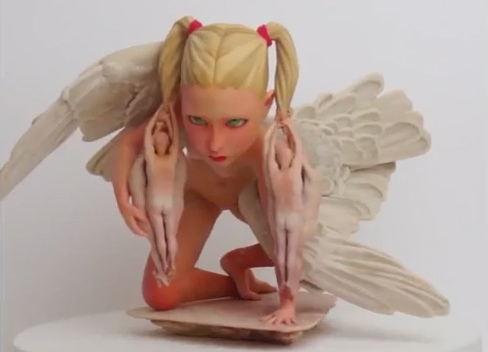
Because I have been a fan of Eric’s work, I have signed up for Eric’s email newsletter. I love to hear what he is doing. Basically, Eric has been creating fine art pieces through 3D printing. What intrigues me about Eric’s work is that the is not just 3D printed artwork in plastic, but instead the pieces are 3dD printed in color He is just not “manufacturing” work, but selling them as fine art. I have often stated that the themes of Eric’s work are a little risque, but in a way they are charming and the soft almost sugary look that printing in color on the ZCorp 650 gives a sweetness and innocence to the piece that I don’t think would be there in another medium.
Again Eric pushes the limits, this time with size. You see the ZCorp 650 can only print 37 x 25 x 20 cm , which is approximately 14.5“ x 10 x 8 inches. So Eric created 10 different interconnecting parts that are glues together. Also, the ZCorp 3D printed parts are not the strongest pieces to work with, that is why they are strengthened. Eric says “they are probably stronger than you think, comparable to ceramics.” But still, he is nervous about transporting them.
I can’t wait to interview all of these creative and wonderful artists for the book, and I’m so thankful they are going to share their process, vendors and materials with us through 3D Technology in Fine Art and Craft. Apparently I’m not the only one who is into inspiring and encouraging the marriage of fine art and technology.
Eric’s work will be exhibited at the art fair REALISME in the Passenger Terminal in Amsterdam.
_______________________________________________
Bridgette Mongeon is a sculptor, writer, illustrator and educator as well as a public speaker.
Her blog can be found at https://creativesculpture.com.
She is the vice chair of the planning committee for 3DCAMP Houston 2012 and 2013 http://www.3dcamphouston.com
Follow the artists on twitter twitter.com/Sculptorwriter
Need Help With This Part Of A Chapter- 3D Printing And Investment Casting
I spend a lot of time on the internet searching for new technology or posting comments on my groups on linkedIn. I am writing a book about using 3D technology in both fine art and craft. I’m putting some of my questions and thoughts below. Please feel free to add to them with things you have discovered, correct my errors in the technological processes, and when possible cite your comments or background. Please let me know if I may quote you if that applies. Also, I’m looking for examples with incredible art. I’m not into showing the creation of oil valves or common items, though that may be what some of these processes are made for. If you have samples of artists or art using these processes, please contact them and see if they would like to be featured in the book and then let me know. I would love to hear about their processes. If you are interested in having an artist try your products to be featured in the book, contact me and I’ll either use my own work, or if I am busy writing, pass it on to another artist that I want to feature, and whose work is top notch.
Investment casting and 3d printing.
Today my search leads me to the topic of 3d printing and investment casting. I’m going to summarize some of my questions in this post and then send this around and hope that some professionals in the industry will be able to help me. It is also my hit list of professionals and companies that I am trying to reach. (Not an easy job as I am presently writing from New Mexico instead of my home base in Houston, Texas, and I do not have my hit list here. This NM trip is another story all together.)
Many things can be burned out of an investment casting. The things I’m noting when discussing these processes of burning out are; detail, a clean burn, temperature, cost, toxicity and build envelope. The few things I am covering in this section of this chapter are listed below. If there are some I have forgotten please feel free to let me know.
ABS and PLA-
Of these I know that PLA is preferred because of the toxicity of ABS. I also have the extrude temperature of ABS as 225 and of PLA 180-200 I suppose this will also depend on the supplier of both materials, but in general is this correct? If this is the extrude temperature what would be the burn out temperature for investment casting?
ABS
* Detail—
* Clean burn?—
* Temperature—
* Cost—
* Toxicity—
* Build envelope–
* Machines and stats and service bureaus and stats–
PLA
* Detail—
* Clean burn?—
* Temperature—
* Cost—
* Toxicity—
* Build envelope–
* Machines and stats and service bureaus and stats–
PAPER AND CERAMIC
In a podcast interview with fellow artist Paul Effinger we talked about burn out quite a bit. But this interview and the accompanying book that I wrote, “Digital Sculpting With Mudbox: Essential Tools and Techniques for Aritst “ with Mike de la Flor showed his work. I believe that his piece “Artifices” was 3d printed with a ceramic powder and dipped in a resin binder. The piece, that we featured on page 187 of the Mudbox book, was apparently printed on a ZCorp510. OK 3Dsystems. So, any updates on systems doing this and details.
The Mudbox book was written in 2009 and printed in 2010 and was one of the first books to feature a chapter on 3D technology in the art. I’m curious how the technology has advanced. What machines and service bureaus are printing paper or ceramic for burn out. How do they compare with the detail, a clean burn, temperature, cost, toxicity and build envelope?
I know that mcor technologies is doing some great printing with paper. I’d like to feature them in another part of the book because I love the color work, but I’d also love to talk to them about investment casting and 3D printing of paper.
With these products it appears that many are dipped into a solution. If your product is dipped please clarify what it is dipped in and why. Also, as an artist I am concerned if a piece is dipped in anything as I know that the dip will really affect the texture on a piece. I love texture on my artwork and this would be very difficult for me.
Also, with all 3d printing texture is more than just what I put into it, but what the material that is being burned out can affect the look of a piece . I have created molds from wet clay, dry clay, and oil base clay and the same figure will look totally different depending on the item being molded. I’m interested in investigating this more with the 3d printing.
WAX
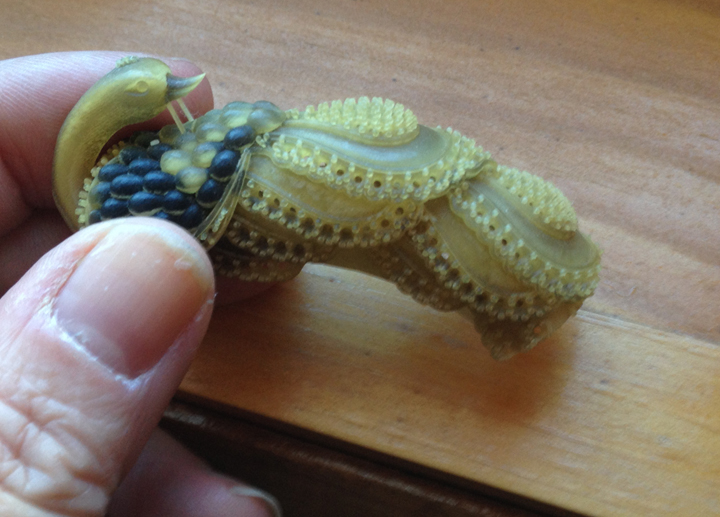
I’m pretty impressed with what I have seen with the wax 3d printing. This piece was sent to me from 3D SYSTEMS a few years ago. I love the detail and take it with me on all my lectures to show as an example. Going to have to dig in my contact list when I get back to the office to find out who sent this to me, and what machine it was printed on. This definitely is an example of the quality/detail that I am trying to show in this book. So what machines are printing wax for investment casting? How do they compare?
I also loved what I saw at envision tech and would love to find someone from this company to talk to.
* Detail—
* Clean burn?—
* Temperature—
* Cost—
* Toxicity—
* Build envelope–
* Machines and stats and service bureaus and stats–PAPER AND CERAMIC
.MGX by Materialize.
I know that .MGX by Materialize has been working on a large build envelope and investment casting. I won’t describe it here, but when I interviewed Joris Debois back in 2010 , we talked about it. We were in contact about 2 weeks ago. I look forward to hearing from.MGX by Materialize. Their process will be a major section in this chapter.
* Detail—
* Clean burn?—
* Temperature—
* Cost—
* Toxicity—
* Build envelope–
* Machines and stats and service bureaus and stats–PAPER AND CERAMIC
Thank you for everyones help. Please feel free to respond here or on linked in, or contact me and let me and we can set up a time to chat if necessary. Thanks in advance,
Bridgette Mongeon
Also note: This section is just about burn out. I am also interested in other parts of 3D technology that are entering or may influence the traditional process of fine art bronze casting, such as what is mentioned in the American Article that I wrote for Sculpture Review in 2007. I’m going to hit up exone and Bob Wood again about printing the investment instead of the piece for investment. I’m wondering how that has changed over the last few years. The 3D printing in metal is discussed in another section.
An Encore of “Taming The Beast” Presentation
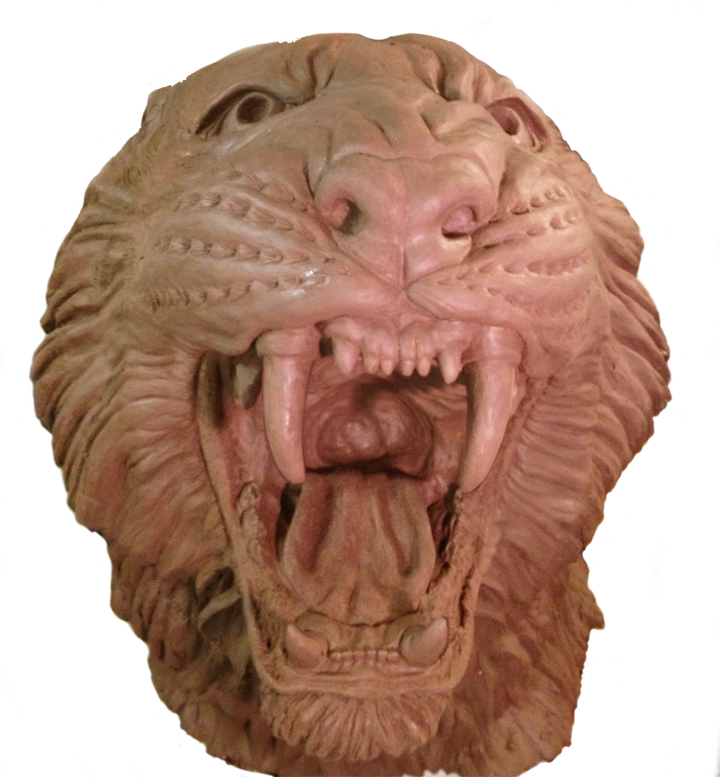
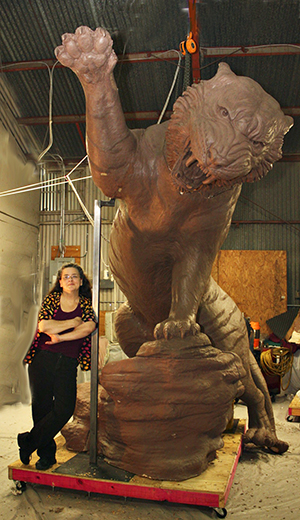
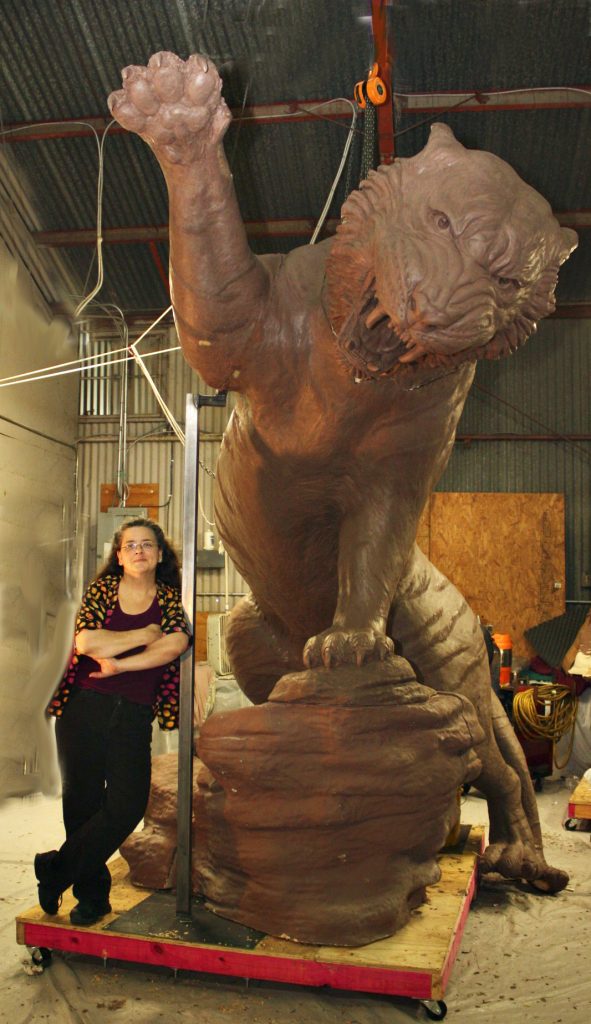
I’m in Sata Fe this week checking the progress on the Grambling State Louisiana Tiger. While here, I presented a lecture called Taming the Beast: 3D Technology in Fine Art and Craft. In the lecture I spoke about the creating of the tiger, how 3D technology is advancing, and how artists are using 3D technology in their workflow. The lecture features a modified and very shortened version of what will be in my new book, 3D Technology in Fine Art and Craft. Shidoni Foundry hosted the first Santa Fe lecture.
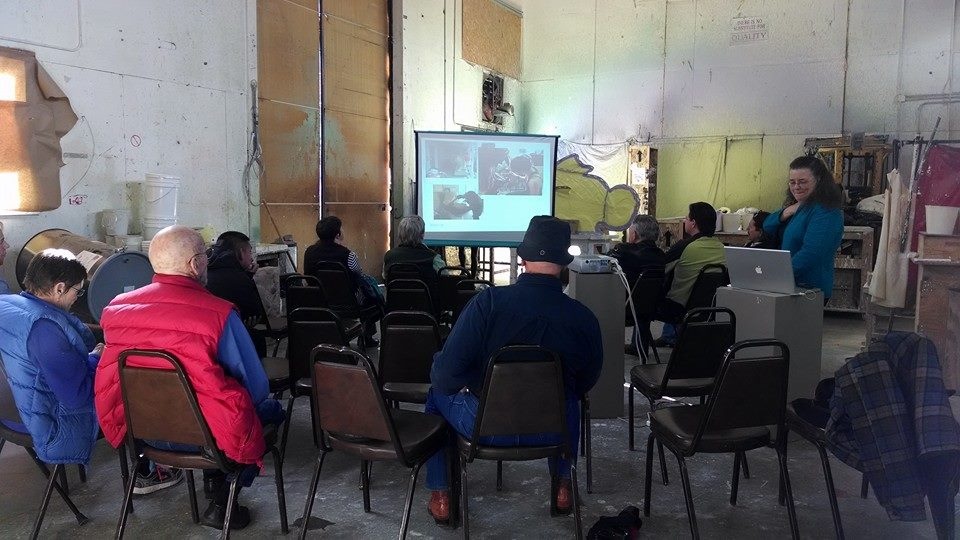
I gave the second presentation of Taming the Beast at a private gathering at Mary Anne’s Stickler’s home. Mary Anne is my host while in Santa Fe and has opened her lovely home to me.
There has been discussion about doing yet another repeat performance of the lecture while I am here. I have extended my stay, and I am in town until the 27th. If we can schedule this, I’ll let everyone know the date, place and time – probably through this blog post or Facebook, so feel free to like my Creative Sculpture facebook page, and comment here on this blog post or on Facebook about the best dates for you, and if you would like to attend. We don’t need a big crowd, 8-20 people is fine.
I will also state that for those people who have heard the lecture, you might also be interested to note that Shidoni Foundry has regular bronze pours on noon on Saturday. If you have never seen this take place it is breath taking. Here is a video they helped me create when they poured the tiger head. Give them a call to reserve your space,1508 Bishop’s Lodge Rd., Tesuque, New Mexico 87574 (505) 988-8001. You can also request to see the beast.
If enough people are interested, and Shidoni is agreeable, maybe the repeat performance can be done there on Saturday morning, before or after a pour. Let me know your preferences, I’m also open to another venue if someoone has suggestions.
For future reference, a Santa Fe artist asked if I would come back and do the lecture in Albeququerqe in the Spring, he is organizing it. I’m delighted. If you know of anyone in Albuquerque that might like to be a part of this as either and attendee, sponsor or would like to host, please let me know I’ll pass the information on to him.
IF YOU ATTENDED EITHER LECTURE
I would greatly appreciate your comments. Please feel free to post them below. Please note, if you comment you are giving me permission to use these elsewhere. These comments are very valuable for me because they help others get a feel for a lecture. For example two that I use quite often concerning my Marketing in the Arts workshop state:
“This workshop is a necessity for every practicing artist and student. I commend Ms. Mongeon on the development of such a resource. “
Professor David Hickman University of Houston
Former President-Houston Society of Illustrators
“I left the room with the certainty that if fame and fortune were going tobe mine, it would only occur if I took the bull by the horns, and you showed me not only where the bull was but how to get the horns, as well.
Besides your ebullient enthusiasm, which is highly contagious, you also shared with us lucky attendees really practical steps to getting where we want to go. I left the lecture with a suitcase of ideas.”
Mary Erbert
Artist-Houston
IN CLOSING
I would like to thank everyone in Santa Fe for their warm welcome and excitement over my work and my research. if you have attended Taming of the Beast: Using 3D Technology in Fine Art and Craft , please feel free to comment here and and include your name and title and location, also let me know what you think about a time , date and place of a repeat performance of the lecture.
Private Gathering on Art and Technology
shared information about incorporating
3D technology in the traditional sculpture
studio at Shidoni Foundry. The lecture
culminated with a viewing of the cast
sculpture and a foundry pour.
As many of you know, I am in New Mexico approving the sculpture of the 14+ foot bronze tiger that I created for Grambling State University in Louisiana. It is being cast by Shidoni Foundry. I also gave a presentation at Shidoni Foundry titled Taming the Beast: A Lecture on Fine Art, Craft and Technology. The lecture is about the process of creating the tiger, but also about some of the items in the new book that I am writing titled 3D Technology in Fine Art and Craft.
My very gracious hostess here in Santa Fe, Mary Anne Stickler has offered to have private gathering in her home for some of her friends who are interested in art, and great conversation. I’m so honored.
Date: Monday, November 18th
Time: 4:00 p.m.
If you miss either one of these lectures and gatherings, don’t fret. I’ll be back this spring doing something similar in Albuquerque-details to come. Oh, and if you want me to come and speak in your area, just give me a call.
_____________________________________________

Bridgette Mongeon is a sculptor, writer, illustrator and educator as well as a public speaker.
Her blog can be found at https://creativesculpture.com.
She is the vice chair of the planning committee for 3DCAMP Houston 2012 and 2013 http://www.3dcamphouston.com
Follow the artists on twitter twitter.com/Sculptorwriter
Taming The Beast: A Lecture On Fine Art, Craft And Technology
Taming the Beast: A Lecture on Fine Art, Craft and Technology
Sculptor Bridgette Mongeon will be presenting a lecture on incorporating digital technology in traditional art and craft on Saturday, November 16, 2013 at 10:00 at Shidoni Foundry, 1508 Bishops Lodge Road, Tesuque, NM 87574.
Digital Sculpting, CNC milling, and 3D printing, combined with traditional sculpture, is the way that Bridgette tamed the 15’ tiger that she sculpted for Grambling State University. Shidoni Foundry in Santa Fe, NM is casting the beast!
Bridgette will be discussing the technology, her process and how others are combining the technology in art, craft and science. The creative event will culminate with a viewing of the completed bronze tiger and a demonstration of a Shidoni bronze pour. Space is limited. To reserve space for Taming the Beast contact Shidoni Foundry office, 505-988-8001 ex 114
About the Artist
Houston, Texas sculptor, Bridgette Mongeon, is a traditional figurative sculptor of over 30 years. Bridgette began to incorporate digital technology in her work in 2008 and coauthored the book Digital Sculpting with Mudbox: Essential Tools and Techniques for Artists. Writing and lecturing about; art, marketing in the arts, creativity, and digital technology, gives her great pleasure. Bridgette holds a BA from Vermont College and an MFA from Goddard. She is presently working on a new book about 3D technology in art and craft.
_____________________________________________

Bridgette Mongeon is a sculptor, writer, illustrator and educator as well as a public speaker.
Her blog can be found at https://creativesculpture.com.
She is the vice chair of the planning committee for 3DCAMP Houston 2012 and 2013 http://www.3dcamphouston.com
Follow the artists on twitter twitter.com/Sculptorwriter
3D Technology in Art and Craft – A Question- 3D Printing in Color
I’m working on a new book that details 3D technology in Art and Craft. It will describe how to create art using such things as 3D printing, 3D scanning, 3D sculpting and 3D milling. It will show how to combine these technologies with traditional art and craft. It will also contain interviews with businesses and artists to discuss their processes. Finally it will be a one stop book that features vendors and other resources.
I’m culling through my many years of research and writing on this topic. I studied 3D technology as it is combined with art as my MFA, and have written and lectured on this topic often. I’m also looking at the new technology that is coming out. In light of that, I thought I would post some of my own questions on the topic. If you have an answer to these questions please feel free to post in the comments section of the blog or drop me a line. Please cite your answers when possible. I greatly appreciate it.
3D Question- printing in color.
I’m intrigued with printing in color.
As part of the book I really want to walk the reader through creating a piece of art that uses 3D scanning and 3D printing as the art interacts with natural surroundings. I wrote about that in a previous post. I love the video created by Greg Petchovsky who takes objects in the real world and then recreates them or adds to them in a 3D program and then prints them out using a 3Dprinter. I contacted Greg about this project, asked him how he scanned the color and what other details he could tell me about the quick projects in the video. He was kind enough to answer some questions. Here are his comments from the e mail
had my prints done by Shapeways, they used ZCorp 3d printers.
The material isn’t waterproof, it will warp and develop white discoloration if exposed to water. I haven’t left 3d prints outside for a long period of time, so I’m unsure how long they would hold up.
I set up the scale in 3ds Max. I just used calipers to measure the object, but in future I’m thinking I’d include a wooden ruler in the scan.
I don’t think I’d use masks or visibility to make meshes fit into each other. I’d try to use booleans. I haven’t experimented all that much with booleans in zbrush, but basically there’s a button over each subtool that lets you chose between additive, subtractive, or intersection. And the resulting mesh can be calculated using the “remesh all” button… though the results might be somewhat mushy. I believe similar (possibly better?) results can be achieved with dynamesh? And I guess the details could be re applied using projection.”
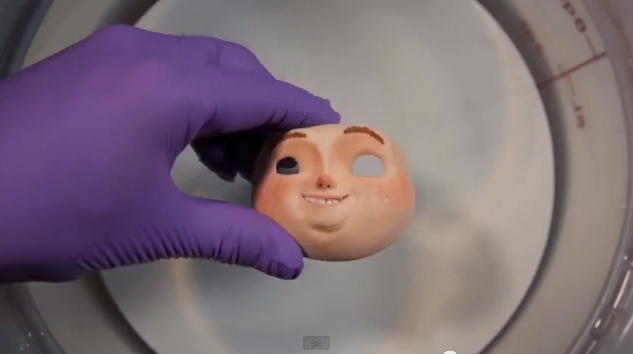
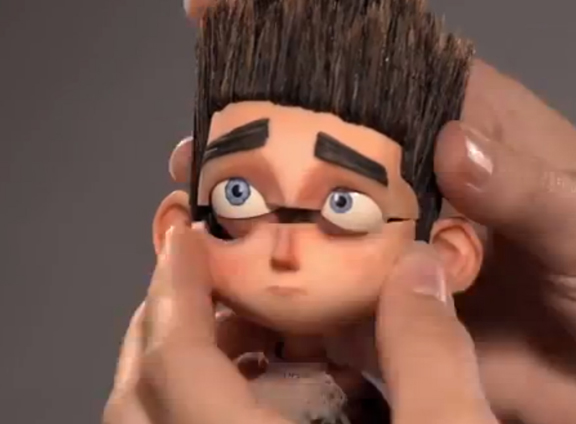
I am also intrigued with the work of Laika and how the puppeteers created the pieces for the making of the movie Paranorman. Each puppet was created using different expressions. These expressions were used with stop animation and some computer graphic work to create the film Paranorman. I’m assuming the super glue will help to strengthen the piece as well as keep it clean.
It is reported by the University of Texas at Austin Architecture school, in this article that using super glue can double the price of a 3D printed piece. I’m still not certain what the process is of “dipping” a piece in super glue/acetone. Seems like it would make a mess and be very difficult to handle. I can’t believe no one has figure out another way to harden these materials. Also, it looks like none of these things printed in color can be used outdoors, so I may have to modify my example for the book to use drift wood instead.
I contacted one of my go -to people on 3D printing Paul Cesak, who just happens to also be the guy that started the 3D printing group on linkedin. The 3D printing group is growing by leaps and bounds. He replies “only with 3D Systems can a 3D print have the full spectrum of color. The downside of that is that it is printed on plaster, is very fragile, and has the texture of sand. Indeed small details are either not printed or are lost in the post-processing.”
I contacted one of my go -to people on 3D printing Paul Cesak, who just happens to also be the guy that started the 3D printing group on linkedin. The 3D printing group is growing by leaps and bounds. He replies “only with 3D Systems can a 3D print have the full spectrum of color. The downside of that is that it is printed on plaster, is very fragile, and has the texture of sand. Indeed small details are either not printed or are lost in the post-processing.”
Another artist that I will be interviewing for the book is Eric Van Straaten. This video shows his work being created. I’m not sure he uses anything to strengthen his pieces. I’ll let you know after we talk for the book.
I have many questions.
QUESTION: how does an STL translate color? I though STL files did not have color?
QUESTION: What 3D printers can print in color?
QUESTION: If this is done through SLS printing, how does the laser depict color? ( I’m wondering if this can be explained simply)
QUESTION: is there nothing else that can strengthen the pieces using this type of 3D printing?
_____________________________________________

Bridgette Mongeon is a sculptor, writer, illustrator and educator as well as a public speaker.
Her blog can be found at https://creativesculpture.com.
She is the vice chair of the planning committee for 3DCAMP Houston 2012 and 2013 http://www.3dcamphouston.com
Follow the artists on twitter twitter.com/Sculptorwriter
Help With A Creative Adventure
As I posted in a previous post, I am writing a book Tra-digi-2014 Sculpture: Using 3d software, milling, scanning and printing in art and craft. In one section of the book I am interested in documenting how to scan things in nature and then create 3d objects in the computer that fit into nature. I suppose I was first introduced to this incredible concept by an online video that I found and played at 3DCAMP Houston 2012. The video created by Greg Petchovsky takes objects in the real world and then recreates them or adds to them in a 3D program and then prints them out using a 3Dprinter.
A rather industrious project that I am trying to do and to record for the book is to create a home in a hole in my tree. I have scanned the tree using 123D catch and would love to be able to get what I need from using just that program, as it is extremely easy to use and free. Free is good because it is not a stumbling block to the readers of the book. I do plan on scanning it with my Next Engine Scanner as well. It will be interesting to see exactly what I will need to complete this project.
I’m going to contact Greg and ask him some of my questions. I will also be looking for printing companies that can help me create this piece for the book, yes, I am happy to plug your company. I’ll include Greg’s video below as well as a short clip of my results from 123D Catch and ZBrush.
Like I need to make this job any harder, I also hope to create some interaction with the piece. That means that I want to hide sensors, lights … so that things that will happen when one walks by. Now to do this part I plan on contacting my resources at TX RX to help me figure out the electronics, and I’m sure that trying to hide these things in channels in the artwork will also pose a challenge.
I won’t be able to update my process on this project here, as I don’t want to spoil it for those wanting to read the book. If you should be able to help with any of my questions, suggestions or thoughts please contact me through my contact form on my website or through facebook.
Video by Greg Petchovsky
Video of my scan and ZBrush
Questions
How do you see the color when it is in Zbrush, as Greg has in the video?
Where did Greg have his printed, in what machine?
What is the stability of the color and what products can work outside?
Any secrets to how to get the size to match. I’m back to the idea that Zbrush really needs real sizes.
Zbrush- is there away to create an object that will fit in the hole of the tree, and perhpas use a mask and visibility to get rid of the areas that are not needed?

Bridgette Mongeon is a sculptor, writer, illustrator and educator as well as a public speaker.
Her blog can be found at https://creativesculpture.com.
She is the vice chair of the planning committee for 3DCAMP Houston 2012 http://www.3dcamphouston.com
She is also the owner and creator of the God’s Word Collectible Sculpture series http://www.godsword.net
Follow the artists on twitter twitter.com/Sculptorwriter and twitter.com/creategodsword
Listen to The Creative Christian Podcast or the Inspiration/Generation Podcast
Click on Podcast Host Bios for a list of all podcasts.
I Really Need A Measuring Tape in ZBrush or Mudbox
When I started in ZBrush and Mudbox years ago, the computer graphics world ( CG) would often say, “Why do you want to get things out of the computer?” I felt like I was just told I had purple spots on my face. I am a traditional sculptor who uses digital process to create sculpture in the physical form. I have a variety of things that I do that incorporate both traditional and digital or what I call tra-digi art. I know my use of these digital processes is not the way others use them, but it is how I make my living. Oh, and by the way, if you ever want to bring me in to lecture on this subject I would be happy to do so.
When I was at the ZBrush booth at SIGGRAPH last year I saw that someone mentioned that others were translating their designs into the real world. So, I’m not alone.
PIXOLOGIC>>>>GIVE ME A MEASURING TAPE.. PLEASE!
Over the years I have found one thing is a constant – I need a measuring tape! The hard part about this is that in the computer your sculpture is not really any size. It lives in a virtual world with virtual coordinates. However, to get this virtual sculpture to live in a real world I need to compare it to the real world. Over the years this problem has come up again and again.
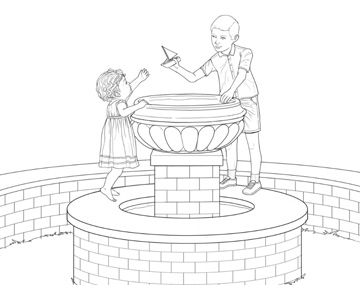
I would still need to create this digitally.
PRESENTATIONS- Comparison to what is there.
This usually happens when I’m working out the design, For example the landscape architect gives me blue prints and I need to come up with something. In the case of the fountain I could go and take pictures of what was created on the job site. The client wanted two children, and I was to incorporate the fountain base, and another piece that would sit on top. I would have loved to create this in ZBrush, but I opted for a simple sketch because of the limitations of measuring.
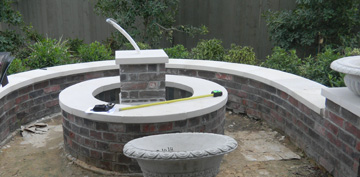
CAN I SHIP IT?
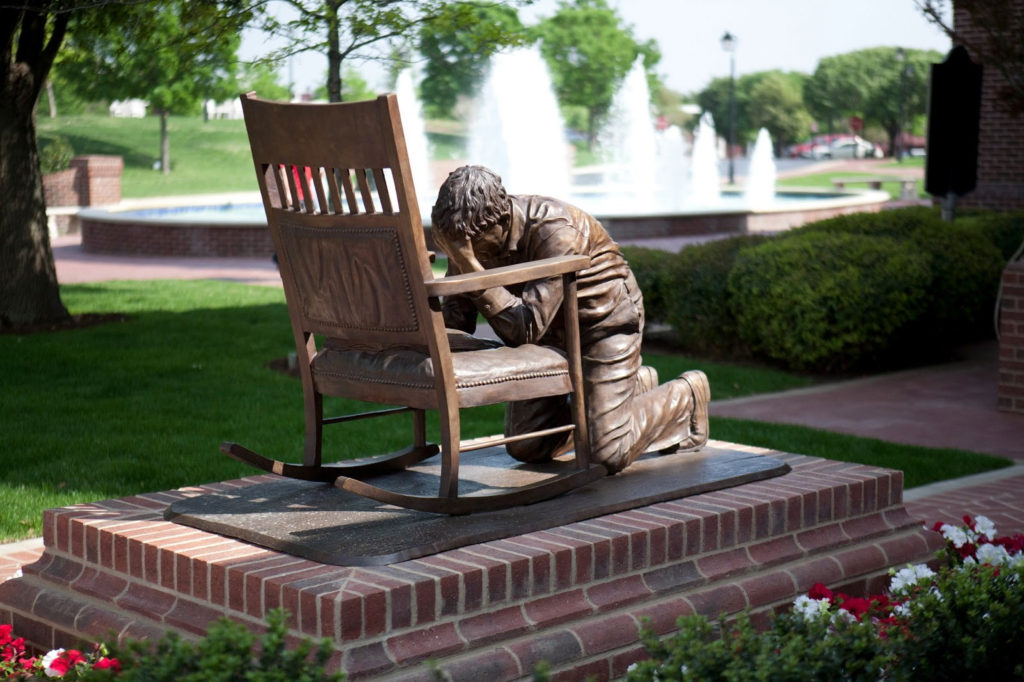
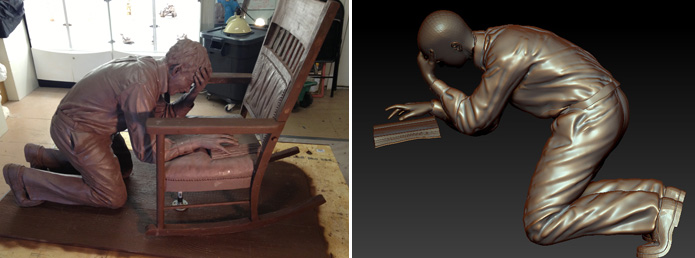
I know that someone working in the computer may not be thinking about shipping their final product. But I ship bronze sculptures all of the time. In many cases this is something I work out in the design process. If I can figure out how to modify the sculpture sometimes, it can save thousands of dollars. For example, I modified the design of the floor of the sculpture of the praying man to be able to fit the width of my van and still be life-size. I was able to do this in the sculpting process when in my traditional studio but there are other times I need this as well. Shipping the Tiger sculpture from my studio in Houston, Texas to Louisiana is a massive investment 7,000- 10,000. The tiger will have to ship on its side. However, I need to be sure that it can do so and fit on the flat bed trailer with packing.
MILLING?
Most of my sculptures, once created and revised in the computer are enlarged digitally in foam. This takes the place of doing the traditional armature of welding and pointing up as done in the past. Synappsys Digital Services does most of my enlarging. They figure out the mass if I give them the height, but it is often necessary to figure measurements out in the design. In
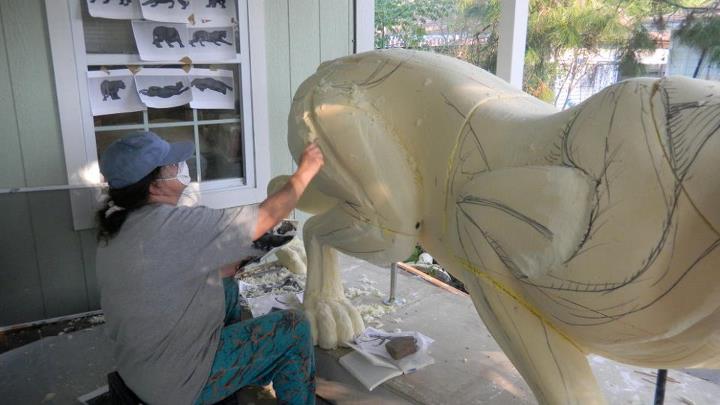
Often in the design stage it would help to be able to say, if it is this height,
what is the width at this place in the sculpture.
the case of the Tiger sculpture I lowered the head and the arm of the tiger, mostly because I could not find a warehouse big enough to allow me to sculpt that size piece. Subtracting a foot, by lowering the hand/head helped the design, but also give me a little more room to work. I would not have known to do that had I not measured in advance.
ARMATURE?
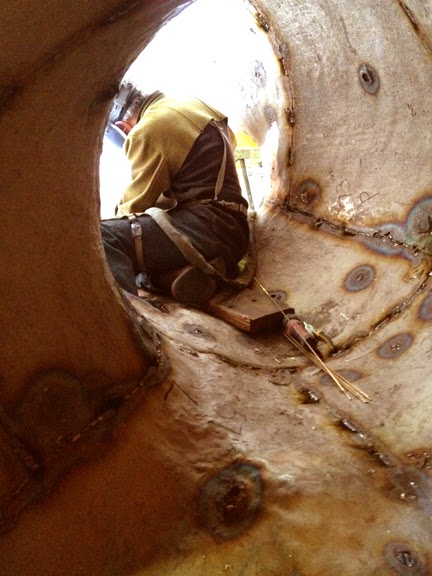
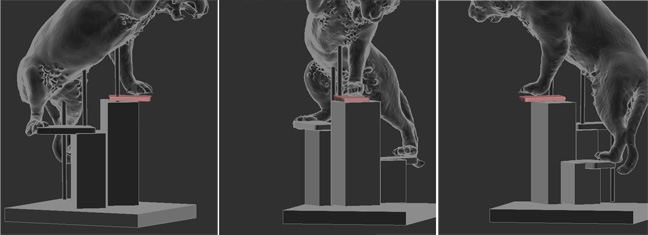
I’m taking time to write this post as I work diligently on trying to figure out the armature for the 13+ foot tiger. Though I can twirl the image around in my computer by pressing certain keys, in the real world this sculpture will have gravity and weight to deal with. The foam of the tiger, once togther will probably weight about 170 lbs. Then we add a layer of wax and a fine layer of clay. This will probably add about 400+ lbs to the tiger alone. Having the proper armature to hold this tiger up is imperative. Without it I could have the entire thing fall and, God forbid, be under it when it does. If I had a measuring tape in zbrush I could be making a schematic for my carpenter to build my base and armatures. I am also looking at a way to create the sculpture separately cutting the pieces in 1/2 so that I don’ t have to carve 15 feet in the air. Oh I wish I had a measuring tape.
Work around.
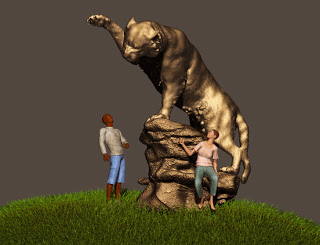
Yes there are probably ways to work around this. For example, I know the man in the scene if 6 feet, I can make a long flat piece that measures 6 feet and work with that. But being able to give one element a size, the man is 6 feet—and then able to click anywhere else on the sculpture to see what that size is in relation to the given size of the man- this would make my life a lot easier. So how about it Pixologic? Can I please have a measuring tape in the next version?
These are only a quick few ways I can see that having a measuring tape in a program like ZBrush or Mudbox would really help my work flow, and might even help to extend the buyers of these programs. In my speaking engagements I often tell my audience that I turned to the use of digital tools to extend my career. Pushing around clay with my hands has caused some great aches and pains over the years. Most of my audience wants to learn these processes as well, for just these reasons. Please give a listen Pixologic and Autodesk lets see how you measure up!
_______________________________________________

Bridgette Mongeon is a sculptor, writer, illustrator and educator as well as a public speaker.
Her blog can be found at https://creativesculpture.com.
She is the vice chair of the planning committee for 3DCAMP Houston 2012 http://www.3dcamphouston.com
She is also the owner and creator of the God’s Word Collectible Sculpture series http://www.godsword.net
Follow the artists on twitter twitter.com/Sculptorwriter and twitter.com/creategodsword
Listen to The Creative Christian Podcast or the Inspiration/Generation Podcast
Click on Podcast Host Bios for a list of all podcasts.
Figuring Challenges, Both Digitally and Traditionally
Here is the challenge
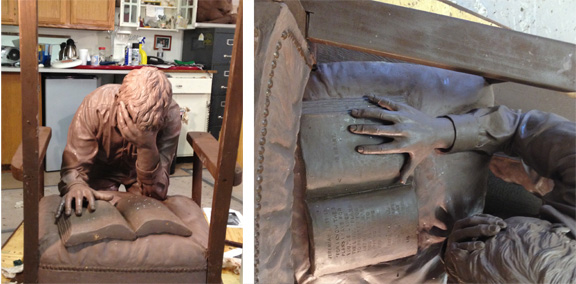
I’m trying to create quite a bit of text in a sculpture. Traditionally I prefer when text is created in a sculpture is is recessed as apposed to sticking out of the clay. Usually I create this type of affect with the following steps.
TRADITIONAL WAY
1. Set the text in a program on the computer. The kerning or the spacing between the letters must be a lot as you want the words to translate to the clay and not get cut apart in the steps that are to come up- the mold making, wax pouring and bronze casting.
2. Text also must be a good text for this process. Having small white space in the middle of a P is hard to keep through this process. I usually go with a Futura or Helvetica type face and make it bold. In this case all upper case will translate better through the process.
3. Print out the properly kerned text and then lay it over the clay. Very carefully scribe each letter into the clay. Then when the paper is lifted off you must carefully cut each letter with an exacto knife, holding the knife on an angel so you get the “chiseled” look and the mold will pull easily.
The difficulty with this traditional way, even though I have already paid an intern to scribe every letter, is that it is taking me about 1 hour per 3 lines and I don’t really like the way it looks. So I’m exploring digital processes.
WHAT THIS IS FOR?
This is for a life size bronze sculpture. The bible that sits on the seat and is already roughed in. The client wants text in the bible so a scripture will be read. It will set into the bible, not come out of it. I started hand carving it but it is not crisp enough and taking forever.
POSSIBILITIES?
I have in the past had rubber stamps made for a sculpture, but remember these are in reverse. A vendor suggested using this company in Houston. They have done a lot of work for my other vendor American Collectors Studio
Lobue’s Rubber stamps# is 713-652-0031 ,1228 McGowen at Caroline
I also own a variety of “press in letters” for clay. But when you press in letters the clay has to go somewhere and so you get this bumpy look. It also is a fine art to make all of your words line up and not be bouncing all over the place. And finally will they have a good type face at the right size that you need? That is the hardest part. I will try to list these press in type letters at a later date. Some sculptors might find it useful.
DIGITAL WAY
I know that there are 3d printed materials that are flexible like rubber. So I am looking for this to be printed as a flexible material. Crisp text. That way, I can cut away the top layer of this clay page and set this into the clay. Because the bible is created with a dip the flexible material will allow me to creatively put it on the bible with the wave that it needs. So I’m presently searching local vendors that can do this in Houston. I know that I could probably go to imaterialze or Shapeways, but they do this out of the country and I’m on a deadline.
Jose at the University of Houston 3d printing department made a suggestion- more on that later.
BUT WHAT ABOUT YOUR FILE?
We needed an stl file. That is what is used for 3d printing. I tired doing this simple project of insetting copy in zbrush and did not have much success. I was disappointed. I love the program but really wish some things were not so hard. My 3d super hero husband created outlines in illustrator and brought it into 3ds max using Boolean to extract the type. We estimated it to be 1/4 inch thick with a 1/8 inset. I know that the more material the print the bigger the cost. I’m waiting to see if I need to revise the files. More on this later. Lets see what company saves the day, with as little cost and quick turn around!
MORE TO COME!
and the winner is…. Loboue’s! they are charging $80 a page, certainly worth it. Having it set digitally was 500-1,000. Sometimes the old way is the best way.
Bridgette Mongeon created this sculpture for Dallas Baptist University. If you would like to read the entire process on the artists project blog for this project visit http://prayingmansculpture.blogspot.com/ .
Back To A Panther Sculpture
I have recently been asked about the possibilities of taking the panther that I created for Prairie View A & M and making it into a smaller version or perhaps even jewelry. Of course the traditional process of sculpting a smaller version of the panther is always possible. But that process means a mold and casting and as a table top version the cost of this process can run a couple thousand dollars. I’m open to exploring other options.
With the melding of digital technology in my traditional sculpture studio optional technology is definitely a possibility that I am curious to explore. If you follow the blog on the Panther Project you know that the original panther design was created in the computer, and enlarged by SNYAPPSYS Digital services in foam. Clay was added to the foam for the final version. It was then put through the traditional mold making process for bronze casting.
This digital process of enlarging expedites my work tremendously. The difficulty is that digital models, as seen in the computer, rarely translate well to real life. There were many modifications that I did on the large panther. As the blog shows, I carved on the foam, accentuated muscles and features so that it would translate well into bronze and in some places even lengthened or added to the figure. I also modified the pose.
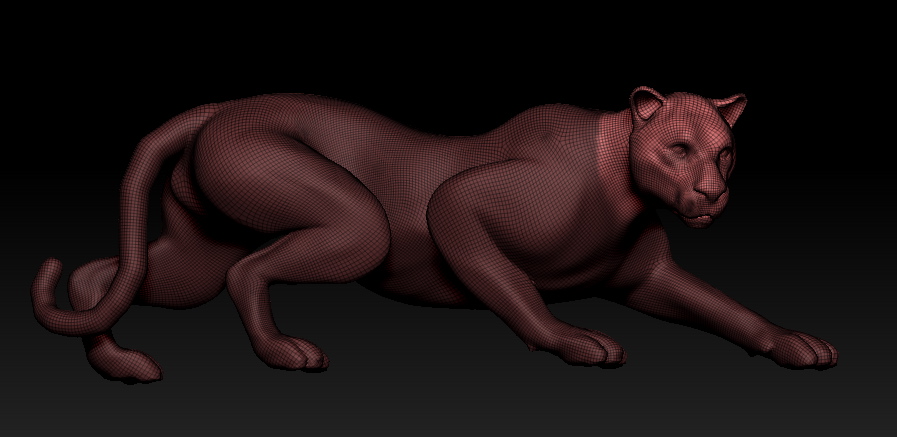
So, I’m back to the digital drawing board. I am opening the original file of the panther and comparing it to my traditional bronze piece. My goal will be to do more work on the digital version and experiment with printing it using the 3D printing process.
The program that I am sculpting in is ZBrush. I’m exploring the new features that are available in Zbrush 4R4 that were not available when I created the panther just a year ago. Features like QRemesher that helps me to retopologize the panther, or fix the geometry, so that I can create a better digital sculpture. I’ll report back on how the digital sculpting progresses, as well as how the 3D printing process comes along.
Project blog for the Prairie View Panther can be found at https://prairieviewpanther.blogspot.com/


