Evelyn Rubenstein
Working On Evelyn
Though Evelyn is not scheduled to be delivered for quite some time, I’m working diligently to get ahead of my deadline and I am making very good progress.
| Although I have a very good foam armature, there are so
many modifications that are made to it. The placement of the right thumb baffles me at first. |
| Sometimes you must look at the context of something
to see its proper placement. Severe modifications to the sweater are made. |
__________________________
This is the blog about the creation of the Evelyn Rubenstein sculpture for the Evelyn Rubenstein Jewish Community Center in Houston Texas. To see more of the artist work, visit her Creative Sculpture website and Blog
______________________________________________________________
- Bridgette Mongeon-Sculptor, Writer and Speaker
Bridgette Mongeon is a sculptor, writer, illustrator and educator as well as a public speaker.
Her blog can be found at https://creativesculpture.com.
She is also the owner and creator of the God’s Word Collectible Sculpture series
Follow the artists on twitter twitter.com/Sculptorwriter twitter.com/creategodsword
Facebook http://www.facebook.com/bridgette.mongeon
Listen to The Creative Christian Podcast or the Inspiration/Generation PodcastClick on Podcast Host Bios for a list of all podcasts.
Listen to the Art and Technology Podcast
Thinking About All That You Have Touched
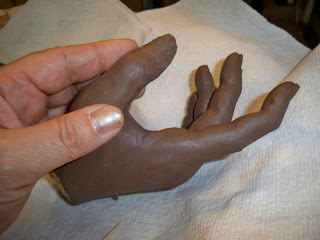
How much does one life play against another? How has Evelyn influenced those that have been in her life? It is very interesting to think about. I sculpt her hands and think of her children’s hands that held hers, the work that she did, the things she learned. Did she like to get her hands dirty, work in the garden? How about holding the hands of her grandchildren.
I’m noticing her hands, they are as much a part of her personality as her face is. They seem strong, not necessarily slender and delicate. They remind me more of my own.
As I work on Evelyn’s hands and look at her nails I am reminded I have gone back to wearing nail polish, not as an influence of Evelyn, but due to the fact that I am working so often in the clay it is almost impossible to get all of the dark brown clay out from under my nails.
Evelyn’s shirt is complete. I like it, her waist band on her skirt is complete. I want to move to the sweater, but first I must place her hands, place them on her hips in this wonderful pose.
You can follow along with this entire process of creating a life size bronze for the ERJCC on the Evelyn Rubenstein project blog located at http://erjcc.blogspot.com/
Coming Together
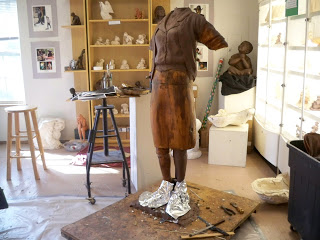
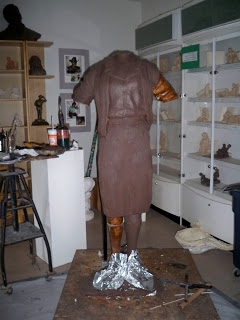
The sculpture has been coming together. I have put the legs on with my sculpted high heels. I was afraid they would get splattered with clay and foundry wax and so I have given Evelyn some tinfoil slippers. The skirt was shortened, and this means some work will need to be done with the legs, but I have decided to work from the top down. The entire sculpture is covered with foundry wax and then with clay. A former student who has come to learn mold making helps me by covering the rest of the sculpture with clay. When I see the skirt and most of the sweater covered with a thin layer of clay the sculpture becomes more intimate to me. I have only worked on the detail of the blouse adding depth and clay. The foam armature, though very helpful still needs adjusting and I often cut into it, put wax upon the foam opening and then more clay.
You can follow along with this entire process of creating a life size bronze for the ERJCC on the Evelyn Rubenstein project blog located at http://erjcc.blogspot.com/
My Recent Sculpture Is In Pieces
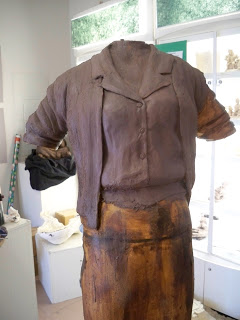
If you have been following this blog on the Evelyn Rubenstein Poject you have seen how the 3d image was created in the computer and then sent to Synappsys Digital Service for milling. This gives me my armature. However the foam armature comes to me in pieces. Now I must put these together. I do this using Spray foam and secure the pieces with skewers. Some pieces I might not put together yet, such as the arms/hands. I may want to play with their placement a bit after the clay is put on the armature.
However, I feel confident in putting together the skirt with the bodice and I can begin to see how she is coming together. The hands are very fragile and I also attach broken fingers and sand the foam. We are a long way from completing the sculpture, but I’m excited to get my hands dirty and I look forward to meeting Evelyn in the process.
You can follow along with this entire process of creating a life size bronze for the ERJCC on the Evelyn Rubenstein project blog located at http://erjcc.blogspot.com/

Sculptor, Writer and Speaker
Bridgette Mongeon is a sculptor, writer, illustrator and educator as well as a public speaker.
Her blog can be found at https://creativesculpture.com.
She is also the owner and creator of the God’s Word Collectible Sculpture series
Follow the artists on twitter twitter.com/Sculptorwriter twitter.com/creategodsword
Facebook http://www.facebook.com/bridgette.mongeon
Listen to The Creative Christian Podcast or the Inspiration/Generation Podcast Click on Podcast Host Bios for a list of all podcasts.
Listen to the Art and Technology Podcast
My Armature Is Delivered To My Door
I had been away and out of the studio for a week and while gone I was happy to see that Synappsys Digital Services, took the digital work that I had done and created and milled out my pieces. Here is a bit of technical information for any artists seeing this blog post. Synappsys has two CNC milling machines, a 21inch z axis, and a custom one that they designed and built— a 3 axis- with a 8′ rotary axis. besides milling Synappsys Digital Services, offers 3d rapid prototyping. They are in Norman Oklamoma which does not pose that much of a problem for me as a Texas artist as I can send them my files and foam pieces are light and will fit in a wardrobe box.
The process
Foam is put on the milling machine and the machine mills out the digital file that I have sent to them. The entire reason for this process is that it saves me time in creating an armature. I also can figure out some details of the process, and design which has been discussed in previous posts.
______________________________________________________________
You can follow along with this entire process of creating a life size bronze for the ERJCC on the Evelyn Rubenstein project blog located at http://erjcc.blogspot.com/

Sculptor, Writer and Speaker
Bridgette Mongeon is a sculptor, writer, illustrator and educator as well as a public speaker.
Her blog can be found at https://creativesculpture.com.
She is also the owner and creator of the God’s Word Collectible Sculpture series
Follow the artists on twitter twitter.com/Sculptorwriter twitter.com/creategodsword
Facebook http://www.facebook.com/bridgette.mongeon
Listen to The Creative Christian Podcast or the Inspiration/Generation Podcast Click on Podcast Host Bios for a list of all podcasts.
Listen to the Art and Technology Podcast
Detailed Description of The Process of Tra-digi Art
POSER, DAZ 3D and Zbrush- Creating of digital armatures
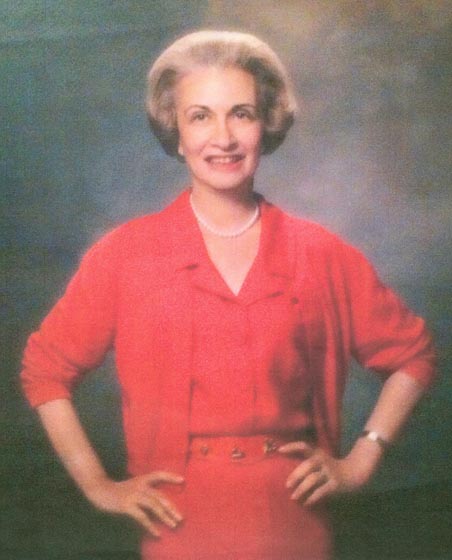
Evelyn Rubenstein Jewish Community Center.
This is a rather long and detailed explanation for a process that I use called tra-digi art. It is copied from my sculpture blog, and is intended to not only show the process, but help other individuals who are learning these processes. Tra-digi art is incorporating traditional processes with digital processes for artwork that is realized in a physical form.
In this project I’m trying to obtain an armature that I can use for the new life-size bronze sculpture of Evelyn Rubenstein. I know my pose, so I don’t need a tradition sculpted maquette to show my client. The pose is from a photograph that my client has of Evelyn in a suit. I am, however, missing some information such as the position of her legs. And I need to create a 3d model of this pose because I intend on having it milled for me. In other words, Synappsys digital services will take my 3d model enlarge it and mill it out in foam, instead of me having to go through the tedious process of welding medal, using spray foam and making a life-size armature as I used to do before the tra-digi process. This process is very similar to what I did with the 11 foot panther project.
So. using the provided picture and a program called Poser along with Daz 3d models and 3d clothes I can expedite my process by creating a similar pose to the one in the photograph.
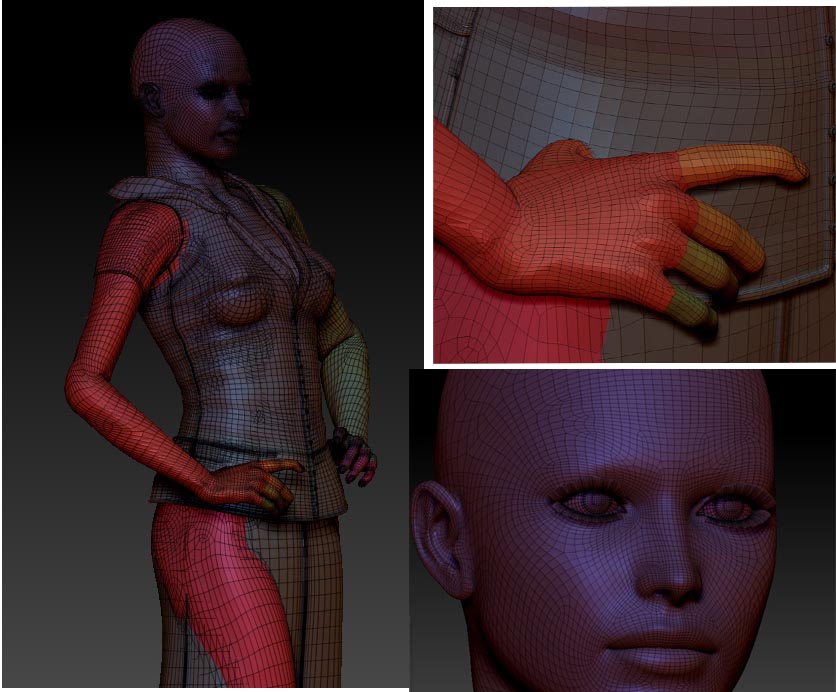
It helps me to be able to see and I can create the information that I don’t
have in the photograph, like her legs and feet
I really like working in Poser, though Daz 3d does have a free modeling program that does the same thing, I wish I had the time to learn it. Poser, feels very intuitive for what I am trying to do, I can push and pull, repose, try different things- meanwhile seeing my figure from all sides and getting to “feel” the pose. I’m not using Poser to “create my art,” instead it is just as one would use their clay, or how we used to use an old wooden maquette to get a feel for the pose and try out different elements. I have done this before and have a video of the Jenna project that shows this process in more detail.
In the picture of the Poser model on this page, it is showing the mesh, or underlying structure. I need to see this to be able to know how things will work as I continue on the sculpture. For example, this model has eyelashes. I would not want that “milled” out and so they must be taken out before I can bring it into zbrush.
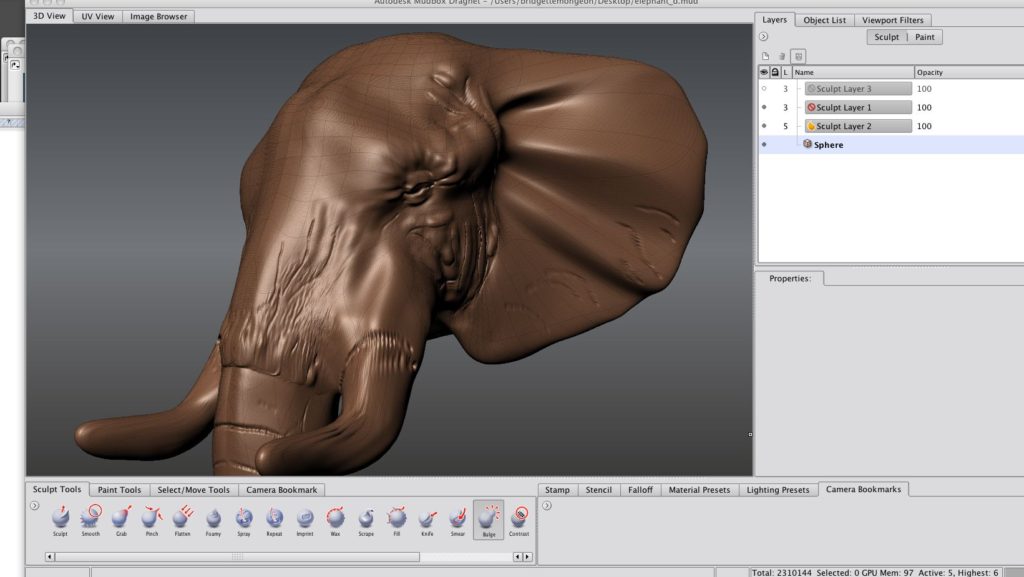
the underlying mesh or geometry. Then when you tried to sculpt
on the piece it would be deformed.
Zbrush by Pixologic, is one of the digital sculpting program that I use. It has quite a few new features. Dyanmesh being one of them. Usually Dyanmesh is used to sculpt from a blob, pull things out and then it remeshes the 3d model so there is no pulled or deformed geometry. This pulled gemoetry was one of the things I hated about digital sculpting, when I started years ago. Basically what this means is that behind every computer generated sculpture there is an underlying mesh.
If you double click on the elephant sculpture you will see a larger photograph that demonstrates the pulled mesh that I am speaking of. See how the squares are not uniform but some are bigger and further apart? Now, the digital tools are improving. It makes it more and more like traditional sculpture. For example, with Dyanmesh in Zbrush- just pull and push and add digital clay and then press a Dyanmesh button and the program magically creates your sculpture into an overall good workable mesh.

So far my workflow has been, Poser, and Zbrush, but I have had to do this in parts. When bringing the entire figure back into Poser I am using Dyanmesh to remesh the underlying structure so that I can revise it.
I had to experiment with a few different resolution settings. But I was able to get a pretty good mesh that I could work on. Problems with dynamesh with my process- holes. I found that I had some holes in the geometry in my piece when I remeshed using dynamesh in Zbrush. Just use the inflate tool and then remesh using dynamesh and this usually fixes the problem. Remember you are trying to get a basic geometry to work with. You can’t do details when using dynamesh.
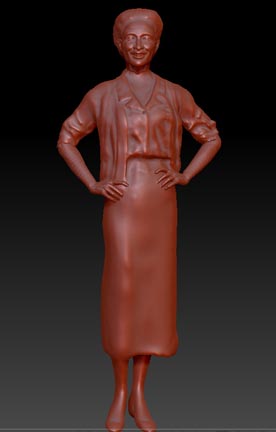
Still needs some work.
I believe I will shorten her legs
a bit as well as her skirt.
I also will add her pearls.
The back of the sculpture
needs work, I’m off next
week to take some pictures
of her daughter-in-law
with a sweater on
so I can see the folds.
Yes, I could have started from scratch and sculpted Evelyn in the computer from a ball of clay, but this way expedites my process. I can see what a mesh will look like coming from Poser and remeshed. I think this may work.
I worked on the head, which in this view still needs more hair and is not a true likeness of Evelyn, but has a good form to start with. Much of the final detail is done in real clay down in my sculpture studio. I also worked on her arms separately. Now that I have gotten her this far here are the problems I have to work out.
Height. I believe my original model used in Poser is too big, and after confirmation I find that the Victoria 4 base model is 5’10.5″ tall. My subject evelyn is 5’6″. This confirms some of the visual things I was noticing with this sculpture. The other thing is that I believe the skirt in this view is a bit too long. Call me a stickler but I’m going to shorten it a bit, or try different lengths to see what I like. Back to the drawing board. I’ll update more later.
If you are new to 3d sculpting and want to learn about topology, a wonderful video is created by Guerilla CG Called Subdivision Topology: Artifacts. It is a good thing to realize what is going on behind the scene, but I am thankful that the sculpting programs are making it easier for artists to sculpt without having to deal with the mundane but necessary topology.
Armature-Part 2
I have been using digital processes with my traditional sculpting processes for a while. A process I call tra-digi art. I was thrilled to create a book on part of this topic called Digital Sculpting In Mudbox: Essential Tools and Techniques for Artists.
It still feels strange to do so much work on a sculpture and not getting my fingers dirty in clay. But here I sit in my office, above my studio, working out details of Evelyn. The pose has been decided on, but there are some details of this pose that need to be worked out.
1. In what position are her feet? What is the missing information that I don’t have in my reference photograph?
2. How will she stand within her placement at the Evelyn Rubenstein Jewish Community Center? She is going in the lobby, but we need her to work well in the lobby design and, still be secure. That means she has to be secured to the floor and perhaps a third point. I’m considering hiding that 3rd place of securing in her right elbow sweater folds.
I will not be creating this armature in the traditional process as mentioned in part one, instead I will be creating the basic armature of her within the computer and Synappsys Digital Service In Oklahoma will take my 3d file and then mill out an armature in foam. Then, I will cover the foam with clay and add my details. You can see this milling part of the process in the video showing Jenna in the previous post. You can also see how we used a foam armature if you take a look at the Prairie View Panther Project Blog. The Prairie View Panther was a large 11 foot panther that was created in bronze for Prairie View University in Prairie View Texas.
In the next post you will see my process of working up the digital sketch of Evelyn for her armature.
Creating an Armature- Part 1
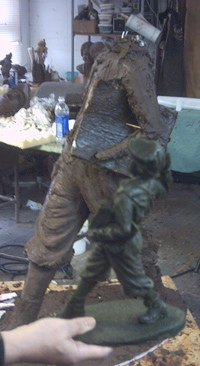
to the enlarged Newsboy sculpture
piece, point by point. This will
not be the process used to
create the armature of Evelyn.
Instead new digital process
will be used by the artist.
Traditional sculpture has changed for some over the years. When it comes to creating a sculpture for a client, many start with a small maquette, or small sculpture. This is usually done to try to obtain a pose and work out the movement of a piece. An example of creating a maquette can be seen in my Newsboy blog, and is shown on this page.
In the case of the Evelyn sculpture we are not going to create a maquette. Instead, we are going right to a large sculpture. The reason for this is that we know the pose. It has been decided on, and there is little to figure out in this sculpture project.

life-size sculpture
of the newsboy.
Going from a maquette to a large sculpture in the traditional process can be very, very time consuming, and up until adding digital technology to my process, it was one of my least favorite things to do. There is some detail about this traditional process in my journal of creating the newsboy. The process consists of measuring up the sculpture, point by point, creating an armature, made up of rebar, and or pipe, chicken wire, spray foam and then of course clay. It is time consuming and not a very creative part of the process, but it is necessary.
New part of my creative process
Over the last few years I have been incorporating both traditional process of sculpting with digital technology. You will see this in the up and coming posts about the armature. I call this tra-digi art. I love it, it expedites my process, gives me more control over my tools, and when these tools are used to help to create a pose, as the example of Jenna in the video below, it helps my client to visualize the piece.
Here is a video that describes how I have used tra-digi art in the past. Check back to see how we are using this with Evelyn.
The Pose
The pose of the sculpture to be created for the Evelyn Rubenstein Jewish Community Center- Houston has already been decided on. It will be the exact pose that you see of her hands on hips, sweater, suite and pearls. This pose was already decided on by my client before I came into the picture, but I love it. I think, it has a personal meaning to me as well.
I didn’t know Evelyn, I wish I had. I hope I can as I work on this project. Some tell me I develop a relationship with the deceased through my posthumous sculpture. I know it sounds a bit strange, but in hindsight, I guess that is what I do. I learn so much about them. It is important to me to do this, as I want more than a likeness, I want their essence.
What this pose tells me….
Back in the 80’s I was reprimanded for this pose. Yes, a man once told me a woman never puts her hands on her hips. I disagree. This pose says, I’m confident of myself, I’m friendly, but… don’t cross me, I know what I am doing. Perhaps, back in the 80’s with the man who said it to me, it was threatening to him. I’m overjoyed to see this pose that demonstrates not only strength but grace at the same time. Wow, how she does that is so impressive. I hope I can transfer that to the clay.
Often, when working on posthumous sculpture I get a “feel” for the person. This is most likely drawn by the comments I hear from others. That is why I count on the stories of others, and visiting with others about Evelyn.
What I feel about Evelyn today
Empowered.
Strong
Creating a legacy
I’m honored to work on this sculpture, and look forward to getting to know Evelyn a bit more.
A Wonderful Project For 2012- Finding Evelyn Rubenstein

I am very pleased to announce that I have been asked to create a life-size sculpture of a very influential woman of Houston. The Jewish Community Center has been renamed as the Evelyn Rubenstein Jewish Community Center. It is my job to capture not just the likeness of this woman, but the spirit and essence of someone I have never known. I’m up for the challenge, but unlike many of my other posthumous sculptures, it is difficult to find information on Evelyn. I count on family and friends to assist me with this process. For me posthumous sculpture is a cocreation between myself and those who know and love my subject. It is their stories that assist me with that etherial part of posthumous portrait sculpting. So if you knew Evelyn, please share your stories. You can do so through comments or by contacting me directly
The life-size sculpture will greet individuals as they enter and leave the ERJCC.
Here is an article in the Jewish Herald Voice describing the entire new renaming.

