zbrush
Measuring Tape in ZBrush
Recently I posted about my need for a measuring tape in ZBrush,. I created an entire post about my need. I have to say, this is not my first time requesting this from ZBrush, but it is the first time that someone replied and said, “hey, they finally gave us one and this is how you use it.” Apparently the transpose line can be made into a measuring tape. The transpose line is the line that comes up when you are trying to move, scale or rotate an object. To create the calibrations of the transpose line find “preferences” in your menu and scroll down to “transpose line” and then indicate your units of measurements.
Thanks to the guys on the Pixologic forum for sharing as well as the ZBrush, group on Facebook. I get all of my answers from these guys.
Thanks also to Pixologic for hearing my request for all of these years. I do find that I actually still have to count the units as I’m working. Don’t make the mistake like I did, If you want 13 feet you need 15 tick marks. I would suggest to set your measurements and then count the units to be sure it is correct. Missing a foot on my sculpture or even a 1/2 a foot would be tragic.
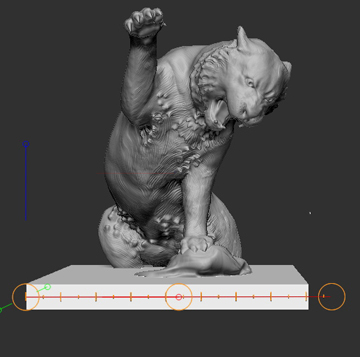
It would be great if all of the measurements actually appeared in a box when you used the transpose line. For example, after using the transpose line I could look ,and see if what I have drawn is actually the amount of feet I need? In the case of the tiger I have decided to sculpt him in two parts and I need to be sure those two parts will fit in the 9 foot clearing of the studio. I’m working through this, and ZBrush, is helping considerably not only in figuring out the perfect division for the tigers parts, but also to know how big to make my base and and how that all fits together. Maybe these measurements appear somewhere that I don’t know about but my further request for Pixolboic would be if these measurements showed up and as I use the transpose tool I could check myself. IE… Ah yes, that is 15′ 3″ and the width then this is……
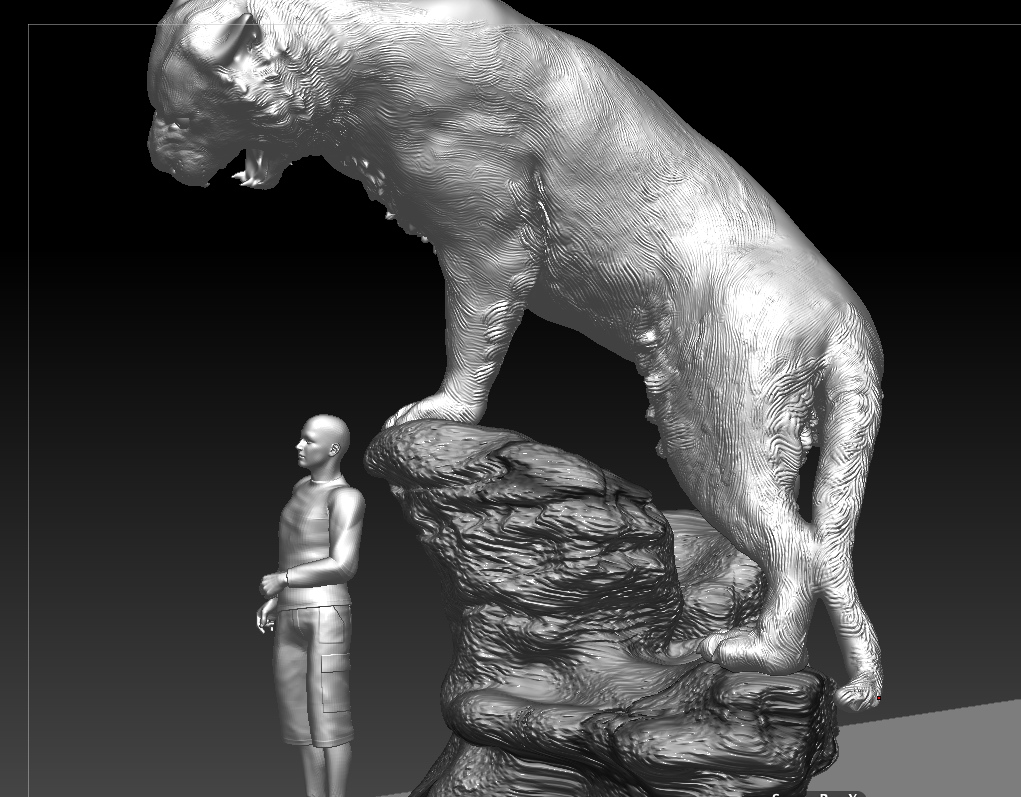
NOTE: the way I separated my tiger into two subtools
1. I made a mask over the area I wanted to divide ( control, click and drag)
2. I split those polygroups to make individual subtools here is how.
FYI HERE IS THE ANSWER?
Someone suggested I try these calipers. Why have I not heard about Screen Calipers from Ionico sooner? With all of my posts and rantings about a sculptor needing calipers you would have thought this would be brought to my attention sooner. I checked… they work on PC and Mac. Well, I’m going to contact the company to see if I can review these calibers and if they work post some tutorials about how I use them. I’ll let you know.
_______________________________________________

Bridgette Mongeon is a sculptor, writer, illustrator and educator as well as a public speaker.
Her blog can be found at https://creativesculpture.com.
She is the vice chair of the planning committee for 3DCAMP Houston 2012 http://www.3dcamphouston.com
She is also the owner and creator of the God’s Word Collectible Sculpture series http://www.godsword.net
Follow the artists on twitter twitter.com/Sculptorwriter and twitter.com/creategodsword
Listen to The Creative Christian Podcast or the Inspiration/Generation Podcast
Click on Podcast Host Bios for a list of all podcasts.
Teaching Myself And Learning From Others Part 4 of 4
This will be a monumental sculpture.
Onward- Not long ago, Kevin Salki performed a great act of chivalry by coming to my aid and helping me with a work flow that I had to figure out.
To recap, I’m a traditional sculptor who uses digital technology to create presentations. The technology assists me in my traditional work, as I use it to have my monumental designs milled out. If you are interested to read more about that it is talked about in these two project blogs- Evelyn Rubenstein, and Prairie View Panther blog . I have been a traditional sculptor for 30 years.
My difficulty that I posed on a facebook forum was, how do I create a bronze material in ZBrush that I can light, and how would I create tiger stripes in a presentation?
This is part 4 of this documentation
Part 1 talks about how I needed a new bronze material instead of a metcap- we are working in ZBrush
Part 2 talks about how I got that material using Kevin’s video ( at the bottom of this post)
Part 3 talks about painting strips on my tiger using a darker version of that material – This is for a presentation for a client
Part 4, this page talks about putting it into my presentation.
Kevin walks me through the entire process above, and then goes a step further into making the sculpture into a presentation.
Kevin states, “this is going to be basic.” Good, I need basic.
He says he loads in a few HDR maps. (What are these?) According to Wiki
High dynamic range imaging (HDRI or HDR) is a set of methods used in imaging and photography, to allow a greater dynamic range between the lightest and darkest areas of an image than current standard digital imaging methods or photographic methods. This wide dynamic range allows HDR images to represent more accurately the range of intensity levels found in real scenes, ranging from direct sunlight to faint starlight, and is often captured by way of a plurality of differently exposed pictures of the same subject matter
Kevin states that Sibl has some pretty good HDR maps. Well, I had to see for myself, this is all about education. The website is intriguing and I could easily float off onto another track, but I’m on a deadline and doing these blog posts is distraction enough FOCUS! Kevin also mentioned a plug in at Sibl but. I’ll have to ask him about what he meant.
In my project I won’t use an HDR, but I do want to see how it works so I uploaded Topanga_Forest_B. I suppose my question is this- Kevin states that the HDR that he is loading will give him a background and source for lighting information for his scene? Hmmm, does that mean that ZBrush takes information from the photograph? Lets check this out. I download topanga forest and have a bunch of things in the file. Kevin clicks around on a few files in the video and I can’t really see, so I’m guessing. I pick forest 3 pk hdr. Nothing happens even after adjusting the gamma, as he states. Still nothing. I change what file I choose, and try again-still nothing. I’ll check with Kevin and clarify this direction.
(I don’t necessarily need to do my background this way, but I’m dedicated to getting through his video and understanding the process, and finding the best way to work this, but because my deadline is pressing down on me, I’ll have to experiment later. )
FYI I Looked around for other free hdr maps her is what I found.
http://freepanorama.blogspot.com/
http://www.unparent.com/photos_probes.html
PROBLEM
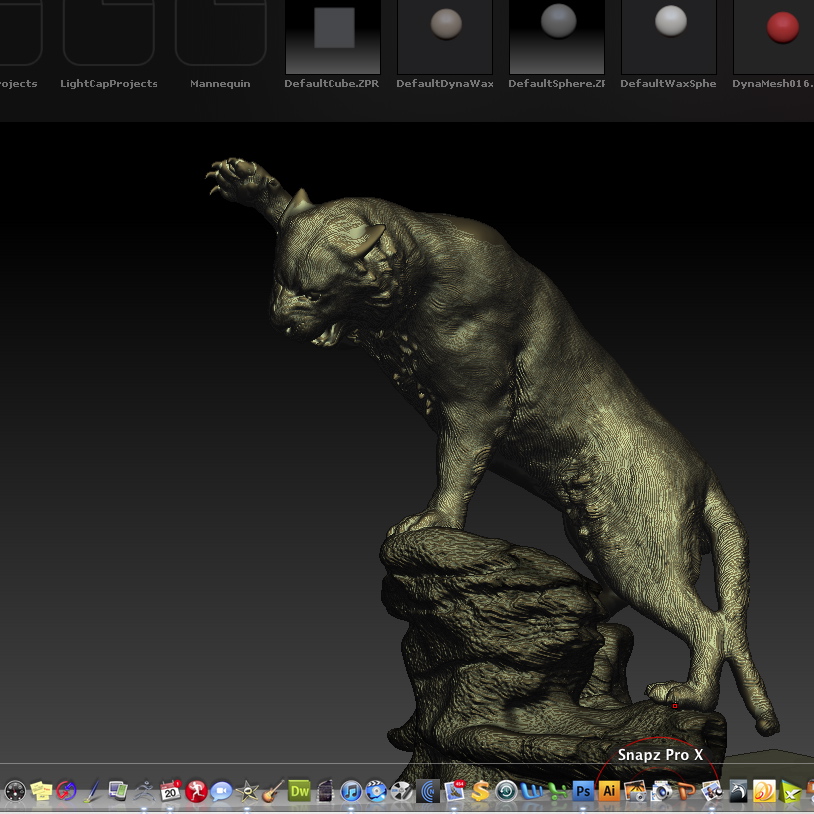
Next day after rendering I don’t like how the stripes look. I tried a variety of ways to create them. In the traditional sculpture, I do believe I will put texture over the entire sculpture or perhaps sculpt deeper fur texture where the stripes are. That way the traditional patination can settle into the crevises. (See the previous post for more information on this.)
In the end, I ended up adjusting the color and the Materials Blend Radius in the Render pallet, until I get the look that I need.
PRESENTATION
I would have loved to put my sculpted tiger into the scene of the school, however, I did not have a high resolution image of the school.
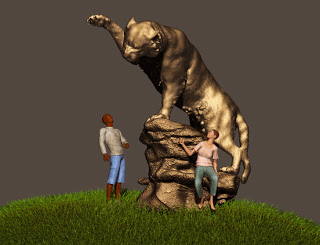
This tiger is massive and therefore, I did feel it was necessary to show a relationship to a real person. I move to Poser grabbing a Daz Michael and a Daz Vickie model. Clothing is essential, and I have often said that this part reminds me strangely of playing paper dolls when I was a little girl. I loved paper dolls. Unfortunately, those making daz models and their clothes are often men. This simply means that these men see no need to have real casual clothes for the poor Daz Vickie model. Poor Vickie, she must walk around all confined and pushed up. I’m sure she is sitting in the computer saying, “Hey guys, get real, how about a comfortable sun dress?” So I purchased the most casual clothes

I could find from Daz, and gave Daz Vickie a makeover. After clothing Michael and Vickie, I export them as obj’s and then add them to the scene. I do wish that that this process was easier. As an obj Vicki and Michael are just the color of the material and not life-like. I wish I could import them into my scene totally clothes and with facial texture, hair etc. This would save me a ton of time. I feel I probably will have to learn another 3D program that will allow me to import Vickie and Michael, completely clothed and textured, as well as the complete rendered ZBrush tiger. I’m open for suggestions to additional software to add to my repertoire, though I’m not terribly excited about having to learn a new software. My husband has been telling me the same thing.
Meanwhile, I take the Daz Michael and Daz Vickie from Poser and use lightbox textures, polypaint and Spotlight to help me show some type of reality or at least so that it does not look like the bronze.

I have not used Fibermesh much in zbrush, but I do like it and am thankful for the grass in this scene.
I am sorely lacking in skills on both lighting and rendering and wish I could hire someone to really walk my little brain through this process. Any takers? we can do joint tutorials on my process.
Photoshop is my final stop for this presentation. I like that I can manipulate the color balance as well as the brightness.
So hear are the final versions of the Tiger. A very long but fulfilling learning process. Now, let me get my hands in the traditional clay.
I will be documenting this entire project on a blog, but can’t put it up quite yet. I’ll be sure to let everyone know when that goes up.
Bridgette Mongeon-Sculptor, Writer and Speaker
Bridgette Mongeon is a sculptor, writer, illustrator and educator as well as a public speaker.
Her blog can be found at https://creativesculpture.com.
She is deeply engrossed in the planning committee for 3DCAMP Houston 2012 http://www.3dcamphouston.com
She is also the owner and creator of the God’s Word Collectible Sculpture series
Follow the artists on twitter twitter.com/Sculptorwriter twitter.com/creategodsword
Listen to The Creative Christian Podcast or the Inspiration/Generation Podcast
Click on Podcast Host Bios for a list of all podcasts.
3DCAMP Houston Returns In 2012 With The Collaboration Of The University of Houston to Build STEAM

Press Release (Houston, TX—June 24, 2012) 3DCAMP Houston, a local organization supporting education in all things 3D, is proud to announce its return scheduled for Saturday, September 29. The University of Houston College of Natural Sciences and Mathematics and the School of Art will host 3DCAMP Houston 2012, featuring a number of expert speakers who will discuss 3D technologies and how they are impacting new and existing disciplines. This year the camp will also feature an art exhibition to showcase the impact of technology on art.
3D technology, once reserved for the likes of sophisticated science fiction films, has advanced to now include a myriad of artistic and scientific disciplines. This year’s camp will showcase these advancements with presentations exploring innovative technologies. From holographic paintings that tantalize the viewer to 3D printers that produce completely formed sculptures, there is something amazing for everyone to experience.
The goal of 3DCAMP Houston 2012 is to encourage and educate individuals about the use of 3D in various disciplines; therefore 3DCAMP 2012 is returning with STEAM, an educational initiative that supports 3DCAMP Houston educational goal of incorporating and encouraging the blending and education of Science, Technology, Engineering, Art and Math (STEAM).
“The College of Natural Sciences and Mathematics at the University of Houston is pleased to help further the community’s appreciation and knowledge of the many aspects of 3D applications in our modern world. The rapid evolution in visualization technology is playing a critical role in advancing many important areas, from medical and surgical techniques to new methods of energy realization and information transmission,” said Mark A. Smith, dean of the college. “With the university playing a critical role nationwide in these developments, it is satisfying as well as natural to help bring this understanding to our community through 3DCAMP 2012.”

Rex Koontz, director of the university’s School of Art added, “Technology, art and design are converging into a significant force on our cultural and economic landscape. The School of Art welcomes the opportunity to work with the cast of 3DCAMP to further the goal of creating synergies between art and technology.”
3DCAMP Houston is an all-day event and is open to the public. It features lectures and presentations from professionals in the arts, architecture, engineering, science and much more. Online registration will open in July at www.3dcamphouston.com
Vendors will be on hand to demonstrate the possibilities and uses of some of the most interesting and mind-blowing 3D technology. “The Third Dimension,” an art exhibition comprised of 3D art, will be open to the public on Friday, September 28.
For more information concerning 3DCAMP Houston 2012, the art exhibition, and volunteer opportunities please visit www.3dcamphouston.com.
Media Contact:
Bridgette Mongeon
Please feel free to repost this press release, with photo credits.
Teaching Myself And Learning From Others Part 3

This is a post/tutorial that has been continued from Teaching myself and learning from others part 2. I’m continuing on with my progress of getting this to work on my project. (Please note this is a WIP)
Well… Kevin and I cheated. I got the bronze color by uploading his material. Because my sculpture has so much texture, as compared to his in the video it automatically makes the sculpture look different. (I’m kind of known for my textures and with the traditional process it also changes the color of the patination.) When sculpting on the real clay I believe I will really emphasize the stripes by carving the fur differently where the stripes are. I’ll probably give it more texture or more strokes. Because, unlike the digital process, weather will change my traditional sculpture patination. Even if it goes dark, I will need the stripes to show. But for now, it is back to the digital model.
A little too green, so I bumped down the color diffuse on the blue, hey it almost sounds like I know what I am doing now. I now want to change my specular but my curve looks all wonky. Not sure how to get it to do what I want it to do.
—Mental note- remove unwanted dots on specular curve by dragging them off. And there is a tiny reset button under the shift if it gets really out of control. Kevin confirms that his too is a little wonky at times.
I also must remember to do a quick render ( shift R) because the digital model looks way different with the render than it does just working on the screen.
Now I’m on to part 5.58 on Kevin’s 14 minute video made for me for this tutorial. So on to making a darker color of the material for the stripes.


So instead of Kevin’s green of 72 red, 116 green, and 93 blue, I oped for a darker brown 109 red, 59 green, and 33blue. Maybe I’ll lighten it just a touch using the mixer that Kevin has introduced me to.
I also decided I would play with the noise slider. I have never been one to see differences in this type of thing. Often my husband Mike de la Flor will work with photoshop and say, “see this?” and well, I just don’t see it. I think it is because I don’t work with color and have not for years. Of course I work with the color terra-cotta, longhorn white, as it pertains to clay and bronze. I really, really want to learn color and rendering with zbrush. I have some illustrations I would like to do. So maybe I can talk Keven into doing some more of these tutorials with me.

I’m posting both of these renders. One is at noise level of 10 and the other 129. Though I can’t say what the difference is, if there is any, I m gravitating to the higher noise level than the lower. I don’t know why, to me it looks like the bronze has been bead blasted instead of sand blasted. Bead blasting feels softer.

On to stripes.
I wish it would be so easy. Kevin says to copy the material and then paste it so I have a duplicate. It took a couple of tries but I managed to do it. I actually feel good about the process. On to rendering.
Stay tuned for part 4 of ?

Bridgette Mongeon-Sculptor, Writer and Speaker
Bridgette Mongeon is a sculptor, writer, illustrator and educator as well as a public speaker.
Her blog can be found at https://creativesculpture.com.
On the planning committee for 3DCAMP Houston 2012 http://www.3dcamphouston.com
She is also the owner and creator of the God’s Word Collectible Sculpture series
Follow the artists on twitter twitter.com/Sculptorwriter twitter.com/creategodsword
Listen to The Creative Christian Podcast or the Inspiration/Generation Podcast
Click on Podcast Host Bios for a list of all podcasts.
Teaching Myself And Learning From Others Cont Part 2 of_____

This is a post/tutorial that has been continued from Teaching myself and learning from others part 1. If you are following along, this is a wonderful video tutorial explained by Kevin Salki . You can find the video in post 1. I’m continuing on with my progress of getting this to work in this blog post. (THE SCULPTURE IS NOT FINISHED YET)
STEP ONE- applying double shader- when I did this I had a mess which looked something like this.
What I discovered was that I just had my lights switched off and my color was set to black. I’m really not sure which of these fixed the problem but I’m on target. My black painting that I did on the tiger, shown in previous post, also seems to have disappeared. It would be nice if it stays gone. DUH! so I fixed that and now mine looks just like the video.
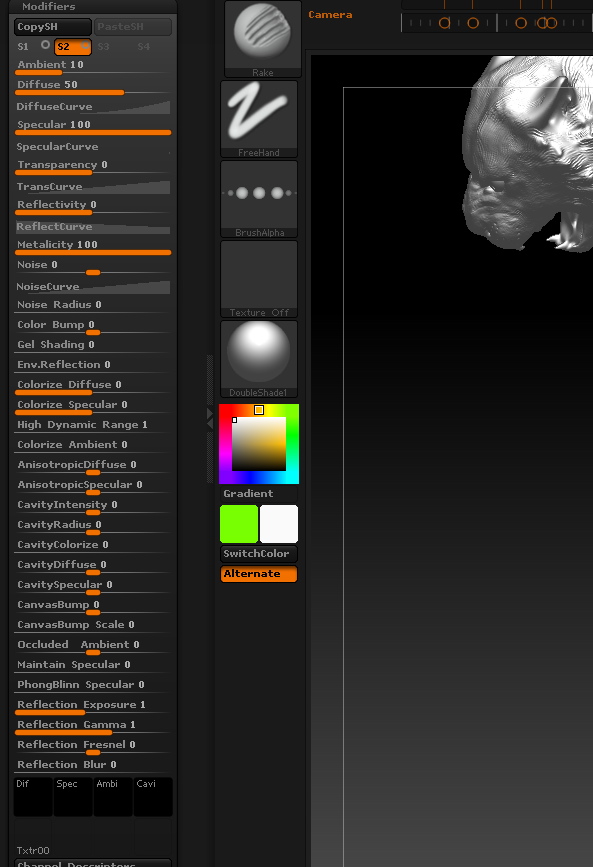
I used subtool master found in the Zplugin menu and now have what Kevin has. ( I am on .41 of his instructional video created especially for my project, the video is located in part 1 of Teaching myself and learning from others part 1. I owe this man a debt of gratitude for walking me through this.)
I’m so glad this is a video and not written because as he proceeds and I see all of the things in the modifiers of materials menu, my eyes glaze over. I am a traditional sculptor entering this digital process a few years back. I still don’t know what half of this stuff does. And I
probably know enough to be very dangerous with ZBrush. When 3D guys talk about things like ambient occlusion or speculators or whatever, well, they might as well be talking Greek. But this is how I learn best, show me and let me try. The terms I hear Kevin say just before 1.36 are “Diffuser,” “Speculator,” and “Cavity.” I have made a mental note and this blog post to remind myself- look this up. Maybe I can figure out what these actually do. But now to follow the video and see what happens.I have picked my base color and indeed it comes up in the little box marked diffused. he sayed that is my base color, so even though I don’t know why they call it diffused, I’m head somewhere.
I adjust my specular as he states, again, no idea what I am doing, nor what specular is but Kevin says “this is what determines how glossy the material looks ” Indeed, I’m seeing this as well. But I think, even when I am doing patination at the foundry I turn to the foundry man and say, “Give me a little more brown, kick it back here, can you do some more highlights there.” Even so, when at the foundry I tell the person doing the patination, hit it with water, because as they apply the chemicals I can’t really tell what it will look like in the end when it is waxed. The water helps me to do that. No, won’t be hitting my Wacom with water, but I guess, I’m doing my own patination. I’m beginning to get a little giddy.
Yes, I’m only at 2:02 of this 14 minute video. And he says to drop down the ambiant and crank up the diffused? Following along master.
Dropping down the ambient makes if feel richer. I like where I am going. The hardest part about watching this video is I can not see the numbers. My ambient is set to 2. I have no idea what the diffused should be set to I did mine at about 44.
On to the “second property of this material.” 2.14 of the video found in the previous post Teaching myself and learning from others part 1.
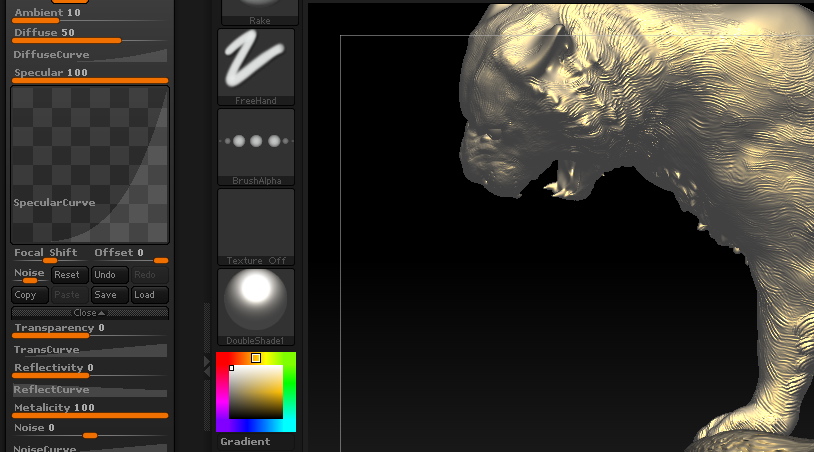
Here I am stuck! I assume that the S1, S2, S3 and S4 are channels of color that I am mixing to create my bronze material. I think I actually did mine backwards and my S2 was the gold and my S1 is the green. I don’t suppose that matters. Remember, I am in a place I have never been before. So clicking around on things, I realize that the little circles next to S not sure what it does. however, I can’t see the secondary color. I do notice that as I click around on these little dots the color turns off and on, but still my green is not turning on. Perplexed. Little grasshopper runs to the master to see what he says.
Facebook is a wonder and Kevin Salki who has created this video for me, has looked at my screens shot to the right that says “woops” and notices a few things. His reply “Crank your “Colorize Diffuse” to 100 Also, at the top of the properties you can play around with your ambient and diffuse numbers, in the video I set the ambient to 2 and diffuse to 88″

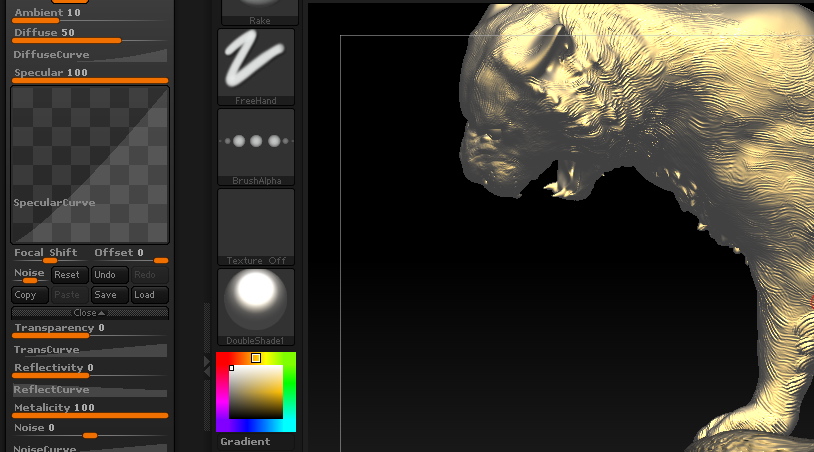
I follow as a little grasshopper should to the ZBrush master, and now I get something like this.
I ask Kevin a few questions.
ME: “Out of curiosity, if I don’t like how these look blended can I go back and change them?”
Kevin: “Yup, nothing is really ever permanent in zbrush, you can readjust the look of your material on the fly. I recommend doing the “mixer” option on the second color rather than the first (how I did it in my video). If you want to have the oxidized look of the green be the dominant color, and the original bronze in the cavities.”
ME: “ok so switch them? Gold as S1 and Green as S2? or is this something that you do in the mixer pallet?”
Kevin: “So after 2:22, I had just finished setting the second color. It really doesn’t matter which one is where, just so long as you remember that the one you do the mixer on will cause the other color to come through more. So if green is on S2 and you use the mix by Cavity option (as in the video) you are telling zbrush that you want the green to be confined to the cavities mainly, therefore the bronze will bleed through as the green is pushed into the cavities of your model.”
Kevin: “Oh, and clicking on the little circles in the S1 and S2 buttons will disable that section. So if you are seeing black, its because you’ve temporarily disabled that part of the material.”
On to the mixing. OR NOT
I tried to create channel 1 and 2 as Kevin said, I had many questions and in the end I ended up making my s1 gold and my s2 green. Still my results don’t look the same as his. Is it a mac/pc thing? Well I still have some sculpting to do on the piece. So, I’ll finish sculpting and try this again later. I will get to the point of presenting in the next day or so. I must. I’ll continue to document my progress with Kevin’s video.
For those watching this blog, after presenting the sculpture as a bronze in zbrush it will be modified and sent to Synappsys digital services. Here Synappsys will enlarge my file and mill it out in foam so that I can create this larger than life-size bronze. There is a blog on a similar project that I did for Prairie View A & M here. The same process is documented in this photo album on my personal facebook page. Soon this tiger project will be documented in a blog.
Stay tuned for part 3 of ?
_______________________________________________
Bridgette Mongeon-Sculptor, Writer and Speaker
Bridgette Mongeon is a sculptor, writer, illustrator and educator as well as a public speaker.
Her blog can be found at https://creativesculpture.com.
On the planning committee for 3DCAMP Houston 2012 http://www.3dcamphouston.com
She is also the owner and creator of the God’s Word Collectible Sculpture series
Follow the artists on twitter twitter.com/Sculptorwriter twitter.com/creategodsword
Listen to The Creative Christian Podcast or the Inspiration/Generation Podcast
Click on Podcast Host Bios for a list of all podcasts.
Teaching Myself And Learning From Others
The title of this blog post is “Teaching myself and learning from others”. This is the entire process of how I learn things. I plug away at a project and search for answers. I got stuck on this recent project and this incredible person Kevin Salki from the Facebook Zbrush forum came to my aid, and he even created a video to help. It is so incredible when you find someone who is willing to go the extra effort to assist you in your learning process. I thought I might take this entire post and document this learning process on this specific subject.
To recap- I’m working in ZBrush trying to put together a presentation for a traditional sculpture project by working digitally. For example -how I did with the Mad Hatter tea party “Move one place on” pitch to a recent client.
“Move one place on” a life size sculpture for a park.
I noticed that when I was working on Mad Hatter sculpture that the Metcap material that I applied to the sculpture to make it look bronze did not interact with the lights, and therefore I had a hard time lighting it. For those of you new to ZBrush , a metcap material can be applied to your sculpture. These are made available in many places. For example check out these metcap materials. However, if I can’t light the sculpture, or put it in a scene, then using a metcap can pose a problem. I have posted this question in numerous places, and until Kevin came along, no one has helped me work through the problem. I’m sure this is not going to be as easy as pushing a few buttons, so I thought I would document how Kevin Salki and I work through it.
Here is my post on the forum
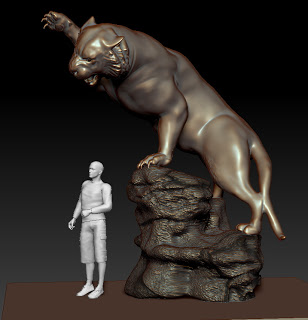
man is placed to show the massive size of this life size sculpture.
ZBrush question. I’m posting everywhere I hope someone can give me guidance, I’m on a deadline.
Any Zbrush users out there? Question- I am creating presentations for a larger than life-size bronze and I am using a metcap bronze that I found on the internet. I like the look, however, if I understand it, metcap materials are not affected by lighting in the final rendering? If this is the case, how would I get the bronze look that I need in my presentations without the metcap?
Being that I will try and take the digital sculpt presentation and put into a photograph of the area that the client has provided, lighting will be essential.
And, In the case of the tiger, I need to add some darker bronze stripes. Now I’m very puzzled. Another problem. How can I add these stripes to the metcap or other solution that I’m sure you guys know, but I can’t figure out?
I had entertained using GoZ but I was not sure if that would work with the metap and I have never used GoZ with anything. If that is a solution, is there a good tutorial on using GoZ and photoshop? I looked everywhere. However, that still does not solved the problem with lighting and a metcap.
I’m posting a picture but it is very much a work in progress. This is a regular part of my workflow as a traditional artist and I would be very thankful if you could help me figure this out.
I can hardly believe that Kevin Salki went to all of the effort to record a video to walk me through this process. So, in light of his educational efforts. I’ll document my process of doing this with him on this blog post. It may be a long one, nothing ever goes smoothly with this sort of thing, in fact, I might have to make it my next couple of posts.
STEP ONE- applying double shader- as I expected- I have to undo the stuff I have done before I can do what Kevin has asked me to do. As I apply a double shader (doubleshade1) in zbrush, this is what I come up with. Also, I started to paint the stripes in and hated it. Should have done it on a layer, but did not and so, I may have to backup to a previously saved version before I did this. Which means a ton more work, but hey that is all about learning. FYI- always save incremental versions of your work. Unfortunately, I have written over my incremental versions and will have to figure out how to undo all of this stuff. or erase the part of the gier where the strips have been put and start again. Now Kevin, do you have any ideas how to make my image look like yours when saying apply double shader?
Stay tuned as we figure out this problem
_______________________________________________
Bridgette Mongeon-Sculptor, Writer and Speaker
Bridgette Mongeon is a sculptor, writer, illustrator and educator as well as a public speaker.
Her blog can be found at https://creativesculpture.com.
On the planning committee for 3DCAMP Houston 2012 http://www.3dcamphouston.com
She is also the owner and creator of the God’s Word Collectible Sculpture series
Follow the artists on twitter twitter.com/Sculptorwriter twitter.com/creategodsword
Listen to The Creative Christian Podcast or the Inspiration/Generation Podcast
Click on Podcast Host Bios for a list of all podcasts.
Presentation For a Park

I have been working on this pitch for a life-size bronze sculpture scene that individuals can interact with. This is a quick sketch of a possible design. Do you want to join the Mad Hatter at his tea party? The idea is that you could go to the park and sit at this bench. Each character is created to interact with a real person. My next part of the pitch is to see if I can pose children with this piece.
MY WORK FLOW
The project has been created using a variety of materials and software. Daz 3D models were very helpful, though often not enough. I had to sculpt quite a few things using ZBrush such as the rabbits clothes, his watch, the benches the table and the table clothes, along with the head of the Mad Hatter. Everything else is pretty much Daz 3D. My work flow is to bring Daz 3D characters into Poser and then once posed bring them into ZBrush. I can change the mesh to be able to sculpt on the figures and it gives me a way to expedite the presentation. As in the past, the actual sculptures don’t really look like the people in the scene once it is physically sculpted. For example, if I can convince my client I would like Alice to resemble my daughter when she was that age. Though it is not an exact replica of the planned life-size sculpture it sure helps my client to visualize my presentation.
Preparing ZBrush File For Digital Milling

I have worked diligently with this model. For ZBrush users or traditional sculptors entering the digital field, here are some things that I had to do near the end.
Perspective
Be sure that I was viewing this entire project in the perspective view. We traditional sculptors are not used to having to push a button to see in perspective, but these digital programs do. This should be done in the beginning to be sure you are sculpting correctly. This is basic, but check before you output.
Will my cut foam pieces align?
I had to fix the arms, as mentioned in the previous post. I need to fit these arms on the body and they will be milled at a higher resolution. I also plan to use less clay on them. I had sculpted them way under the sweater, instead I cut them off at the sleeve. I did this using Transparency to see through the sleeve.

Preparing Files
I will be sending this as 4 separate files- the base, the body, and the two individual arms. I might also combine them and send them as one file so that Synappsys can see how they go together. Though I do want them milled separately.
Before I can get these pieces ready there is another step I must do. Right now the files are very large for each. ZBrush has something called Decimation Master. Decimation master lets you hold your detail, but brings the file of each of the pieces down considerably
For example:
Before Decimation Master After Decimation Master
34% OF DECIMATION)
Right Arm
Active points 326,954 127,188
Left Arm
Active points 296,078 140,452
Body
Active points 7,751 mil 3,329mil 1,149 mil
Base
Active points 87,202 37,468
I can export the entire project and individual subtools, ie. arms, body and base as individual obj’s and then combine them as one obj . However, ZBrush also has a plugin that allows me to collect for output in the preferred .stl file for digital printing. Which means that I will have a different type of file for the vendor. In the next post I’ll talk about my experimentation with this plug in.
Ready To Send Sculpture For Enlargement

used as the armature f
or the life-size sculpture.
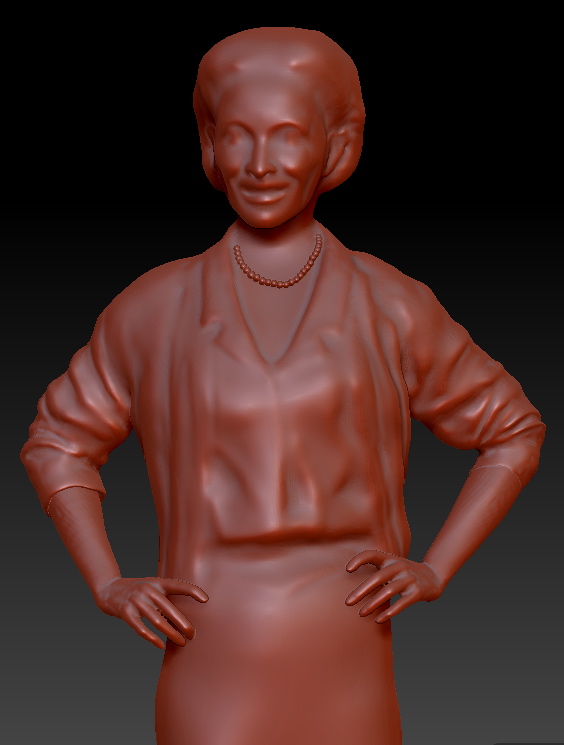
I have been working hard, looking at reference and learning about my new subject—Evelyn Rubenstein. I am documenting this process on a blog created for the Evelyn Rubenstein Sculpture for the Evelyn Rubenstein Jewish Community Center. I’m also posting some more detailed, technical information on my own Creative Endeavors blog. I have been using some of the new tools in Zbrush. Such things as Dynamesh which made my work much easier. The final sculpture will be milled in foam by Digital Sculpture Enlargement and Reduction and then sent to me. I will put clay on the foam and finish detail so that it can go through the bronze process. I thought I would give you a little 3 dimensional tour of this new piece before finalizing it for output.
Working On Preparing An Armature
I have been using zBrush to create an armature to send to Synappsys Digital Services for milling.
This is similar to what I wrote about in Digital Sculpting With Mudbox: Essential Tools and techniques for Artists, and what I have done with the panther project; however, I feel I’m pushing the process a bit more.
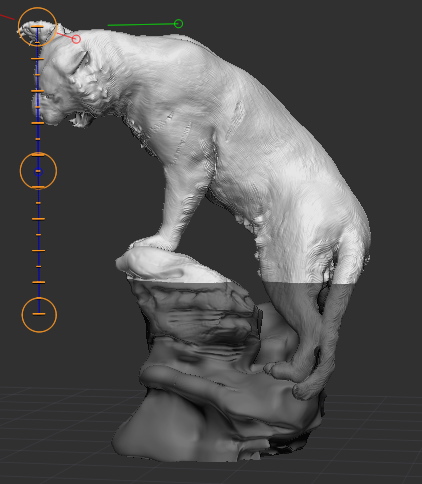
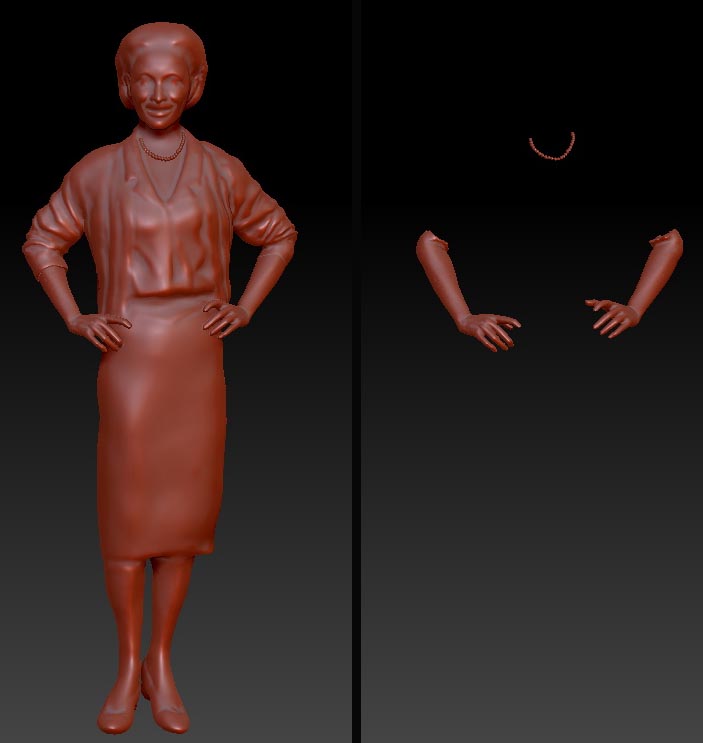
Here is the digital sculpture almost ready for the milling process. I believe I am going to send it to them but would like to separate the arms from the sculpture. The reason for this is that in the digital sculpture if the hands are sent with the body as one file they get lost in the clothing. I would like to determine their placement without losing details. Synappsys will separate them anyway within the process of getting the pieces ready for milling.
I’m not sure what will happen with the pearls. I doubt these can be done, and might actually be better for me to sculpt them on her. In fact, I’m leaning in that direction. Having them on the sculpture while working digitally has helped me with size and proportions. I have a few more things to do to the sculpture, and am anxious to hear what Synappsys thinks.
I SPOKE WITH SYNAPPSYS
Here are some of the things we discussed. As mentioned in my previous post, this Dynamesh is acting similarly to what Synappsys’ program will do when it lowers resolution. I have been requesting that Synappsys to mill out several heads that show either different resolutions of milling or different reductions. I am hoping to include this in my up and coming book, 3D 2012 digital art in a physical form. This will be a very important visual for artists to understand this entire process.
Some thoughts as Synappsys and I spoke
- The arms are created as what zbrush calls a “sub tool” I can separate them for milling , but I should probably be sure that they are cut and align evenly with the arms. Presently they sit within the sleeve. If they are a clean cut, and can match up, preferably somewhere in the arm where the sweater is, where I will have more design wiggle room, that will be better.
- It is almost paralyzing to try and figure out what size to mill this out at. There are several variables. If I want to add a lot of clay in the traditional studio , I have to allow for that mass. This may mean that I want to reduce the size. I may want to add little clay to the arms and hands, and up to 1″+ amount of clay to areas like the sweater, skirt, hair etc. So, I might have the pieces milled at different sizes.
- But the size problems don’t end with milling. In the traditional process of bronze casting of a life size person, it is known that artwork shrinks. My foundry indicates that I could lose up to an inch in size. But often times, the foundry can make this up as they are welding the many pieces together. Another aspect of casting in bronze is that “some pieces can shrink in the center, or look skinnier,” says Scot Yoast of Art Foundry Houston.
The entire concept is frustrating for an artist who goes through great lengths to sculpt a perfect or near perfect sculpture and have such deformations. My heart gets excited when I think about how digital processes are infiltrating the lost wax method of bronze casting and how this will change in the near future. A subject that I have discussed quite often on this blog, and I will go into great detail in my new book For now, I’m having to work this tra-digi art in any way that I can to get the results I desire.