Word of The Day- Thanatology
With my work of sculpting posthumous sculpture, my study of sculpting the deceased, and the writing of the book, “Bringing to Life the Spirit of the Deceased- A Sculptor’s Journey” which I am still searching for a publisher, I cannot believe I did not come across this word.
It means the study of everything that has to do with dying, death, and grief. There is even an organization called The Center for Thanatology Research and Education Inc.
Once again I ask myself, why am I drawn to this area? For me it is a God thing. I know that creating a sculptor of a loved one can be very healing for the family. I am extremely thankful that I have a job that helps others. But even as a child I was drawn to the subject. I write about it in my book, and may even have mentioned it before. It was my job each spring to bury the baby birds that fell from the nest hidden in the rafters of our old Victorian home. I was the only 5 year old that I know that had their own baby bird cemetery. It is an uncontrollable desire to give credence to a life lived, to somehow establish a physical existence that others can see and say, “Who was this person?”
here is a portion from the book, “I have always been intrigued with the story that I heard about elephants, marveling at the bones of their ancestors that they never knew. I remember seeing an elephant documentary that said that elephants that came across bones of their ancestors would pick them up and caress them, passing them from one to another in a respectful but mourning ritual. By doing so, it helped them come to terms with death. I feel that this action, this simple action by a wonderful and majestic creature is what I feel when I create posthumous portraiture. When the box of personal affects comes to my studio and I examine its contents, from that day forward until the day that the sculpture is complete, I have spent time lovingly caressing the life that I have had the pleasure of being introduced to. I turn that life over and over in my hands and in my heart as lovingly as those majestic elephants did with the bones of their ancestors. It is through this ritual and my art that my experience is enhanced and the healing process and letting go occur for my client.”
Making Mud Pies- Nature or Nurture?
I was reminded that years ago I used to have regular art shows at my studio, monthly in fact. We would always have a creative thing for people to do. Once we had “shoot the sheet.” We put clothes dies in water pistols and let everyone create a joint piece of artwork, another time we had paper airplane contest, you should have seen all of the airplanes in my rafters. One time I had a mud pie contest. What surprised me was that so many people did not want to participate. They did not want to get their hands dirty. I am reminded of this as my newest apprentice said, she hates to have her hands dirty.
Is this a nature or nurture thing? Do some children just love playing in dirt and others can’t stand it? Did you make mud pies?
As I worked in the garden putting down the stone and pathways my tools were, a piece of foam to sit on, a small mallet that I often would use the wooden handle to push in the pebbles, a small hand shovel, and two small buckets one filled with pebbles or sand, the other to take things away. I also had two stones that I really need to paint a notice on , “mom’s caveman tool, do not misplace.” A simple triangle stone that fit perfectly in my hand and was great for smoothing or digging. I would sit on my foam mat, which has a wonderful Cezanne painting on the one side, my tools spread out about me and working on the space between my legs. ” You look like a little girl,” my husband commented. I often wonder were there characteristics that I had as a child that would have been an indication that I would have liked getting my hands dirty for a living? Playing in mud, clay, or digging in the dirt. I do know that I love the tactile feel of gardening. I know health wise I should probably put on gloves, but I don’t enjoy the experience as much. Was I born this way?
Tilly Came To Take A Look
This morning Tilly came to take a look. I found her in the” soon to be new bog area” looking up at the pink rock. She used to like to sit on the black liner. I asked, “Want me to build you some steps up from the bog? She just looked taking it all in. “It will look much different when I fill the pond back up.” I assured her, like she could really understand. “Did the baby come with you?”
Yesterday I put the waders on that my husband bought for me years ago. I choose to do this when I was straddling the bog and edge trying to sink a milk crate, put a concrete block on top and then what I now refer to as “the bathing stone.” A stone that has the perfect slope for baby and Tilly to get on and sun bath. The bottom of the pond was murky, thank god for my toes being covered. I balanced that milk crate with rocks that I shoved under the murk and between the crate, this I did with my toes and feet. I am sure I looked a site standing in the pond.
There is one small problem with the pond that I just cant figure out. You see I can’t use concrete on the pond liner as it is a living pond and it the concrete will play havoc with this perfect system that I have here. It could even kill all of the fish and turtles. I could not stand for that. So, once again. I’ll finish the edge and fill the pond, but the beach will have to stay just liner, until I come up with another solution.
originally I was going to, lower the pond level even more to expose the beach and stream, put in concrete with pebbles, scrub the concrete once cured with vinegar, this helps neutralize the concrete. While scrubbing it I was going to vacuum the vinegar up with my wet vac. YES! a lot of work, but I am not sure even that would keep the critters from being hurt. I can not stand the thought, and can’t find help. So… Fill her up and work with dilemma that another time. I really have to get back to the studio.
Working On The Pond

It is coming along. I am very tired of laying stone. Tilly and her baby have moved to the upper pond while this one is under construction. She will be so surprised when she comes home.
Have You Ever Placed a Ton of Rock?
I began my pond about 9 years ago. It started with an upper pond then the 14 foot stream and the lower pond. The edge of the lower pond has never been completed. I am not sure why. Probably because I have changed my mind so many times about what it should look like. When people would walk by the pond, on the way to the studio I would say, “My work in progress.” I kind of feel like this back yard is a living sculpture, a never ending piece of work and a very magical place. By the end of the week I expect the lower pond to be done. What will I do with my self? How will I ever adjust to the fact that I don’t have to “finish” the pond?
My hands ache, my back aches, and I still have about a 1/2 a ton of rock to place. Wish us luck.
Oh yes, and Tilly the turtle, along with little guy have moved up to the upper pond. They really did not like all of the noise and disturbance at the lower pond. But boy won’t they be surprised when it is done. The design is one that is very turtle friendly, with special treats for them both. For one of those treats I have to get into the lower pond. That should be interesting. I’ll update more, must find Advil.
Using the Computer And Poser in The Sculpture Studio

Created for Best of Artists and Artisans web site
By Bridgette Mongeon © 2008
It seems strange; here I am in the office on the computer working with my latest creation instead of being in the studio getting my hands dirty. Commissions usually begin with a concept, that consists of trying to figure out the best pose to represent your subject and to present to your client. This usually means many sketches. With a new program in my office, I can create images and make changes quite easily. The program, Poser 7, by Smith Micro is a 3D design program that allows me to bring subjects into a virtual reality and pose them. Smith Micro also offers Poser Figure Artist that is created specifically for artists needing reference. At $99.00 Figure Artist is quite a bit more affordable than Poser 7 is at $249, though academic pricing for Poser 7 is only $147. For the sake of this article I will be working with Poser 7, and will review Poser Figure Artist at a later date.
Not only can I create an idea of a pose in Poser 7, but I can also rotate that image and look at the sculpture from all angles, just as if I were walking around it in my studio.

I can’t say that this technology is new, Poser was first released in 1994. It has, however, taken me some time to get my own hands on it and get it in my office. Until this time I had to sit next to my husband as he works on the program prompting him, “Move this here, move that there.” It is stifling for someone who works with movement to try and direct someone else. I am thrilled to finally have this in my own hands and delighted with how easy it is to work with.
Ellie Sculpture
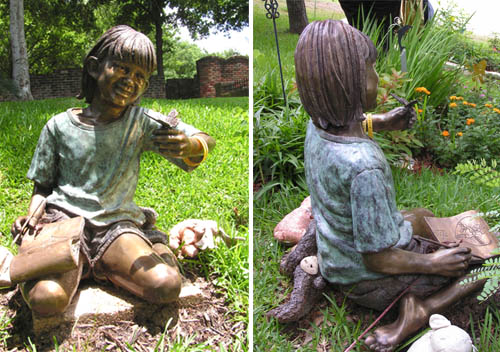
I have used this program for presentations in the past . When creating the concept for the sculpture Ellie, I used a 3D model of a young girl and posed her in a seated pose that I found in my reference photographs, adding pertinent elements like a butterfly and her sketchbook, that contains the image of The Gift Heart. This was an important element to the parents because her artwork was chosen by MD Anderson Cancer Center and made into many different artistic elements. The parent had originally considered creating just The Gift Heart as her headstone, so I wanted to be sure this was a part of the sculpture. By engraving it in her sketch book her friends could create a rubbing of her art.
Once the sculpture was posed it was brought into Photoshop and made to look like a bronze for a presentation to the clients. Of course the sculpture changed and morphed through the sculpting process, but it was with the sculpture of Ellie that I realized the value of Poser in the sculpture studio.
Lucas Sculpture
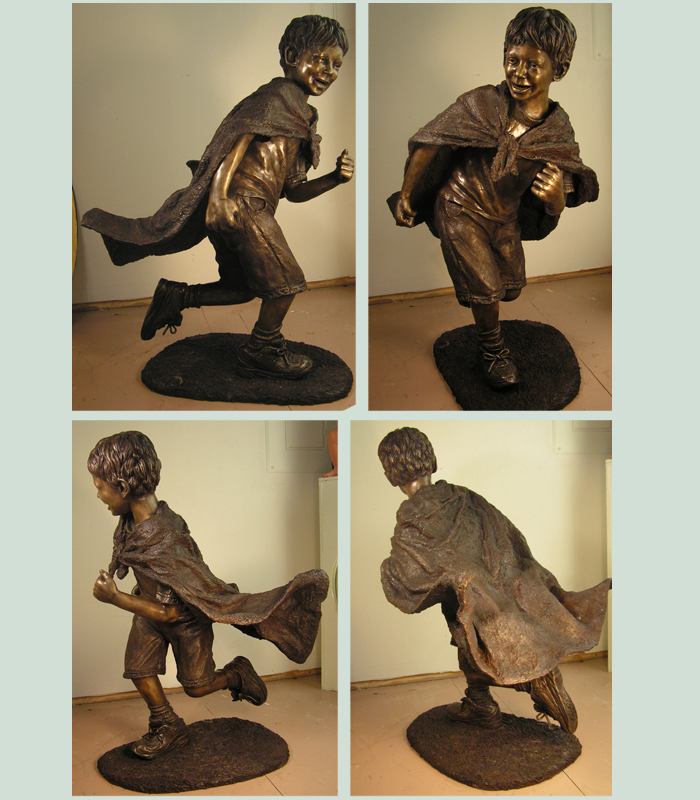
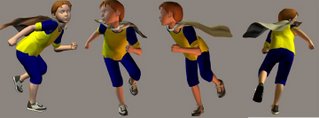
With the sculpture of Lucas, a little boy of five, for which I created a memorial, I wanted to create him running with a cape as he played Batman. If you have ever tried to prompt a child model to run and hope to catch that sort of action, it can be very difficult. I worked for hours and tired out the child, quickly running out of stickers and bribes to get him to try, “Just one more time.” My live model gave me some reference material, but for my presentation I went back to Poser. We purchased a 3D model named Matthew from Daz. Within Poser you can actually make your model walk or run. Walk Designer in Poser allows you to pick the gate of the walk, even head bounce, arm swing, and stride. With a little tweaking we made Matthew run, and I not only had something to show my client, but reference to work from.
Sculpture of Jenna
I utilized my recent commission of a 14-month-old little girl that I am going to create as a bronze cherub as an opportunity to try my own hand at using Poser. Poser has a limited amount of figures that it comes with, but you can easily buy more. For example, it didn’t come with wings or a cherub or a baby. I bought these 3D models, along with several poses from Daz. The total cost was about $55.00 for those extras, but it was worth it as it saves a ton of time in posing. Buying extra poses meant I had to make fewer adjustments to the 3D model.
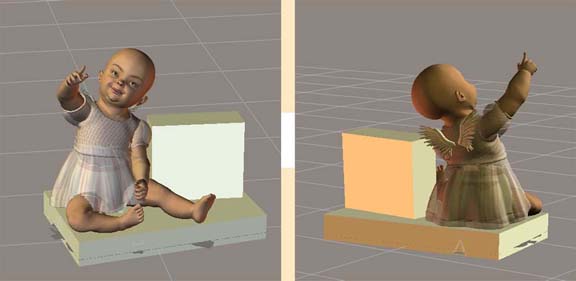
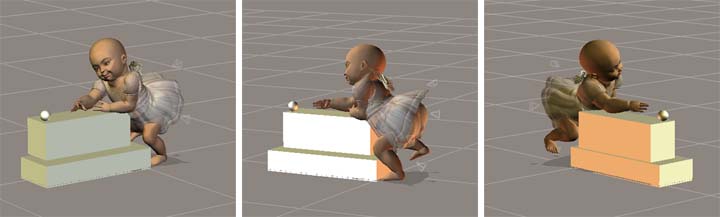
The client and I went through several poses, standing, seated, pretending to take off her socks, climbing on the headstone, and finally with a butterfly on her finger. The winner of all the poses was Jenna with a butterfly on her right hand and her left hand configured loosely with the sign language symbol “I love you.” I love that her leg is kicked up in glee.
I look forward to working with Poser for future projects expediting presentations and playing within a virtual worlds to help my clients see the vision that I already see, bringing these precious loved ones to life and quickly into the studio to be created in bronze.
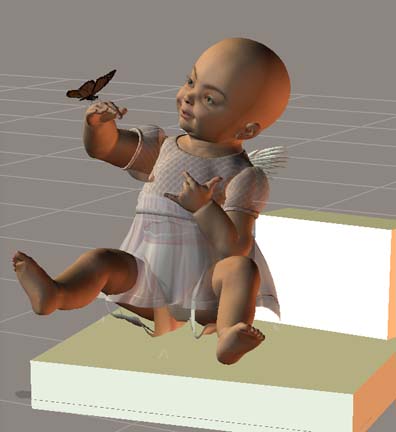
Each change was simply done to the original, saved, and then I captured an image to email to my client to review. Creating these models and sending JPGS to my client made my process of defining a pose fast and fun.
Here is an update on some of my Creative Endeavors!
Recent articles written by Ms. Mongeon
“Optimize Your Presence on the Internet.” Sculptural Pursuit. Vol.7 No.2 (Summer 2008) 53.
To see a list of all articles visit the artist’s works published page
Technology in The Art Studio
Created for Best of Artists and Artisans website
By Bridgette Mongeon © 2008
CLAY
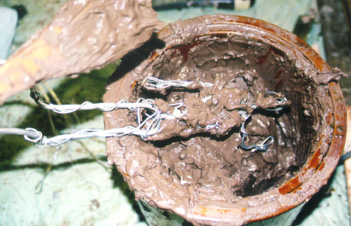
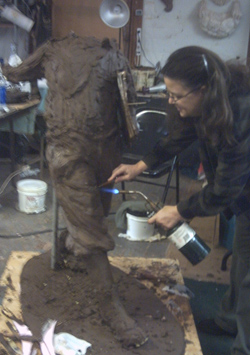
In my twenty-three years of sculpting, the process and materials have changed very little. Moving from water-based clay to a wax-based clay was probably my biggest change over the years. It was really done out of necessity. Being a commissioned sculptor, the time between starting a sculpture and a final approval could be months. Trying to keep a water-based clay portrait or a life-size figure from drying out and cracking was a nightmare and when introduced to Classic Clay (brown firm AB200) from Reynolds Advanced Materials, I made the switch. Almost all of my work is created for reproduction by either the manufacturer of my gift items or my foundry for bronze. I rarely fire sculpture in the kiln. In using Classic Clay I no longer have to keep my sculptures wet over the months of time that it takes for an approval, but having to heat up the Classic Clay, with crock pots and torches is a bit inconvenient. The studio is less dusty with the wax-based clay, than it was with water-based clay but I miss having the feel of the water based clay. Even the process of drying out, that caused me such tension, gave me that leather hard stage in the during the drying process that was perfect for adding fine texture to the sculpture.
Casting Outdoor Sculptures
I also keep my eye out for changes in technology as it pertains to casting material, especially outdoor material. Many years ago, when I cast in concrete, I was desperate for additives or different strong but lighter casting material. Whenever someone would tell me they had a product it always fell short of my expectations. Upon further research, it would not withstand the elements. it would chip or it did not come in bright white so that concrete dyes could be added. I have not poured in concrete in a while, so I do not know if anything new is on the market. Though it would be interesting to know if something is now available.
Mold Making Material
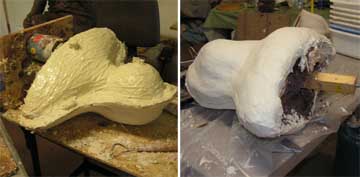
Mold making material is another area where technology is vital to my production. If someone could invent a mother mold material with the strength of fiberglass, but not the smell and toxicity, that would be great. (A mother mold is the structure that is put over a rubber mold when making a mold. The mother mold holds the rubber in place, so that when you pour something in it, it is not deformed. Usually the mother mold is plaster that is heavy or fiberglass resin that is toxic and uncomfortable to work with.)I have tried Plasti Paste, a mother mold material purchased from Reynolds Advanced Materials but personally I was not happy with the results. (photograph shows rubber mold with plaster mother mold)
I’m intrigued with the materials used in special effects and frequent the web sites of Reynolds Advanced Materials and Smooth On ( Reynolds Advanced Materials is part of Smooth On ) to see what new items they have.
I have spent some time ordering and utilizing their free dvd’s and pamphlets. The Reynolds site has an entire section on How To. I would love the free time to play with all of the fun things that can be found from these vendors. And now Smooth On has Youtube videos! Like this one on how to create a face mold.
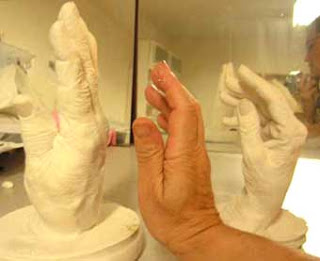
I recently utilized Smooth On’s material for casting hands, and the process that they discuss in the second YouTube video, is similar to what I did. I cast my mom and dad’s hand and they are now two of my most prized possessions. I wrote about them in my newsletter, and posted my thoughts and the process on my forum. The process was the same as the Smooth On video, though I cast their hands in plaster and the Smooth On video shows plastic. ( picture shows father’s cast, my hand, and mother’s cast)
Digital Enlarging
My most recent endeavor into new technology in the art studio has been digital scanning and enlarging. I visited Synappsys Digital Services and was intrigued by what I saw.
Before I go any further, I must first explain the process that a sculptor goes through to enlarge a sculpture. Often a client will want to see a small maquette, which the artist creates for approval by the client. Then the artist proceeds to enlarge the sculpture by creating a metal armature of pipe or rebar, foam and chicken wire. This armature gives the sculpture structure and support, and the foam offers mass that is light in weight. A final layer of clay is put over the foam and details are added. This process can take weeks. (If you would like to see the entire process of creating a life-size sculpture in this manner, please review my online journal of creating the life-size newsboy.) If a sculpture is going from maquette to monumental, the process is a monumental task!
Synappsys Digital Services, along with a few others in the country offer the resource of digital enlarging. They take your small maquette and digitally scan it. Once the scan is in the computer, the data is compiled to create a 3D model. The 3D model is enlarged in the computer and milled out in urethane foam. I have written about this process in detail for an article in the up and coming Sculptural Review Magazine on technology.
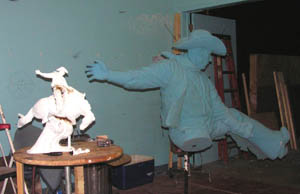
(Picture of the Ranger by Harold Holden maquette and enlarged urethane foam created by Synappsys Digital Services)
I visited Synappsys Digital Services to review the process and was thrilled with this new technology. I can’t wait to use it myself. Of course it is a bit of investment. The cost ranges from $1,500 to 4,000 for scanning and milling a 6-foot man depending on the detail and the density of foam used. They can even spray clay on the foam before shipping it to your studio. This process will save me so much time and money, I am definitely adding it to my repertoire of new resources. While preparing the article for Sculptural Review Magazine, I called many different vendors that offer this process. Here is a short list for your records. Prices can vary between vendors as well as the detail that can be obtained in the scanning and milling.
They say “necessity is the mother of invention”, and looking over this article I can see why. It is necessary that I create, and I love vendors that can assist in my creative process.
List of 3D resources
Digital Atelier, formerly Johnson Atelier
Cyber FX
Direct Dimensions specialize in scanning.
Satellite Model specializes in milling.
Digital stone project This company mills in stone.
All written work is copyrighted and cannot be used, whole or in part,
without the written consent of the author.
The Coolest Thing… GREAT RESOURCE!
More people should know about this. If you own an Apple Computer and want to learn to do anything, from very basic, what is a mouse and how do I turn the thing on, to how do I create a podcast, video, website etc. You can order something called “One to One” It cost me 99.00 for a years worth of One to One. Once a week I can go to the apple store and get one on one training on anything I want. I can bring in my website design, podcast, video etc and they help me figure out how to do it, lately I am going in for upper level stuff, audio etc. But this is such a great resource. I just don’t know why more people are not working with it. I didn’t know it was available and most do not.
My father owns a PC in another state, and I know he is frustrated with the new operating system and the computer. Geek squad costs so much, but it is probably the only alternative for him. I wish he owned an Apple. If he did I would buy him One to One.
Today I had a One to One. You see I am trying to put up podcasts. There was a woman working with the specialist next to me she must have been in her 70’s. She brought her own laptop, which is an advantage to those having a lap top. I was impressed with her.
I headed over to Micro Center to buy new headphones and other tech items and there was a guy in line that said he owned an Apple and didn’t know what to do with it. I told him about the One to One. He had no idea! I have run across many who don’t. THIS IS THE COOLEST THING! Sorry PC guys. One more reason to love my Apple computer.
I really must create a video on One to One.
PLEASE MAKE PLANS FOR THE UNVEILING!
August 25th 2008, TW Wood Gallery. ( not sure of the time)
DATE IS BEING MOVED TO SEPTEMBER 25th 2008 5:30
There Is Nothing Like Molten Bronze!
June 10
The professors glasses are all fogged up!
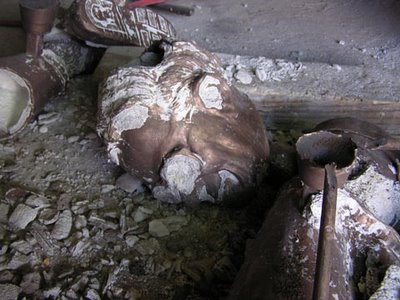
While at the foundry dropping off the Jenna waxes and picking up wax two, I snapped these pictures of Dick Hathaway. Here you can see his head foot and…? The white stuff on the metal is the ceramic shell. The foundry will now break this away and begin to weld him back together again. Quite a process!
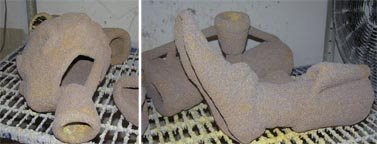
While at the foundry dropping of the Jenna waxes and picking up wax two I snapped these pictures of Dick Hathaway. Here you can see his head foot and…? The white stuff on the metal is the ceramic shell. The foundry will now break this away and begin to weld him back together again. Quite a process!
June 05
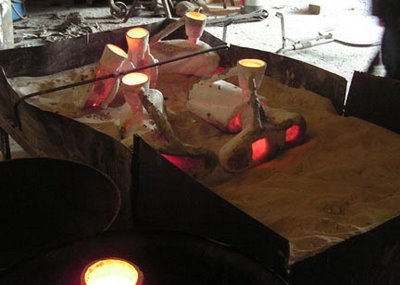
Today I went to see the pour of pieces of the Dick Hathaway sculpture. Here you see them pouring the head, in the background are the some other parts of the sculpture. You could say Dick Hathaway has a hot foot.
June 03
Richard Hathaway
Meanwhile I was able to take some pictures of Dick Hathaway, or at least pieces of him that have gone through the dip process. They are a bit different than the last pictures of the head.
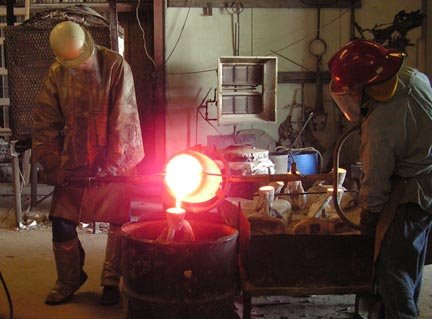
Quite a shell around those wax pieces. If you have followed documentation process before you will note that inside these shells are the waxes. On Thursday the wax will be burned out of these shells until only a cavity remains. The molten bronze will be carefully poured within that cavity. The pour is scheduled for Thursday. I hope to get some good video footage of it for the upcoming video. I just love to watch a pour! There is something very entrancing about that glow!
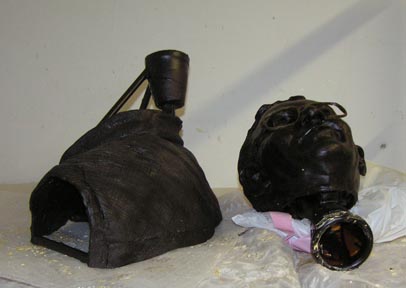
May 29th
On with the bronze process of Professor Richard Hathaway
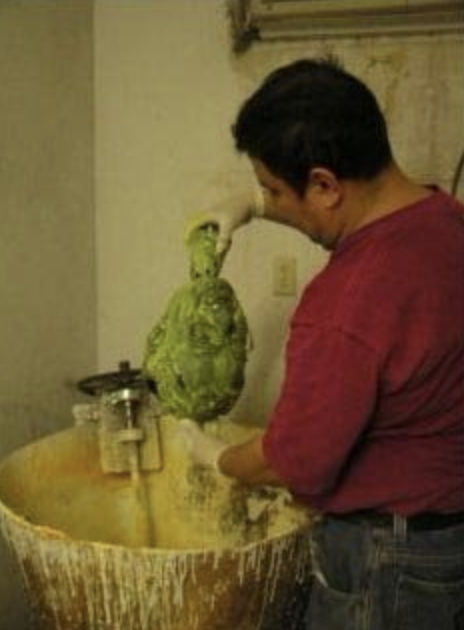
The next step, after the creating the waxes, is the gating of the waxes. Pour cups and wax sprues are added to the waxes that came from the Dick Hathaway molds. These are then dipped into a mixture coating the waxes both inside and out. Each of the many pieces will need to be dipped creating a ceramic shell. I went to the foundry today to take some pictures and video of the dip process for the next video that I will be creating about this sculpture. This part of the bronze process will take the foundry about a week.